
Classic Crème Brûlée Recipe Fool-Proof & Easy
Classic Crème Brûlée Recipe Fool-Proof & Easy

- Serves: 4 People
- Prepare Time: 20 minutes
- Cooking Time: 30-40 minut
- Calories: -
- Difficulty: Easy
Welcome to the ultimate guide for making a classic crème brûlée recipe that’s so simple, you’ll wonder why you ever bought it from a restaurant! This isn't just any custard recipe; it's a fool-proof, restaurant-style at home version designed for anyone who loves delicious dessert recipes but thinks crème brûlée is too fancy to tackle. If you can whisk and pour, you can absolutely make this creme brulee dessert. Get ready to impress your friends and family with a silky smooth custard homemade recipe topped with that iconic, satisfying crack of caramelized sugar. Let's make some magic!
Short hook: What crème brûlée is, why this version is simple but “pro-level.”
One-sentence reassurance: “If you can whisk and pour, you can make this.”
This recipe is designed to be your go-to for creme brulee dessert. It’s incredibly simple, yet delivers a luxurious, professional-quality result every time. The secret lies in a gentle cooking method and clear cues that prevent common mistakes, making this a truly fool-proof experience.
You might think creme brulee dessert is complicated, but this recipe strips away the fuss to give you perfect results:
Simple, one base recipe – no confusing versions to sift through. This is the custard recipe you need.
Uses a gentle water bath and clear temperature cues so you don’t overbake, ensuring a silky smooth texture every time.
Written for home cooks with easy-to-find creme brûlée ingredients and common kitchen equipment.
Built-in make-ahead instructions for stress-free entertaining, making this one of the best dessert recipes easy to make for parties.
Ingredients
Directions
- Heat the Cream In a medium saucepan, gently warm the heavy cream with the vanilla extract (or vanilla bean pod and seeds) and a pinch of salt over medium-low heat. Heat until it's steaming and small bubbles just begin to form around the edges, but do not let it boil. Remove from heat. If using a vanilla bean, remove the pod. If adding orange liqueur, stir it in now.
- Whisk the Yolks & Temper the Custard In a heat-proof bowl, whisk the egg yolks with the granulated sugar until they are just combined and pale yellow – you don't want them pale and fluffy, just smooth. Gradually, about a tablespoon at a time, slowly whisk a small amount of the warm cream mixture into the egg yolk mixture. This crucial step, called tempering, prevents the eggs from scrambling by slowly raising their temperature. Once about a third of the cream has been incorporated, you can slowly pour the remaining cream into the egg mixture while continuously whisking. This creates your silky smooth custard homemade recipe base.
Strain the entire mixture through a fine-mesh sieve into a clean jug or bowl. This removes any potential scrambled egg bits or vanilla bean fragments, ensuring an incredibly smooth custard dessert. Skim off any surface bubbles with a spoon or a quick pass of a kitchen torch. - Pour & Set Up the Water Bath Preheat your oven to 275-300°F (135-150°C). Arrange your ramekins in a deep baking dish or roasting pan. Carefully portion the strained custard mixture evenly into the ramekins.
Place the baking dish with the ramekins into the oven. Then, carefully pour hot tap water or boiled water into the baking dish, ensuring it comes halfway up the sides of the ramekins. Be careful not to splash water into the custards! The water bath (bain-marie) is essential; it ensures the custards bake gently and evenly, preventing them from curdling or becoming rubbery. This technique is a secret to achieving a truly creamy crème brûlée. - Bake Gently Bake for approximately 30-40 minutes (for 4-6 oz ramekins), or until the edges of the custards are mostly set but the center still jiggles like soft jelly when gently shaken. If you have an instant-read thermometer, the internal temperature should read between 170-175°F (77-79°C).
Carefully remove the ramekins from the water bath (use tongs or an oven mitt) and let them cool completely to room temperature on a wire rack. - Chill (Make-Ahead Timeline) Once cooled, cover the ramekins with plastic wrap and chill them in the refrigerator for at least 4 hours, but preferably overnight. This chilling time is crucial for the custards to fully set and develop their rich flavor.
- Simple timeline bullets:
- Up to 2 days before: Bake and chill your custards.
- Day of serving: Add the sugar topping and torch or broil shortly before serving for the best crispness.
- Caramelized Sugar Topping (Torch & No-Torch Options) The crunchy, golden sugar topping is what makes creme brulee dessert so iconic!
- Choosing the Sugar You can use regular granulated sugar, but turbinado or demerara sugar often provides a slightly coarser, more dramatic crunch and a beautiful amber color. Aim for a thin, even layer of sugar – about 1-2 teaspoons per ramekin. Too much will be difficult to melt evenly, too little won't create a satisfying crack.
- Option A – Using a Kitchen Torch This is the classic and most effective method for achieving that perfect creme brulee dessert crust.
- Sprinkle an even layer of your chosen sugar over the chilled custards. Tilt the ramekin to coat evenly, then tap off any excess.
- Hold the kitchen torch flame 1-2 inches above the sugar surface. Keep the flame moving constantly in small circles to melt and caramelize the sugar evenly. It will bubble and turn a deep golden-brown.
- Once caramelized, let the crème brûlée stand for 1-2 minutes for the sugar to harden into a glassy, brittle shell. For a delightful hot-cold contrast, you can briefly re-chill them for 5-10 minutes before serving.
- Option B – Using the Broiler No torch? No problem! Your oven broiler can also create a beautiful crust.
- Sprinkle sugar over the chilled custards as described above.
- Place the ramekins on a baking sheet. Position the baking sheet on an oven rack 2-3 inches from the broiler element.
- Turn on your broiler. Broil until the sugar melts and browns, approximately 3-5 minutes.Watch them like a hawk – sugar can burn very quickly! Rotate the baking sheet if necessary for even caramelization.
- Remove from the oven and let stand for 1-2 minutes to harden.
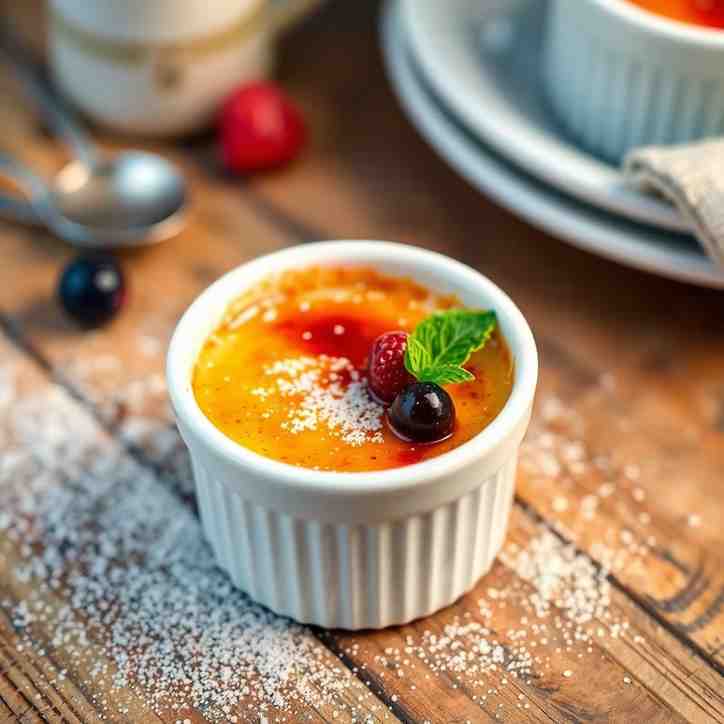
- What Perfect Crème Brûlée Should Look & Taste Like A truly perfect creme brulee dessert is a sensory delight:
- The Sound: A satisfying "crack!" as you break through the thin, glassy sugar lid with your spoon.
- The Texture: A silky, custardy center that is smooth and melts in your mouth – it should not be stiff, rubbery, or soupy.
- The Flavor: A gentle, comforting vanilla flavor, with the optional hint of citrus or liqueur adding a subtle complexity, beautifully complemented by the slightly bitter, caramelized sugar. This is the epitome of delicious dessert recipes.
Classic Crème Brûlée Recipe Fool-Proof & Easy

- Serves: 4 People
- Prepare Time: 20 minutes
- Cooking Time: 30-40 minut
- Calories: -
- Difficulty: Easy
Welcome to the ultimate guide for making a classic crème brûlée recipe that’s so simple, you’ll wonder why you ever bought it from a restaurant! This isn't just any custard recipe; it's a fool-proof, restaurant-style at home version designed for anyone who loves delicious dessert recipes but thinks crème brûlée is too fancy to tackle. If you can whisk and pour, you can absolutely make this creme brulee dessert. Get ready to impress your friends and family with a silky smooth custard homemade recipe topped with that iconic, satisfying crack of caramelized sugar. Let's make some magic!
Short hook: What crème brûlée is, why this version is simple but “pro-level.”
One-sentence reassurance: “If you can whisk and pour, you can make this.”
This recipe is designed to be your go-to for creme brulee dessert. It’s incredibly simple, yet delivers a luxurious, professional-quality result every time. The secret lies in a gentle cooking method and clear cues that prevent common mistakes, making this a truly fool-proof experience.
You might think creme brulee dessert is complicated, but this recipe strips away the fuss to give you perfect results:
Simple, one base recipe – no confusing versions to sift through. This is the custard recipe you need.
Uses a gentle water bath and clear temperature cues so you don’t overbake, ensuring a silky smooth texture every time.
Written for home cooks with easy-to-find creme brûlée ingredients and common kitchen equipment.
Built-in make-ahead instructions for stress-free entertaining, making this one of the best dessert recipes easy to make for parties.
Ingredients
Directions
- Heat the Cream In a medium saucepan, gently warm the heavy cream with the vanilla extract (or vanilla bean pod and seeds) and a pinch of salt over medium-low heat. Heat until it's steaming and small bubbles just begin to form around the edges, but do not let it boil. Remove from heat. If using a vanilla bean, remove the pod. If adding orange liqueur, stir it in now.
- Whisk the Yolks & Temper the Custard In a heat-proof bowl, whisk the egg yolks with the granulated sugar until they are just combined and pale yellow – you don't want them pale and fluffy, just smooth. Gradually, about a tablespoon at a time, slowly whisk a small amount of the warm cream mixture into the egg yolk mixture. This crucial step, called tempering, prevents the eggs from scrambling by slowly raising their temperature. Once about a third of the cream has been incorporated, you can slowly pour the remaining cream into the egg mixture while continuously whisking. This creates your silky smooth custard homemade recipe base.
Strain the entire mixture through a fine-mesh sieve into a clean jug or bowl. This removes any potential scrambled egg bits or vanilla bean fragments, ensuring an incredibly smooth custard dessert. Skim off any surface bubbles with a spoon or a quick pass of a kitchen torch. - Pour & Set Up the Water Bath Preheat your oven to 275-300°F (135-150°C). Arrange your ramekins in a deep baking dish or roasting pan. Carefully portion the strained custard mixture evenly into the ramekins.
Place the baking dish with the ramekins into the oven. Then, carefully pour hot tap water or boiled water into the baking dish, ensuring it comes halfway up the sides of the ramekins. Be careful not to splash water into the custards! The water bath (bain-marie) is essential; it ensures the custards bake gently and evenly, preventing them from curdling or becoming rubbery. This technique is a secret to achieving a truly creamy crème brûlée. - Bake Gently Bake for approximately 30-40 minutes (for 4-6 oz ramekins), or until the edges of the custards are mostly set but the center still jiggles like soft jelly when gently shaken. If you have an instant-read thermometer, the internal temperature should read between 170-175°F (77-79°C).
Carefully remove the ramekins from the water bath (use tongs or an oven mitt) and let them cool completely to room temperature on a wire rack. - Chill (Make-Ahead Timeline) Once cooled, cover the ramekins with plastic wrap and chill them in the refrigerator for at least 4 hours, but preferably overnight. This chilling time is crucial for the custards to fully set and develop their rich flavor.
- Simple timeline bullets:
- Up to 2 days before: Bake and chill your custards.
- Day of serving: Add the sugar topping and torch or broil shortly before serving for the best crispness.
- Caramelized Sugar Topping (Torch & No-Torch Options) The crunchy, golden sugar topping is what makes creme brulee dessert so iconic!
- Choosing the Sugar You can use regular granulated sugar, but turbinado or demerara sugar often provides a slightly coarser, more dramatic crunch and a beautiful amber color. Aim for a thin, even layer of sugar – about 1-2 teaspoons per ramekin. Too much will be difficult to melt evenly, too little won't create a satisfying crack.
- Option A – Using a Kitchen Torch This is the classic and most effective method for achieving that perfect creme brulee dessert crust.
- Sprinkle an even layer of your chosen sugar over the chilled custards. Tilt the ramekin to coat evenly, then tap off any excess.
- Hold the kitchen torch flame 1-2 inches above the sugar surface. Keep the flame moving constantly in small circles to melt and caramelize the sugar evenly. It will bubble and turn a deep golden-brown.
- Once caramelized, let the crème brûlée stand for 1-2 minutes for the sugar to harden into a glassy, brittle shell. For a delightful hot-cold contrast, you can briefly re-chill them for 5-10 minutes before serving.
- Option B – Using the Broiler No torch? No problem! Your oven broiler can also create a beautiful crust.
- Sprinkle sugar over the chilled custards as described above.
- Place the ramekins on a baking sheet. Position the baking sheet on an oven rack 2-3 inches from the broiler element.
- Turn on your broiler. Broil until the sugar melts and browns, approximately 3-5 minutes.Watch them like a hawk – sugar can burn very quickly! Rotate the baking sheet if necessary for even caramelization.
- Remove from the oven and let stand for 1-2 minutes to harden.
- What Perfect Crème Brûlée Should Look & Taste Like A truly perfect creme brulee dessert is a sensory delight:
- The Sound: A satisfying "crack!" as you break through the thin, glassy sugar lid with your spoon.
- The Texture: A silky, custardy center that is smooth and melts in your mouth – it should not be stiff, rubbery, or soupy.
- The Flavor: A gentle, comforting vanilla flavor, with the optional hint of citrus or liqueur adding a subtle complexity, beautifully complemented by the slightly bitter, caramelized sugar. This is the epitome of delicious dessert recipes.
The following nutritional values are per serving (one piece of cake) Calories ~350-400 kcal Carbohydrates ~25-30g Protein ~5-7g Fat ~25-30g Time-Saving Tools & Ingredients Making crème brûlée might sound fancy, but with a few smart tools, it's actually a breeze! These aren't strictly required, but they'll definitely make your life easier and your dessert even more perfect. Problem: You want that signature, perfectly crisp, caramelized sugar topping, but your broiler feels like a gamble, and you don't want to overcook your delicate custard. Problem: After whisking your custard, you might notice tiny bits of cooked egg or small lumps from the sugar that could make your final crème brûlée less smooth. Problem: Using ramekins that are too large or too small can lead to inconsistent baking times, making it hard to get that perfectly set yet jiggly custard. Click any ingredient for detailed nutritional information:Recipe Nutritional Values
Additional Information
Recipe Success Tips
Pro Tips, Variations & Storage
Ingredient Substitutions & Variations
Cultural Variations
Make-Ahead & Storage Instructions
Frequently Asked Questions
Recommended Kitchen Tools
Kitchen Torch
Agitate: An unevenly broiled topping can be burnt in spots and barely melted in others, leaving you with a less-than-ideal crunch and a hint of bitterness. Plus, constantly opening the oven door can mess with the temperature of your already chilled custard.
Solution: A simple kitchen torch gives you ultimate control. You can precisely melt and brown the sugar right at the table if you want, creating that beautiful crackling crust in seconds without disturbing the custard underneath. It's a game-changer for consistently perfect brûléed tops.Fine Mesh Sieve
Agitate: A grainy or lumpy custard can really detract from the luxurious, silky texture that crème brûlée is famous for. You want pure, unadulterated creaminess!
Solution: Simply straining your custard mixture through a fine mesh sieve before pouring it into ramekins removes any impurities or tiny bits of cooked egg that might have formed. This extra step takes mere seconds but guarantees a velvety smooth, restaurant-quality texture every single time.Ramekins (Proper Size)
Agitate: If your ramekins are too deep, the edges might be overcooked and rubbery before the center sets. Too shallow, and they might set too quickly, losing that delicate wobble. Plus, having an odd number or mismatched sizes can make a water bath tricky.
Solution: Investing in a set of standard 4-6 ounce ramekins ensures consistent custard depth, leading to even baking and that ideal texture. They fit well in a water bath, and having enough means you can make a full batch without fuss.Calories per Ingredient
You may also like

Hey there! I’m just someone who seriously loves good food and believes that cooking doesn’t have to be complicated to be amazing. Whether it’s a quick weeknight dinner or a cozy weekend meal, I’m all about sharing easy, tasty recipes that actually work.


