
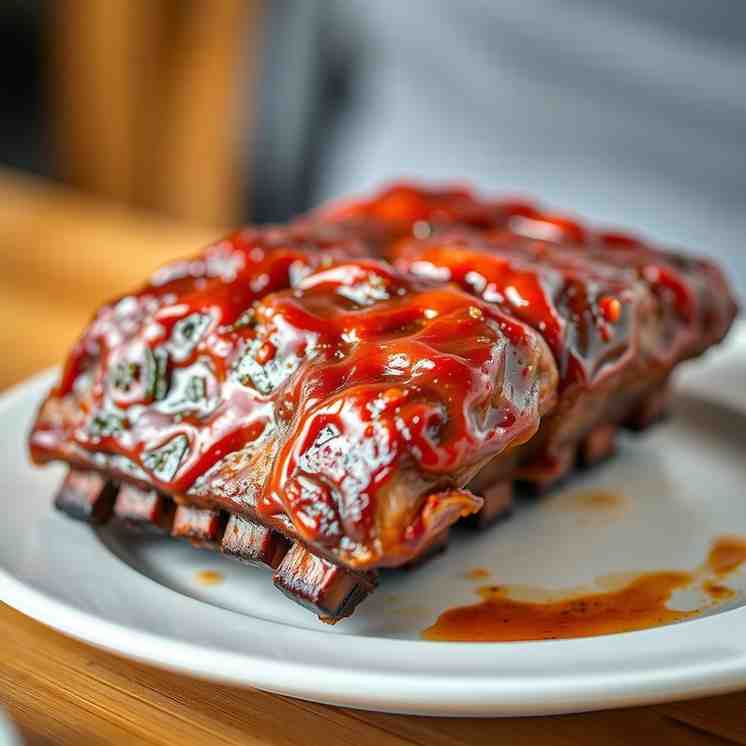
Fall-Off-The-Bone Oven BBQ Ribs - Easy & Delicious
Fall-Off-The-Bone Oven BBQ Ribs - Easy & Delicious

- Serves: 6 People
- Prepare Time: 20 minutes
- Cooking Time: 2 hours 45
- Calories: -
- Difficulty: Easy
Forget the smoker, the grill, and all the stress! Get ready to make the most incredible, fall-off-the-bone tender BBQ ribs recipe right in your own oven. This isn't just another bbq ribs recipe; it's the recipe for succulent, sticky, and perfectly caramelized pork ribs that taste like they came from your favorite barbecue joint. Whether you're a beginner or a seasoned cook, our easy, step-by-step guide will have you mastering oven-baked bbq ribs in no time, making them a fantastic bbq dinner idea any night of the week.
So, why are these oven bbq ribs so incredibly good? It's all about technique, borrowing the best ideas from pro pitmasters and simplifying them for your home kitchen. We bake the pork ribs low and slow in a tightly wrapped foil packet, which locks in moisture and gently coaxes the meat into ultimate tenderness. Then, at the very end, we brush on a luscious, homemade bbq sauce for ribs – sweet, smoky, and perfectly tangy – and broil them briefly to create that irresistible sticky, caramelized glaze, much like grilling ribs on the grill would achieve. No fancy equipment needed, just your oven and a little patience!
Here’s why you’ll absolutely love this barbecue ribs recipe:
No smoker, no grill, no stress – just your regular oven does all the hard work.
Fall-off-the-bone tender with a sticky, caramelized glaze that’s pure perfection.
Simple pantry ingredients you likely already have, with easy swaps to fit your taste.
Detailed step-by-step instructions and helpful tips to ensure your bbq ribs are a smashing success every single time.
Let's get those ribs for barbecue ready!
Ingredients
Directions
- Prep the Ribs
- Remove your pork ribs from their packaging and pat them very dry with paper towels. This helps the rub adhere and creates a better "bark" later.
- Trim any loose bits or thick flaps of fat if needed.
- Remove the membrane: This is a crucial step for truly tender ribs. Flip the ribs bone-side up. Slide a butter knife under the thin, papery silver skin (membrane) at one end of the rack, lifting it to loosen. Grab the membrane firmly with a paper towel (it can be slippery!) and pull it off in one sheet. Don't panic if you can't get all of it; your bbq ribs will still be delicious!Season With the Dry Rub
- In a small bowl, stir together all the dry rub ingredients: brown sugar, smoked paprika, garlic powder, onion powder, ground cumin, chili powder (or cayenne), Kosher salt, and black pepper. This is your best ribs rub!
- Lightly oil both sides of the ribs with the neutral oil or olive oil. This helps the rub stick and penetrates the meat.
- Sprinkle the rub generously over both sides of the ribs, focusing more on the meatier side. Press the rub into the meat gently.
- Let the ribs sit:
- Minimum: 20–30 minutes at room temperature while your oven preheats.
- Optional (for deeper flavor): Cover and refrigerate the seasoned ribs for up to 24 hours. If you do this, bring them closer to room temperature for about 30 minutes before baking.
- Wrap for Low-and-Slow Baking
- Preheat your oven to 275°F (135°C), using the standard bake setting (not convection).
- Line a large rimmed baking sheet or roasting pan with heavy-duty aluminum foil.
- Place each rack of ribs on its own large piece of heavy-duty foil (meat side up). For easier cleanup, you can optionally line the inside of the foil with parchment paper.
- Splash about 2–3 tablespoons of apple juice or chicken broth around (not directly on the rub) onto each foil-wrapped rack. This creates a steamy environment for extra moisture.
- Wrap each rack tightly into a sealed packet, crimping the edges well so that steam cannot escape. Place the sealed packets side by side on your prepared baking sheet.
- Bake Until Tender
- Bake the foil-wrapped ribs at 275°F for about 2.5–3 hours. The exact time depends on the size and cut of your pork ribs:
- Small baby backs: Start checking around 2 hours 15 minutes.
- Larger or St Louis–style ribs: Plan for closer to 2 hours 45 minutes–3 hours.
- How to know they’re done (inside the packet):
- The meat should have pulled back from the bone ends by ¼–½ inch.
- When you lift a rack with tongs, it should bend easily and may crack slightly on top.
- The bones might feel a little loose if twisted gently.
- Troubleshooting: If your ribs still feel stiff, re-seal the packet and bake for another 15–20 minutes before checking again.Make the Sweet & Smoky BBQ Sauce
- While the ribs are baking, prepare your homemade bbq sauce for ribs. Heat a splash of oil in a small saucepan over medium heat.
- If using fresh garlic and onion, sauté them until soft and fragrant (about 2-3 minutes). If using powders, skip this step.
- Add the ketchup, brown sugar (and molasses if using), apple cider vinegar, Worcestershire sauce, Dijon or yellow mustard, garlic powder, onion powder, hot sauce (if using), and smoked paprika (if using).
- Bring the sauce to a gentle simmer and cook for 5–10 minutes, stirring often, until it’s glossy and slightly thickened.
- Taste and tweak:
- For a sweeter sauce, add a bit more brown sugar or a drizzle of honey.
- For more tang, add another splash of apple cider vinegar or mustard.
- For spicier ribs, stir in more hot sauce or a pinch of chipotle powder.
- Turn off the heat; the sauce will thicken a bit more as it cools.
- Glaze & Broil for Bark
- Carefully open the foil packets (watch out for hot steam!).
- Transfer the baked ribs to a clean, foil-lined baking sheet, meat side up.
- Optional Pro Tip: You can pour any flavorful juices from the foil packets into your BBQ sauce and whisk them in for extra depth of flavor.
- Brush the ribs generously with your homemade bbq sauce for ribs on all exposed sides.
- Move an oven rack near the top of your oven; switch the oven setting to broil.
- Broil the ribs for 3–5 minutes, watching them very closely. You want the sauce to be bubbling and caramelized with some dark spots, but definitely not burnt.
- Optional: For an extra sticky glaze, brush on a second light layer of sauce and broil for 1–2 more minutes.Rest, Slice, Serve
- Let the finished bbq ribs rest for 5–10 minutes before slicing. This allows the juices to redistribute, ensuring they stay juicy.
- Slice between the bones into individual ribs or 2–3 bone sections, depending on your preference.
- Serve these glorious oven-baked bbq ribs with extra sauce on the side and your favorite bbq dinner ideas sides!
You may also like


Hey there! I’m just someone who seriously loves good food and believes that cooking doesn’t have to be complicated to be amazing. Whether it’s a quick weeknight dinner or a cozy weekend meal, I’m all about sharing easy, tasty recipes that actually work.


