
Classic Dark Chocolate Biscuits Easy Afghan Recipe
Classic Dark Chocolate Biscuits Easy Afghan Recipe
- Serves: 10 People
- Prepare Time: 15 minutes
- Cooking Time: 15 minutes
- Calories: 145
- Difficulty: Easy
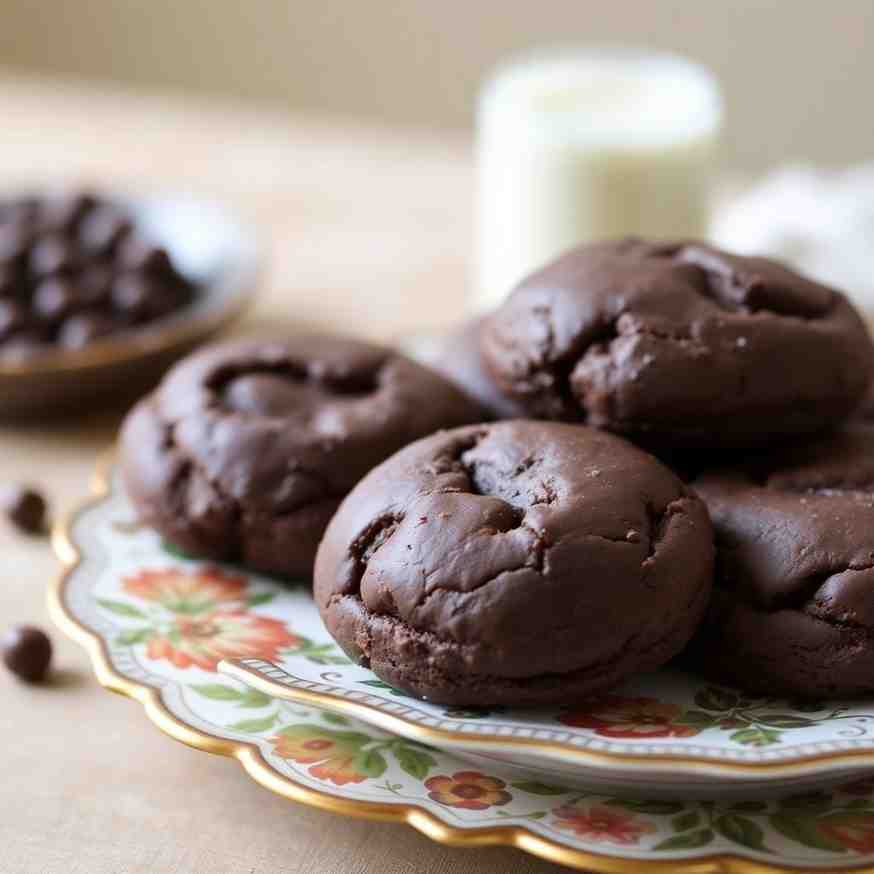
Get ready to discover a true baking gem from New Zealand: Classic Afghan Biscuits! These aren't just any dark chocolate biscuits; they're a beloved home-baking staple, known for their irresistible crunch, rich cocoa flavor, and a generous topping of thick chocolate icing and a walnut. If you've been searching for chocolate chunk biscuits or biscuits with dark chocolate that stand out from the crowd, you've hit the jackpot. While our Kiwi and UK friends call them "biscuits," rest assured, for our US readers, these are delightful cookies with a unique twist! This recipe is designed to be your go-to: it's a one-bowl wonder that comes together in about 30 minutes of active prep and bake time, promising a perfectly crunchy outside, a wonderfully soft and crumbly inside, and that signature creamy chocolate icing with powdered sugar. We’ve meticulously tested these measurements in both cups & grams, with oven temperatures in both °F and °C, so you can bake with confidence and create a batch of these truly special dark chocolate cookies every time.
Ingredients
Directions
- Before You Start:
Preheat Oven: Get your oven ready by preheating it to 325°F (160°C). If you have a fan/convection oven, you might want to reduce the temperature by 25°F (15°C) or keep a close eye on them as they bake.
Prep Trays: Line two baking trays with parchment paper. This prevents sticking and makes cleanup a breeze.
Soften Butter: Ensure your butter for biscuits is properly softened, not melted. If it's straight from the fridge, you can microwave it for 10-15 seconds, flipping it halfway, until it's pliable but not greasy. - Make the Biscuit Dough:
- Cream Butter & Sugar: In a large mixing bowl (or the bowl of a stand mixer), cream together the softened butter and granulated sugar. Beat with an electric mixer on medium-high speed for 2-3 minutes, or by hand for 5-7 minutes, until the mixture is pale and fluffy. It should look light and airy, almost like whipped cream.
- Add Vanilla: Stir in the vanilla extract until well combined.
- Combine Dry Ingredients: In a separate bowl, whisk together the all-purpose flour, cocoa powder, and salt. You can sift them together if you prefer, especially if your cocoa tends to clump.
- Mix Dry into Wet: Gradually add the dry ingredients to the butter mixture, mixing on low speed (or by hand) until a thick, slightly crumbly dough forms. Be careful not to overmix.
- Fold in Cornflakes: Gently fold in the lightly crushed cornflakes using a spatula. Mix just until they are coated in the dough, trying not to crush them completely. The dough will look dry and crumbly, but it should easily squeeze together in your hand. If it feels too dry to hold its shape, add 1-2 teaspoons of milk, a tiny bit at a time, until it comes together.
- Shape and Bake:
Portion Dough: Use a tablespoon or a small cookie scoop (about 1.5 tablespoons) to portion out the dough. Each ball should be roughly 20-25g.
Roll & Flatten: Roll the dough into neat balls, then gently flatten them slightly with the palm of your hand. This helps them bake evenly and gives them the classic Afghan biscuit shape.
Arrange on Tray: Place the flattened dough balls about 1-2 inches apart on your prepared baking trays. They won't spread much, so you can fit a good number on each tray.
Bake: Bake for 12-15 minutes. The biscuits are done when the edges look dry and firm, and the tops appear matte but still feel a bit soft to the touch in the center. They will firm up considerably as they cool.
Cool Completely: Transfer the baked biscuits to a wire rack to cool completely. This is super important! The icing will slide right off if the biscuits are still warm. Allow at least 45-60 minutes for thorough cooling. - Simple Chocolate Icing for Afghan Biscuits:
Mix the Icing: In a medium bowl, whisk together the powdered sugar and cocoa powder until thoroughly combined and any lumps are gone.
Add Wet Ingredients: Pour in the melted butter and 2 tablespoons of hot water. Stir well with a spoon or whisk until a thick, smooth, and spreadable icing forms.- Too thick? Add another teaspoon of hot water, mix, and repeat if needed.
- Too runny? Add a spoonful of powdered sugar, mix, and repeat if needed, until you reach that perfect consistency for a simple icing sugar recipe.
Classic Dark Chocolate Biscuits Easy Afghan Recipe

- Serves: 10 People
- Prepare Time: 15 minutes
- Cooking Time: 15 minutes
- Calories: 145
- Difficulty: Easy
Get ready to discover a true baking gem from New Zealand: Classic Afghan Biscuits! These aren't just any dark chocolate biscuits; they're a beloved home-baking staple, known for their irresistible crunch, rich cocoa flavor, and a generous topping of thick chocolate icing and a walnut. If you've been searching for chocolate chunk biscuits or biscuits with dark chocolate that stand out from the crowd, you've hit the jackpot. While our Kiwi and UK friends call them "biscuits," rest assured, for our US readers, these are delightful cookies with a unique twist! This recipe is designed to be your go-to: it's a one-bowl wonder that comes together in about 30 minutes of active prep and bake time, promising a perfectly crunchy outside, a wonderfully soft and crumbly inside, and that signature creamy chocolate icing with powdered sugar. We’ve meticulously tested these measurements in both cups & grams, with oven temperatures in both °F and °C, so you can bake with confidence and create a batch of these truly special dark chocolate cookies every time.
Ingredients
Directions
- Before You Start:
Preheat Oven: Get your oven ready by preheating it to 325°F (160°C). If you have a fan/convection oven, you might want to reduce the temperature by 25°F (15°C) or keep a close eye on them as they bake.
Prep Trays: Line two baking trays with parchment paper. This prevents sticking and makes cleanup a breeze.
Soften Butter: Ensure your butter for biscuits is properly softened, not melted. If it's straight from the fridge, you can microwave it for 10-15 seconds, flipping it halfway, until it's pliable but not greasy. - Make the Biscuit Dough:
- Cream Butter & Sugar: In a large mixing bowl (or the bowl of a stand mixer), cream together the softened butter and granulated sugar. Beat with an electric mixer on medium-high speed for 2-3 minutes, or by hand for 5-7 minutes, until the mixture is pale and fluffy. It should look light and airy, almost like whipped cream.
- Add Vanilla: Stir in the vanilla extract until well combined.
- Combine Dry Ingredients: In a separate bowl, whisk together the all-purpose flour, cocoa powder, and salt. You can sift them together if you prefer, especially if your cocoa tends to clump.
- Mix Dry into Wet: Gradually add the dry ingredients to the butter mixture, mixing on low speed (or by hand) until a thick, slightly crumbly dough forms. Be careful not to overmix.
- Fold in Cornflakes: Gently fold in the lightly crushed cornflakes using a spatula. Mix just until they are coated in the dough, trying not to crush them completely. The dough will look dry and crumbly, but it should easily squeeze together in your hand. If it feels too dry to hold its shape, add 1-2 teaspoons of milk, a tiny bit at a time, until it comes together.
- Shape and Bake:
Portion Dough: Use a tablespoon or a small cookie scoop (about 1.5 tablespoons) to portion out the dough. Each ball should be roughly 20-25g.
Roll & Flatten: Roll the dough into neat balls, then gently flatten them slightly with the palm of your hand. This helps them bake evenly and gives them the classic Afghan biscuit shape.
Arrange on Tray: Place the flattened dough balls about 1-2 inches apart on your prepared baking trays. They won't spread much, so you can fit a good number on each tray.
Bake: Bake for 12-15 minutes. The biscuits are done when the edges look dry and firm, and the tops appear matte but still feel a bit soft to the touch in the center. They will firm up considerably as they cool.
Cool Completely: Transfer the baked biscuits to a wire rack to cool completely. This is super important! The icing will slide right off if the biscuits are still warm. Allow at least 45-60 minutes for thorough cooling. - Simple Chocolate Icing for Afghan Biscuits:
Mix the Icing: In a medium bowl, whisk together the powdered sugar and cocoa powder until thoroughly combined and any lumps are gone.
Add Wet Ingredients: Pour in the melted butter and 2 tablespoons of hot water. Stir well with a spoon or whisk until a thick, smooth, and spreadable icing forms.- Too thick? Add another teaspoon of hot water, mix, and repeat if needed.
- Too runny? Add a spoonful of powdered sugar, mix, and repeat if needed, until you reach that perfect consistency for a simple icing sugar recipe.
The following nutritional values are per serving (one piece of cake) Calories ~145 kcal Carbohydrates ~20g Protein ~1g Fat ~7g Making Afghan biscuits is a joy, but a few smart tools and ingredient choices can make the process even smoother and quicker! Problem: Creaming butter and sugar by hand can be a real workout, taking a good 5-10 minutes of vigorous stirring to get that pale, fluffy texture the recipe calls for. It’s tiring and can leave your arms aching before you even get to the fun part! Problem: Trying to eyeball dough portions or using two spoons can lead to unevenly sized biscuits. This means some might bake faster and get too crispy, while others are still underdone. Problem: Cookies sticking to the baking sheet is a common issue, leading to broken biscuits and a messy cleanup. Greasing and flouring trays can be time-consuming and often doesn't prevent sticking completely. Problem: Cocoa powder and powdered sugar are notorious for clumping, which means you often have to sift them before use to avoid lumps in your dough or icing. This is an extra step that adds time and creates more dishes to wash. Click any ingredient for detailed nutritional information:Recipe Nutritional Values
Additional Information
Recipe Success Tips
Ingredient Substitutions & Variations
Cultural Variations
Make-Ahead & Storage Instructions
Frequently Asked Questions
Recommended Kitchen Tools
Stand Mixer or Hand Mixer
Agitate: Without properly creamed butter and sugar, your biscuits might not have that perfect crumbly-soft texture, potentially ending up dense or less airy than they should be.
Solution: A stand mixer or a sturdy hand mixer does all the hard work for you in just a couple of minutes. It ensures your butter and sugar are perfectly aerated, leading to lighter, more consistent biscuits, and frees up your hands for other prep tasks.Cookie Scoop
Agitate: Inconsistent baking times can frustrate even experienced bakers, leading to wasted dough or a batch of less-than-perfect cookies. Who wants a mix of burnt and raw biscuits?
Solution: A simple cookie scoop (often labeled as a "disher") ensures every single biscuit is the same size. This guarantees even baking, consistent texture, and a beautiful, uniform look across your entire batch, saving you time and guesswork.Parchment Paper
Agitate: Scraping stuck-on cookies off a tray is no fun, and neither is scrubbing burnt bits of sugar and butter from your baking sheets afterward. It adds unnecessary time and effort to your baking experience.
Solution: Lining your baking trays with parchment paper creates a non-stick surface, ensuring your Afghan biscuits slide right off effortlessly. It also makes cleanup a breeze – often, you can just toss the paper and wipe down the tray.Pre-Sifted Cocoa Powder & Powdered Sugar
Agitate: Lumps in your biscuit dough can lead to uneven chocolate distribution, and grainy icing is a definite texture turn-off. Sifting takes precious minutes away from your baking.
Solution: Opting for brands that offer pre-sifted cocoa powder and powdered sugar eliminates the need for this step entirely. You can measure directly from the bag, saving you time and ensuring a smooth, lump-free consistency in both your biscuits and their delicious chocolate topping.Calories per Ingredient
You may also like


Hey there! I’m just someone who seriously loves good food and believes that cooking doesn’t have to be complicated to be amazing. Whether it’s a quick weeknight dinner or a cozy weekend meal, I’m all about sharing easy, tasty recipes that actually work.


