
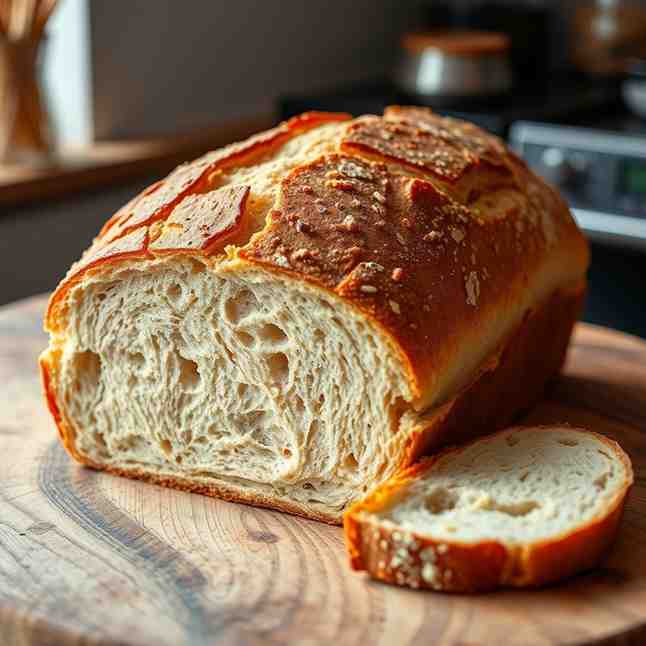
Finnish Rye Dough - Soft, Hearty Bread
Finnish Rye Dough - Soft, Hearty Bread

- Serves: 10 People
- Prepare Time: 30 minutes
- Cooking Time: 35 minutes
- Calories: -
- Difficulty: Easy
If you’ve ever found yourself with a rye bread that felt more like a brick than a fluffy slice, you’re not alone. The unique characteristics of rye dough can make it feel tricky, even for seasoned home bakers. But what if we told you that achieving a soft, sliceable, and deeply flavorful rye loaf is entirely within your reach? This guide is your one-stop shop for mastering a reliable rye dough recipe, designed specifically for everyday American home cooks, not professional bakers.
We're diving deep into the world of traditional Finnish rye dough, focusing on how to create a versatile dough that forms the heart of many beloved dishes, including a canonical, delicious pan loaf. While rye is a staple in Finnish cuisine, this method ensures success no matter where you are. Get ready to bake a bread that's not just good, but consistently great.
Ingredients
Directions
- Mix & HydrateActivate Yeast (if using Active Dry): In a large mixing bowl, combine the warm water and sweetener. Sprinkle the active dry yeast over the top and let it sit for 5-10 minutes until foamy. If using instant yeast, you can skip this blooming step and add it directly with the flours.Whisk Dry Ingredients: In a separate medium bowl, whisk together the rye flour, bread or all-purpose flour, salt, and optional caraway seeds until well combined.Combine: Pour the activated yeast mixture (or just water/sweetener if using instant yeast) into the bowl with the dry ingredients. Add the fat.Mix: Stir with a sturdy spoon or spatula until a shaggy, sticky dough forms and all the flour is hydrated. For a stand mixer, use the dough hook on low speed until just combined. Cover the bowl and let it rest for 10-15 minutes. This autolyse step helps the flour absorb water.
- Knead or Gentle Mix to the Right Dough FeelKnead: After the rest, knead the dough.
- By Hand: Turn the dough out onto a lightly floured or lightly oiled surface. Knead for 8-10 minutes. The dough will be sticky, but resist the urge to add too much extra flour. Use a bench scraper to help incorporate sticky bits.
- Stand Mixer: Using the dough hook, knead on medium-low speed for 6-8 minutes.
- First Rise (Bulk Fermentation)Prepare Bowl: Lightly grease a clean large bowl with oil.First Rise: Place the kneaded rye dough into the greased bowl, turning it once to coat. Cover the bowl tightly with plastic wrap or a damp kitchen towel.Ferment: Let the dough rise in a warm spot (ideally 70-75°F / 21-24°C) for 1 ½ to 2 hours, or until it has roughly doubled in size.Visual Cues: Look for a rounded top and visible small bubbles at the edges. A simple "finger dent" test can confirm: gently poke the dough with a floured finger; if the indentation slowly springs back halfway, it's ready. If it springs back completely, it needs more time. If it collapses, it's over-proofed.
- Shape the LoafPrepare Pan: Lightly grease a 9x5-inch loaf pan.Deflate Gently: Turn the risen dough out onto a lightly floured or lightly oiled surface. Gently deflate it without smashing all the air out.Shape: Pat the dough into a rough rectangle. Fold the top edge down to the middle, then the bottom edge up to meet it, pinching the seam. Roll the dough into a tight log, then pinch the final seam closed along the bottom.Place in Pan: Place the shaped dough, seam-side down, into the prepared loaf pan. Ensure there's good tension; the dough should feel snug but not forced.
- Final ProofCover: Loosely cover the loaf pan with plastic wrap or a damp towel.Proof: Let the dough rise in a warm spot for another 45-60 minutes, or until it has risen about ½ to 1 inch above the rim of the pan.Finger Poke Test (Again): Gently poke the dough. If the indentation slowly springs back about three-quarters of the way, it's perfectly proofed. If it springs back too quickly, it needs more time. If it stays indented and doesn't spring back, it's likely over-proofed.
- BakePreheat Oven: Preheat your oven to 375°F (190°C) with a rack in the center. If you want to create steam (recommended for a crispier crust), place an empty oven-safe pan on the bottom rack while preheating.Score (Optional): If desired, use a sharp knife or lame to make one or two shallow slashes down the length of the loaf.Steam (Optional): Carefully pour about ½ cup of hot water into the preheated pan on the bottom rack (be cautious of steam!).Bake: Place the loaf pan in the preheated oven. Bake for 30-40 minutes, or until the crust is a deep golden brown and the internal temperature reaches 190-200°F (88-93°C) using an instant-read thermometer.Remove from Pan: Once baked, carefully remove the loaf from the pan and place it on a wire rack.
- Cool (Critical for Rye Dough)Cool Completely: This is crucial for rye dough! Allow the loaf to cool completely on a wire rack for at least 1-2 hours, or even longer if possible, before slicing. Rye bread needs this time for its internal structure to set and to prevent a gummy crumb.Slice: Once fully cooled, use a sharp serrated knife to slice the bread.
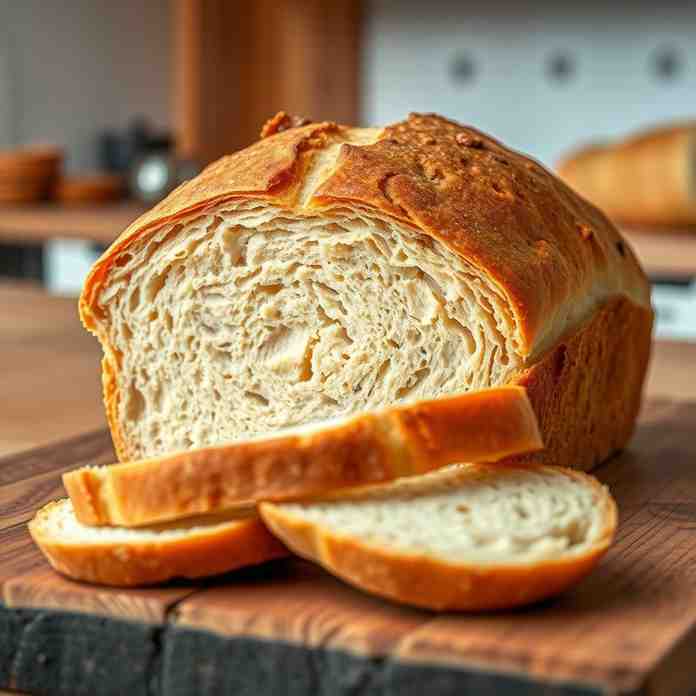
Finnish Rye Dough - Soft, Hearty Bread
- Serves: 10 People
- Prepare Time: 30 minutes
- Cooking Time: 35 minutes
- Calories: -
- Difficulty: Easy
If you’ve ever found yourself with a rye bread that felt more like a brick than a fluffy slice, you’re not alone. The unique characteristics of rye dough can make it feel tricky, even for seasoned home bakers. But what if we told you that achieving a soft, sliceable, and deeply flavorful rye loaf is entirely within your reach? This guide is your one-stop shop for mastering a reliable rye dough recipe, designed specifically for everyday American home cooks, not professional bakers.
We're diving deep into the world of traditional Finnish rye dough, focusing on how to create a versatile dough that forms the heart of many beloved dishes, including a canonical, delicious pan loaf. While rye is a staple in Finnish cuisine, this method ensures success no matter where you are. Get ready to bake a bread that's not just good, but consistently great.
Ingredients
Directions
- Mix & HydrateActivate Yeast (if using Active Dry): In a large mixing bowl, combine the warm water and sweetener. Sprinkle the active dry yeast over the top and let it sit for 5-10 minutes until foamy. If using instant yeast, you can skip this blooming step and add it directly with the flours.Whisk Dry Ingredients: In a separate medium bowl, whisk together the rye flour, bread or all-purpose flour, salt, and optional caraway seeds until well combined.Combine: Pour the activated yeast mixture (or just water/sweetener if using instant yeast) into the bowl with the dry ingredients. Add the fat.Mix: Stir with a sturdy spoon or spatula until a shaggy, sticky dough forms and all the flour is hydrated. For a stand mixer, use the dough hook on low speed until just combined. Cover the bowl and let it rest for 10-15 minutes. This autolyse step helps the flour absorb water.
- Knead or Gentle Mix to the Right Dough FeelKnead: After the rest, knead the dough.
- By Hand: Turn the dough out onto a lightly floured or lightly oiled surface. Knead for 8-10 minutes. The dough will be sticky, but resist the urge to add too much extra flour. Use a bench scraper to help incorporate sticky bits.
- Stand Mixer: Using the dough hook, knead on medium-low speed for 6-8 minutes.
- First Rise (Bulk Fermentation)Prepare Bowl: Lightly grease a clean large bowl with oil.First Rise: Place the kneaded rye dough into the greased bowl, turning it once to coat. Cover the bowl tightly with plastic wrap or a damp kitchen towel.Ferment: Let the dough rise in a warm spot (ideally 70-75°F / 21-24°C) for 1 ½ to 2 hours, or until it has roughly doubled in size.Visual Cues: Look for a rounded top and visible small bubbles at the edges. A simple "finger dent" test can confirm: gently poke the dough with a floured finger; if the indentation slowly springs back halfway, it's ready. If it springs back completely, it needs more time. If it collapses, it's over-proofed.
- Shape the LoafPrepare Pan: Lightly grease a 9x5-inch loaf pan.Deflate Gently: Turn the risen dough out onto a lightly floured or lightly oiled surface. Gently deflate it without smashing all the air out.Shape: Pat the dough into a rough rectangle. Fold the top edge down to the middle, then the bottom edge up to meet it, pinching the seam. Roll the dough into a tight log, then pinch the final seam closed along the bottom.Place in Pan: Place the shaped dough, seam-side down, into the prepared loaf pan. Ensure there's good tension; the dough should feel snug but not forced.
- Final ProofCover: Loosely cover the loaf pan with plastic wrap or a damp towel.Proof: Let the dough rise in a warm spot for another 45-60 minutes, or until it has risen about ½ to 1 inch above the rim of the pan.Finger Poke Test (Again): Gently poke the dough. If the indentation slowly springs back about three-quarters of the way, it's perfectly proofed. If it springs back too quickly, it needs more time. If it stays indented and doesn't spring back, it's likely over-proofed.
- BakePreheat Oven: Preheat your oven to 375°F (190°C) with a rack in the center. If you want to create steam (recommended for a crispier crust), place an empty oven-safe pan on the bottom rack while preheating.Score (Optional): If desired, use a sharp knife or lame to make one or two shallow slashes down the length of the loaf.Steam (Optional): Carefully pour about ½ cup of hot water into the preheated pan on the bottom rack (be cautious of steam!).Bake: Place the loaf pan in the preheated oven. Bake for 30-40 minutes, or until the crust is a deep golden brown and the internal temperature reaches 190-200°F (88-93°C) using an instant-read thermometer.Remove from Pan: Once baked, carefully remove the loaf from the pan and place it on a wire rack.
- Cool (Critical for Rye Dough)Cool Completely: This is crucial for rye dough! Allow the loaf to cool completely on a wire rack for at least 1-2 hours, or even longer if possible, before slicing. Rye bread needs this time for its internal structure to set and to prevent a gummy crumb.Slice: Once fully cooled, use a sharp serrated knife to slice the bread.
You may also like


Hey there! I’m just someone who seriously loves good food and believes that cooking doesn’t have to be complicated to be amazing. Whether it’s a quick weeknight dinner or a cozy weekend meal, I’m all about sharing easy, tasty recipes that actually work.


