
Easy Homemade Rye Bread Recipe - Bake a Deli-Style Loaf
Easy Homemade Rye Bread Recipe - Bake a Deli-Style Loaf

- Serves: 12 People
- Prepare Time: 20 minutes
- Cooking Time: 40 minutes
- Calories: -
- Difficulty: Easy
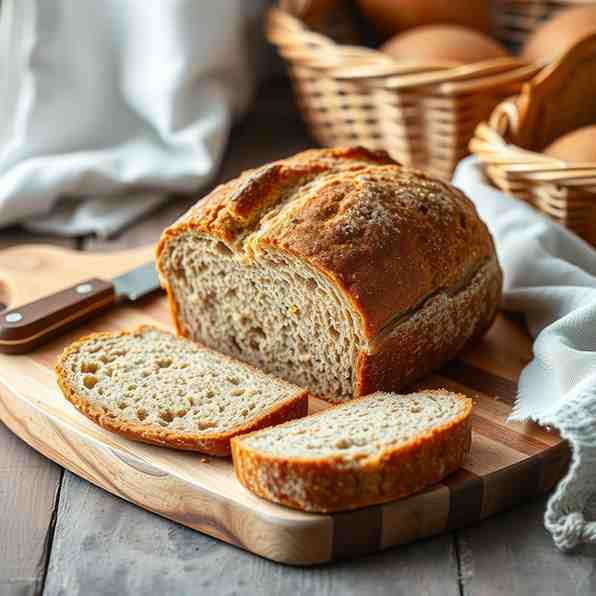
Welcome to your new favorite rye bread recipe! Forget complicated sourdough starters or specialty equipment; this guide is all about crafting a delicious, homemade deli-style rye bread right in your kitchen with just a bowl and a loaf pan. Imagine a loaf with a beautifully soft, sliceable crumb, a hint of caraway, and that unmistakable deep, satisfying rye flavor. Whether you're a seasoned baker or just starting your bread-making journey, this easy one-loaf recipe is designed to give you perfect results every time. Get ready to bake a loaf that's ideal for sandwiches, toast, or just enjoying with a smear of butter.
Ingredients
Directions
Tools You’ll Need (Real-World Gear)
You don't need fancy equipment for this recipe!- Large mixing bowl
- Wooden spoon or sturdy spatula
- Standard 9x5-inch loaf pan (or 8.5x4.5-inch for a slightly taller loaf)
- Plastic wrap or a clean kitchen towel
- Instant-read thermometer (optional, but helpful for perfect doneness)
Before You Start – Rye Flour Basics in Plain English
Understanding rye flour makes all the difference!What Makes Rye Different from Regular Flour
- More Bran: Rye flour contains more of the grain's bran, which can make dough stickier and absorb more water.
- Lower Gluten: Rye has less gluten-forming protein than wheat flour, leading to a denser, less elastic dough.
- Stickier Dough: Don't be surprised if your rye dough feels a bit tackier than a typical white bread dough – that's normal!
- Denser Crumb: Due to lower gluten, rye breads often have a closer, more compact crumb compared to fluffy white breads.
Choosing the Right Rye Flour for This Recipe
Here’s a quick cheat-sheet for selecting your rye flour:- White Rye Flour: Milder flavor, lighter crumb. Good if you're new to rye or prefer a subtle taste.
- Medium Rye Flour: Recommended! This is the sweet spot for classic deli rye, offering a balanced flavor and texture.
- Dark Rye Flour: Stronger, more robust flavor, and a slightly denser loaf.
If using, you might want to add 1-2 tablespoons of extra bread flour if your dough feels too heavy or stiff.
Expect a chewier texture.
Step-By-Step Guide: How to Make Deli-Style Rye Bread
Mix the Dough
- In your large mixing bowl, combine the bread flour, rye flour, salt, yeast, and optional caraway seeds.
- Give them a quick whisk to distribute evenly. Add the warm water, honey (or sugar), and olive oil (or melted butter).
- Mix with a wooden spoon or sturdy spatula until all the flour is hydrated and you have a shaggy, cohesive dough.
Knead Until Smooth and Springy
- Turn the dough out onto a lightly floured surface. Knead by hand for 8-10 minutes.
- Use a push-and-pull motion, folding the dough over itself repeatedly. It will be sticky at first, but resist adding too much extra flour.
- Use a bench scraper to help incorporate sticky bits.
- Dough Checkpoint: When finished, the dough should feel much smoother, more elastic, and slightly tacky to the touch. It should spring back slowly when gently poked.
- (Using a stand mixer: Use the dough hook on low speed for 6-8 minutes until the dough is smooth and clears the sides of the bowl.)
First Rise (Bulk Fermentation)
- Lightly grease your mixing bowl with a little oil. Place the kneaded dough in the bowl, turning it once to coat.
- Cover the bowl tightly with plastic wrap or a clean kitchen towel.
- Let it rise in a warm spot at room temperature (around 70-75°F / 21-24°C) for 60-90 minutes, or until roughly doubled in size.
- Checkpoint: "Doubled" means the dough has visibly expanded and looks puffy. To test, gently poke two fingers into the dough; if the indentations remain, it's ready. If it springs back immediately, it needs more time.
- Note on colder kitchens: If your kitchen is cool, the rise may take longer. Find a slightly warmer spot, like near a sunny window or in an oven with just the light on.
Shape the Loaf for a Pan
- Gently turn the risen dough out onto a lightly floured surface. Gently deflate it by pressing out the air into a rectangle, about 8x10 inches.
- Starting from a short side, roll the dough tightly into a log, pinching the seam closed as you go. Pinch the ends to seal them.
- Lightly grease your loaf pan. Place the shaped loaf into the prepared pan, seam-side down, ensuring it fits snugly.
Second Rise in the Pan
- Cover the loaf pan loosely with plastic wrap or a clean kitchen towel.
- Let it rise in a warm spot for another 30-45 minutes .
- Checkpoint: The loaf is ready to bake when it has risen about ½ to 1 inch over the rim of the pan and looks puffy. A gentle finger-dent test (poke lightly with a floured finger) should leave a slight indentation that springs back slowly.
- Warning: Be careful not to over-proof! If the dough rises too much, it might collapse in the oven, leading to a dense texture. Visual cues for over-proofing include a very bubbly, fragile surface.
Bake to the Right Color (And Internal Temp)
- While the dough is on its second rise, preheat your oven to 375°F (190°C).
- Once the loaf is ready, bake for 35-40 minutes.
- Optional Internal Temperature Target: For perfectly baked rye, use an instant-read thermometer. The internal temperature should be around 200-205°F (93-96°C).
- Crust Check: The crust should be a deep golden brown and sound hollow when tapped on the bottom.
Cool, Slice, and Enjoy
- Once baked, immediately remove the loaf from the pan and place it on a wire rack to cool completely. This is crucial!
- Why Cooling Matters: The internal steam continues to cook and set the crumb, so resist the urge to slice too early.
- Cooling Time: Allow the bread to cool for at least 30-60 minutes before slicing.
- Slice Thickness: Slice thinly for toast or thicker for hearty sandwiches.
Baking Day Timeline (At a Glance)
- 0:00–0:20 – Mix & knead
- 0:20–1:20 – First rise (approx. 60 minutes)
- 1:20–1:35 – Shape
- 1:35–2:10 – Second rise (approx. 35 minutes)
- 2:10–2:50 – Bake (approx. 40 minutes)
- 2:50–3:20 – Cool (minimum 30 minutes before slicing)
Easy Homemade Rye Bread Recipe - Bake a Deli-Style Loaf
- Serves: 12 People
- Prepare Time: 20 minutes
- Cooking Time: 40 minutes
- Calories: -
- Difficulty: Easy
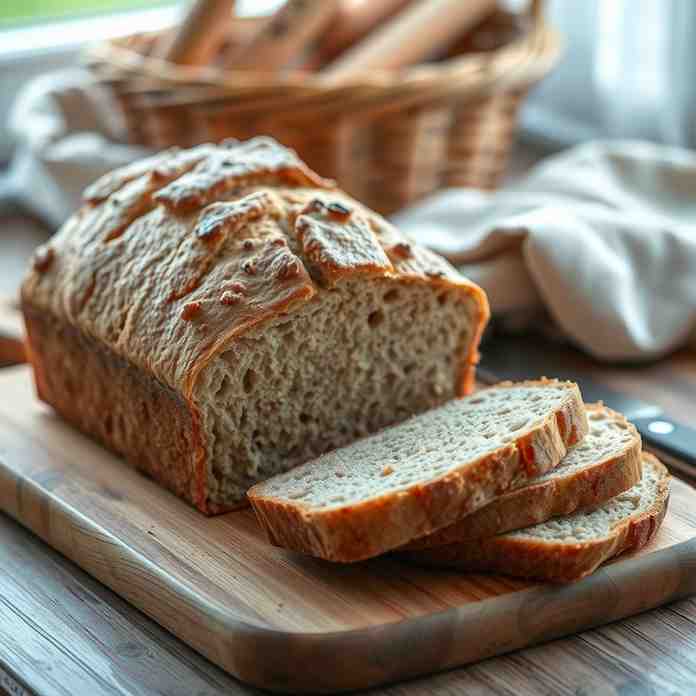
Welcome to your new favorite rye bread recipe! Forget complicated sourdough starters or specialty equipment; this guide is all about crafting a delicious, homemade deli-style rye bread right in your kitchen with just a bowl and a loaf pan. Imagine a loaf with a beautifully soft, sliceable crumb, a hint of caraway, and that unmistakable deep, satisfying rye flavor. Whether you're a seasoned baker or just starting your bread-making journey, this easy one-loaf recipe is designed to give you perfect results every time. Get ready to bake a loaf that's ideal for sandwiches, toast, or just enjoying with a smear of butter.
Ingredients
Directions
Tools You’ll Need (Real-World Gear)
You don't need fancy equipment for this recipe!- Large mixing bowl
- Wooden spoon or sturdy spatula
- Standard 9x5-inch loaf pan (or 8.5x4.5-inch for a slightly taller loaf)
- Plastic wrap or a clean kitchen towel
- Instant-read thermometer (optional, but helpful for perfect doneness)
Before You Start – Rye Flour Basics in Plain English
Understanding rye flour makes all the difference!What Makes Rye Different from Regular Flour
- More Bran: Rye flour contains more of the grain's bran, which can make dough stickier and absorb more water.
- Lower Gluten: Rye has less gluten-forming protein than wheat flour, leading to a denser, less elastic dough.
- Stickier Dough: Don't be surprised if your rye dough feels a bit tackier than a typical white bread dough – that's normal!
- Denser Crumb: Due to lower gluten, rye breads often have a closer, more compact crumb compared to fluffy white breads.
Choosing the Right Rye Flour for This Recipe
Here’s a quick cheat-sheet for selecting your rye flour:- White Rye Flour: Milder flavor, lighter crumb. Good if you're new to rye or prefer a subtle taste.
- Medium Rye Flour: Recommended! This is the sweet spot for classic deli rye, offering a balanced flavor and texture.
- Dark Rye Flour: Stronger, more robust flavor, and a slightly denser loaf.
If using, you might want to add 1-2 tablespoons of extra bread flour if your dough feels too heavy or stiff.
Expect a chewier texture.
Step-By-Step Guide: How to Make Deli-Style Rye Bread
Mix the Dough
- In your large mixing bowl, combine the bread flour, rye flour, salt, yeast, and optional caraway seeds.
- Give them a quick whisk to distribute evenly. Add the warm water, honey (or sugar), and olive oil (or melted butter).
- Mix with a wooden spoon or sturdy spatula until all the flour is hydrated and you have a shaggy, cohesive dough.
Knead Until Smooth and Springy
- Turn the dough out onto a lightly floured surface. Knead by hand for 8-10 minutes.
- Use a push-and-pull motion, folding the dough over itself repeatedly. It will be sticky at first, but resist adding too much extra flour.
- Use a bench scraper to help incorporate sticky bits.
- Dough Checkpoint: When finished, the dough should feel much smoother, more elastic, and slightly tacky to the touch. It should spring back slowly when gently poked.
- (Using a stand mixer: Use the dough hook on low speed for 6-8 minutes until the dough is smooth and clears the sides of the bowl.)
First Rise (Bulk Fermentation)
- Lightly grease your mixing bowl with a little oil. Place the kneaded dough in the bowl, turning it once to coat.
- Cover the bowl tightly with plastic wrap or a clean kitchen towel.
- Let it rise in a warm spot at room temperature (around 70-75°F / 21-24°C) for 60-90 minutes, or until roughly doubled in size.
- Checkpoint: "Doubled" means the dough has visibly expanded and looks puffy. To test, gently poke two fingers into the dough; if the indentations remain, it's ready. If it springs back immediately, it needs more time.
- Note on colder kitchens: If your kitchen is cool, the rise may take longer. Find a slightly warmer spot, like near a sunny window or in an oven with just the light on.
Shape the Loaf for a Pan
- Gently turn the risen dough out onto a lightly floured surface. Gently deflate it by pressing out the air into a rectangle, about 8x10 inches.
- Starting from a short side, roll the dough tightly into a log, pinching the seam closed as you go. Pinch the ends to seal them.
- Lightly grease your loaf pan. Place the shaped loaf into the prepared pan, seam-side down, ensuring it fits snugly.
Second Rise in the Pan
- Cover the loaf pan loosely with plastic wrap or a clean kitchen towel.
- Let it rise in a warm spot for another 30-45 minutes .
- Checkpoint: The loaf is ready to bake when it has risen about ½ to 1 inch over the rim of the pan and looks puffy. A gentle finger-dent test (poke lightly with a floured finger) should leave a slight indentation that springs back slowly.
- Warning: Be careful not to over-proof! If the dough rises too much, it might collapse in the oven, leading to a dense texture. Visual cues for over-proofing include a very bubbly, fragile surface.
Bake to the Right Color (And Internal Temp)
- While the dough is on its second rise, preheat your oven to 375°F (190°C).
- Once the loaf is ready, bake for 35-40 minutes.
- Optional Internal Temperature Target: For perfectly baked rye, use an instant-read thermometer. The internal temperature should be around 200-205°F (93-96°C).
- Crust Check: The crust should be a deep golden brown and sound hollow when tapped on the bottom.
Cool, Slice, and Enjoy
- Once baked, immediately remove the loaf from the pan and place it on a wire rack to cool completely. This is crucial!
- Why Cooling Matters: The internal steam continues to cook and set the crumb, so resist the urge to slice too early.
- Cooling Time: Allow the bread to cool for at least 30-60 minutes before slicing.
- Slice Thickness: Slice thinly for toast or thicker for hearty sandwiches.
Baking Day Timeline (At a Glance)
- 0:00–0:20 – Mix & knead
- 0:20–1:20 – First rise (approx. 60 minutes)
- 1:20–1:35 – Shape
- 1:35–2:10 – Second rise (approx. 35 minutes)
- 2:10–2:50 – Bake (approx. 40 minutes)
- 2:50–3:20 – Cool (minimum 30 minutes before slicing)
You may also like


Hey there! I’m just someone who seriously loves good food and believes that cooking doesn’t have to be complicated to be amazing. Whether it’s a quick weeknight dinner or a cozy weekend meal, I’m all about sharing easy, tasty recipes that actually work.


