
Mapakiwa - Ingredients & How to Make Fluffy Steamed Bread
Mapakiwa - Ingredients & How to Make Fluffy Steamed Bread
- Serves: 6 People
- Prepare Time: 25 minutes
- Cooking Time: 60 minutes
- Calories: -
- Difficulty: Easy
Forget your oven and discover the magic of Mapakiwa, a truly delicious bread recipe that's been a staple in Southern African homes for generations! If you've ever wondered about the best ingredients how to make bread that's incredibly soft, fluffy, and perfect for soaking up rich stews, you're in the right place. This guide will show you how to make bread that requires no oven, just a pot, a lid, and a little love.
Known as Ujeqe or Dombolo in South Africa, and Mapakiwa or Madombi in Botswana, this steamed bread is a testament to ingenious home cooking. Unlike baked bread, steamed bread cooks gently in a moist, hot environment, resulting in an unbelievably tender, spongy texture that's ideal for pairing with hearty dishes. It's the ultimate comfort food, providing a wonderfully soft "sponge" to mop up every last drop of gravy.
This recipe for the bread is perfect for you if:
You don't own an oven or prefer not to use it.
It's too hot to bake, but you're craving fresh, homemade bread.
You want a uniquely soft, "spongy" bread to complement your favorite stews and curries.
We've adapted traditional Southern African techniques for a regular pot and stove, making this a truly modern kitchen-friendly experience. Even if you're a first-time bread maker, our step-by-step cues will help you succeed with this beginner-friendly dough. Plus, this recipe bread dough works beautifully with common pantry all-purpose flour, making it one of the best recipes for all purpose flour you'll find. Get ready to enjoy the satisfaction of making your own soft, fluffy Mapakiwa!
Ingredients
Directions
- Activate the YeastIn your large mixing bowl, combine the warm water and sugar. Sprinkle the yeast over the top. Give it a gentle stir, then let it sit for 5-10 minutes. You're looking for a creamy layer of bubbles to form on the surface – this is your visual cue that the yeast is alive and ready to work its magic!
- Make the DoughWhile the yeast is activating, whisk together the all-purpose flour and salt in a separate bowl. Once your yeast mixture is foamy, pour it into the flour mixture, along with the neutral oil or melted butter. Mix everything with a sturdy spoon or spatula until a shaggy, somewhat sticky dough forms. Scrape down the sides of the bowl to incorporate any dry bits, bringing the dough together into a cohesive mass.
- Knead Until Smooth & ElasticTurn the shaggy dough out onto a lightly floured surface. Knead the dough by hand for 5-8 minutes. If you have a stand mixer with a dough hook, you can use that for 3-5 minutes on medium-low speed.
- Cues for perfect dough:
- The dough should become smooth, springy, and elastic.
- It should be slightly tacky to the touch but shouldn't glue itself to your hands or the counter.
- Failure-Proof Tips:
- If the dough is sticking badly: Add 1 tablespoon of flour at a time, incorporating it fully before adding more. Don't add too much, or your bread will be dense.
- If the dough is tearing and dry: Add 1 teaspoon of warm water at a time, kneading it in until the dough becomes more pliable and cohesive.
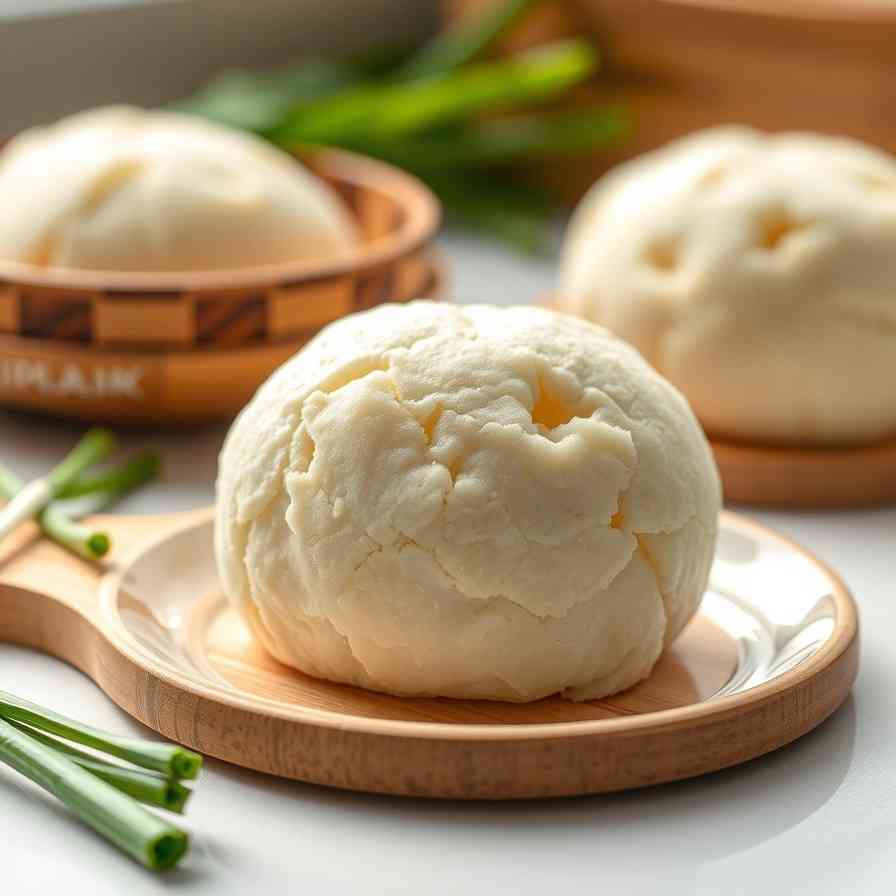
- First RiseShape your beautifully kneaded dough into a smooth ball. Lightly grease your mixing bowl with a little oil, then place the dough ball inside, turning it once to coat. Cover the bowl tightly with plastic wrap or a clean kitchen towel. Place it in a warm spot to rise for about 60 minutes, or until it has visibly doubled in size. Good warm spots include a slightly warm (turned off!) oven, a sunny counter, or near a warm appliance.
- Shape for SteamingOnce your dough has doubled, gently punch it down to release the air.
- Option A (Single Loaf – our canonical presentation): Shape the dough into a smooth round or oval loaf. Lightly grease your heat-proof steaming bowl or dish (make sure it fits comfortably inside your pot!). Place the shaped dough into the greased bowl.
- Option B (Brief Note for smaller portions): If you prefer individual rolls, you may cut the dough into equal pieces (e.g., 6-8) and shape them into smooth balls. Place these in greased mugs or ramekins. Remember, this is the same delicious bread recipe dough, just shaped differently.
- Cover your shaped dough again and let it undergo a second rise for 20-30 minutes, or until it looks puffy and has increased noticeably in size.
- Steam the BreadNow for the exciting part – the steaming!
- Pour about 2-3 inches of water into your sturdy pot – enough to come halfway up the side of your steaming bowl, but not so much that it will boil over into the bread.
- Place your trivet, small rack, or folded towel at the bottom of the pot.
- Bring the water to a gentle simmer over medium-high heat.
- Carefully place your bowl with the risen dough onto the rack in the pot.
- Cover the pot tightly with its lid. Reduce the heat to medium-low to maintain a steady, gentle simmer.
- Steam the bread for approximately 1 hour for a single loaf. If you're using smaller mugs/ramekins, they will cook faster, usually around 35-40 minutes. Avoid lifting the lid too often, as this releases the steam and can affect the cooking process.
- Doneness Cues:
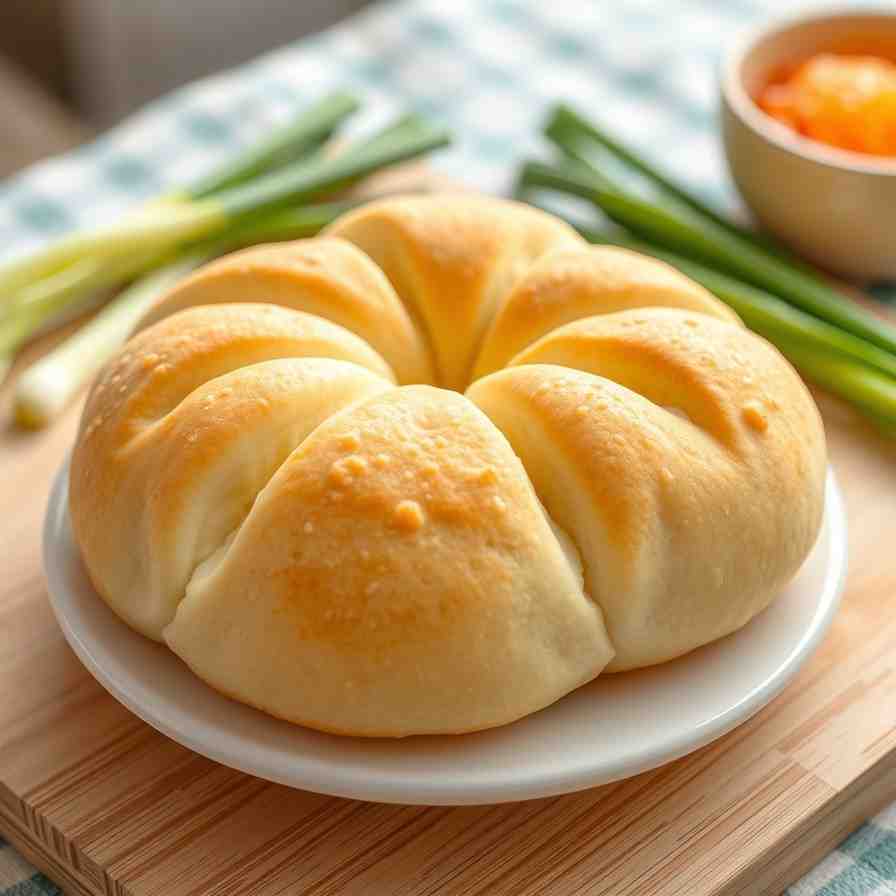
- The bread will have risen beautifully over the rim of the steaming bowl.
- When gently pressed, it should spring back.
- For an optional precise check, an internal thermometer inserted into the center should read above 190°F (88°C).
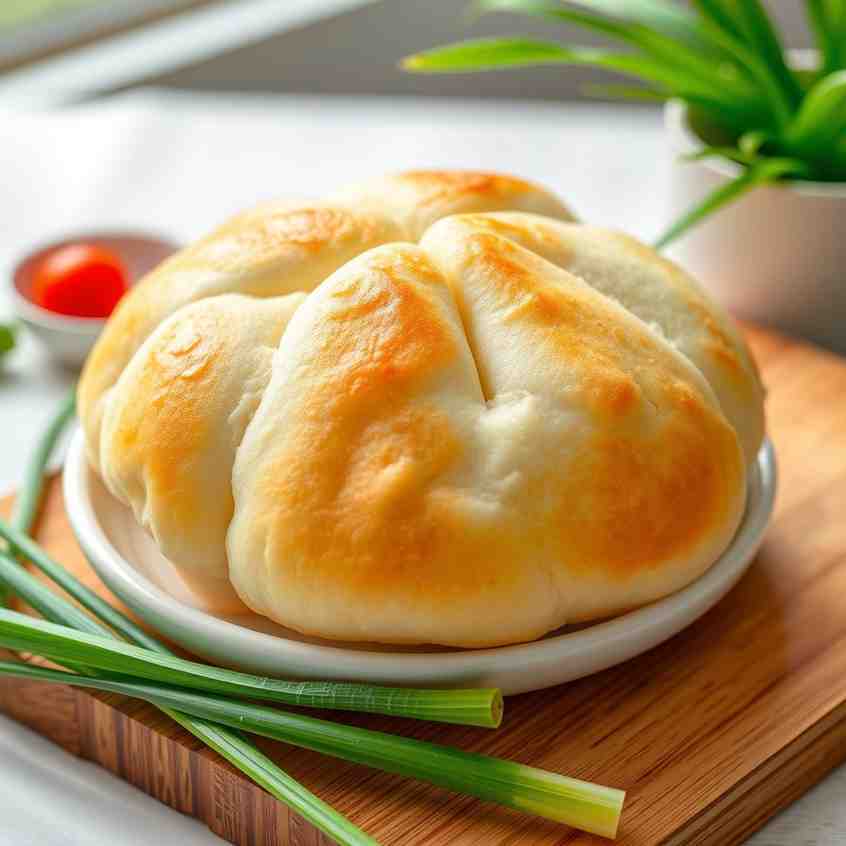
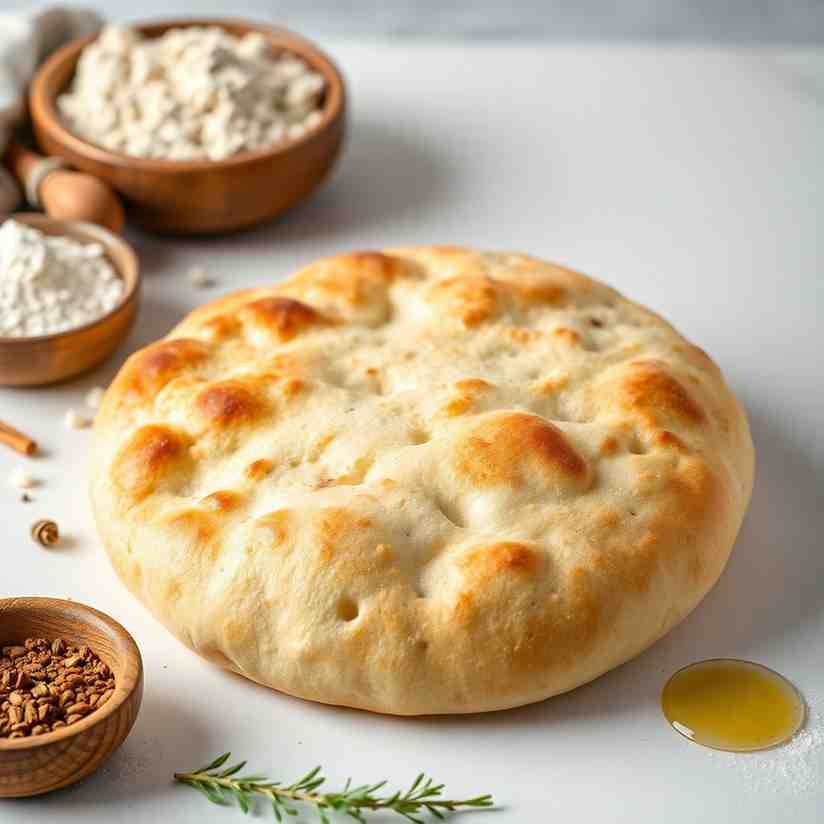
- Cool, Slice & ServeOnce steamed, carefully remove the hot bowl from the pot. Let the bread rest in the bowl for a few minutes. This allows it to firm up slightly. Then, gently turn the bread out onto a wire rack to cool slightly before slicing. Slicing too soon can result in a gummy texture. Serve your delicious bread recipe warm, and get ready to enjoy!
Mapakiwa - Ingredients & How to Make Fluffy Steamed Bread
- Serves: 6 People
- Prepare Time: 25 minutes
- Cooking Time: 60 minutes
- Calories: -
- Difficulty: Easy
Forget your oven and discover the magic of Mapakiwa, a truly delicious bread recipe that's been a staple in Southern African homes for generations! If you've ever wondered about the best ingredients how to make bread that's incredibly soft, fluffy, and perfect for soaking up rich stews, you're in the right place. This guide will show you how to make bread that requires no oven, just a pot, a lid, and a little love.
Known as Ujeqe or Dombolo in South Africa, and Mapakiwa or Madombi in Botswana, this steamed bread is a testament to ingenious home cooking. Unlike baked bread, steamed bread cooks gently in a moist, hot environment, resulting in an unbelievably tender, spongy texture that's ideal for pairing with hearty dishes. It's the ultimate comfort food, providing a wonderfully soft "sponge" to mop up every last drop of gravy.
This recipe for the bread is perfect for you if:
You don't own an oven or prefer not to use it.
It's too hot to bake, but you're craving fresh, homemade bread.
You want a uniquely soft, "spongy" bread to complement your favorite stews and curries.
We've adapted traditional Southern African techniques for a regular pot and stove, making this a truly modern kitchen-friendly experience. Even if you're a first-time bread maker, our step-by-step cues will help you succeed with this beginner-friendly dough. Plus, this recipe bread dough works beautifully with common pantry all-purpose flour, making it one of the best recipes for all purpose flour you'll find. Get ready to enjoy the satisfaction of making your own soft, fluffy Mapakiwa!
Ingredients
Directions
- Activate the YeastIn your large mixing bowl, combine the warm water and sugar. Sprinkle the yeast over the top. Give it a gentle stir, then let it sit for 5-10 minutes. You're looking for a creamy layer of bubbles to form on the surface – this is your visual cue that the yeast is alive and ready to work its magic!
- Make the DoughWhile the yeast is activating, whisk together the all-purpose flour and salt in a separate bowl. Once your yeast mixture is foamy, pour it into the flour mixture, along with the neutral oil or melted butter. Mix everything with a sturdy spoon or spatula until a shaggy, somewhat sticky dough forms. Scrape down the sides of the bowl to incorporate any dry bits, bringing the dough together into a cohesive mass.
- Knead Until Smooth & ElasticTurn the shaggy dough out onto a lightly floured surface. Knead the dough by hand for 5-8 minutes. If you have a stand mixer with a dough hook, you can use that for 3-5 minutes on medium-low speed.
- Cues for perfect dough:
- The dough should become smooth, springy, and elastic.
- It should be slightly tacky to the touch but shouldn't glue itself to your hands or the counter.
- Failure-Proof Tips:
- If the dough is sticking badly: Add 1 tablespoon of flour at a time, incorporating it fully before adding more. Don't add too much, or your bread will be dense.
- If the dough is tearing and dry: Add 1 teaspoon of warm water at a time, kneading it in until the dough becomes more pliable and cohesive.
- First RiseShape your beautifully kneaded dough into a smooth ball. Lightly grease your mixing bowl with a little oil, then place the dough ball inside, turning it once to coat. Cover the bowl tightly with plastic wrap or a clean kitchen towel. Place it in a warm spot to rise for about 60 minutes, or until it has visibly doubled in size. Good warm spots include a slightly warm (turned off!) oven, a sunny counter, or near a warm appliance.
- Shape for SteamingOnce your dough has doubled, gently punch it down to release the air.
- Option A (Single Loaf – our canonical presentation): Shape the dough into a smooth round or oval loaf. Lightly grease your heat-proof steaming bowl or dish (make sure it fits comfortably inside your pot!). Place the shaped dough into the greased bowl.
- Option B (Brief Note for smaller portions): If you prefer individual rolls, you may cut the dough into equal pieces (e.g., 6-8) and shape them into smooth balls. Place these in greased mugs or ramekins. Remember, this is the same delicious bread recipe dough, just shaped differently.
- Cover your shaped dough again and let it undergo a second rise for 20-30 minutes, or until it looks puffy and has increased noticeably in size.
- Steam the BreadNow for the exciting part – the steaming!
- Pour about 2-3 inches of water into your sturdy pot – enough to come halfway up the side of your steaming bowl, but not so much that it will boil over into the bread.
- Place your trivet, small rack, or folded towel at the bottom of the pot.
- Bring the water to a gentle simmer over medium-high heat.
- Carefully place your bowl with the risen dough onto the rack in the pot.
- Cover the pot tightly with its lid. Reduce the heat to medium-low to maintain a steady, gentle simmer.
- Steam the bread for approximately 1 hour for a single loaf. If you're using smaller mugs/ramekins, they will cook faster, usually around 35-40 minutes. Avoid lifting the lid too often, as this releases the steam and can affect the cooking process.
- Doneness Cues:
- The bread will have risen beautifully over the rim of the steaming bowl.
- When gently pressed, it should spring back.
- For an optional precise check, an internal thermometer inserted into the center should read above 190°F (88°C).
- Cool, Slice & ServeOnce steamed, carefully remove the hot bowl from the pot. Let the bread rest in the bowl for a few minutes. This allows it to firm up slightly. Then, gently turn the bread out onto a wire rack to cool slightly before slicing. Slicing too soon can result in a gummy texture. Serve your delicious bread recipe warm, and get ready to enjoy!
You may also like


Hey there! I’m just someone who seriously loves good food and believes that cooking doesn’t have to be complicated to be amazing. Whether it’s a quick weeknight dinner or a cozy weekend meal, I’m all about sharing easy, tasty recipes that actually work.


