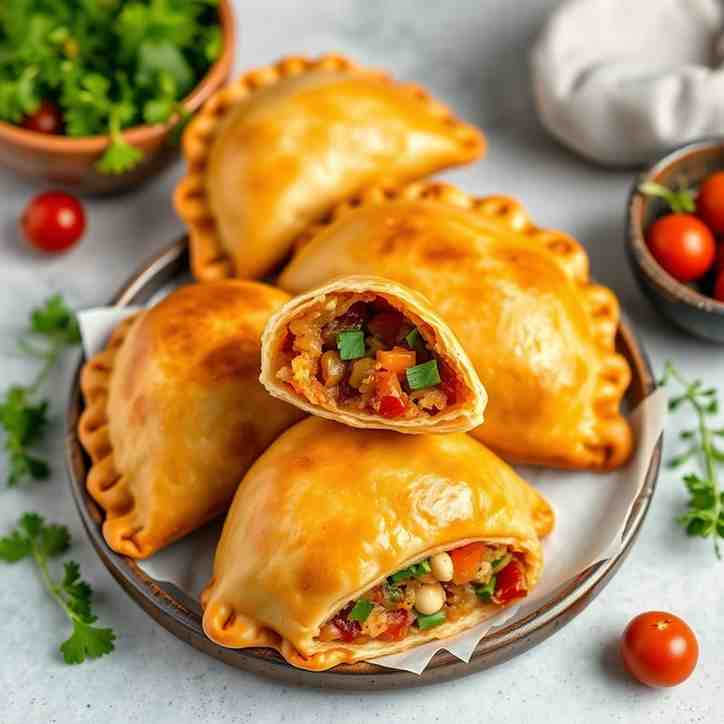
Welcome to the ultimate guide for crafting authentic Argentinian beef empanadas! If you've ever dreamt of sinking your teeth into a perfectly golden, savory hand pie bursting with flavor, you've come to the right place. Our recipe for Empanadas Criollas (or Mendocinas, as they're often called) brings the heart of Argentina right into your kitchen. This isn't just any empanada recipe; it's a comprehensive, all-in-one guide that covers everything from making the tender, sturdy `empanada dough` from scratch to perfecting the juicy, savory beef filling.
You'll love how genuinely authentic these empanadas taste, bringing the vibrant flavors of Argentina to your table. We've meticulously tested this recipe for US home kitchens, ensuring you get that traditional taste without a trip to South America. Whether you're planning a party, gearing up for game day, or hosting an asado (Argentinian BBQ), these `baked beef empanadas` are guaranteed to be a hit. Plus, they're incredibly make-ahead and freezer-friendly, making them perfect for busy schedules.
What makes an empanada truly Argentinian? While many Latin American countries boast their own versions of these delightful savory pastries, Argentina's stand out. Our filling is wonderfully beef-forward, packed with lots of sweet onions, aromatic smoked paprika, earthy cumin, and fragrant oregano. The classic additions of briny green olives and creamy hard-boiled eggs are non-negotiable, adding layers of texture and flavor that define this beloved dish. This recipe leans into the criolla or mendocina style, known for its rich beef and specific spice profile. Empanadas are more than just food in Argentina; they're a cultural experience, often enjoyed as a starter with a traditional asado (barbecue) alongside chimichurri sauce, embodying the spirit of communal dining and exploring cultural cuisines. Get ready to master the art of argentine empanadas and impress everyone with your culinary prowess!
Ingredients
Directions
Homemade Empanada Dough Step-by-Step InstructionsCombine Dry Ingredients: In a large mixing bowl, whisk together the flour and salt.
Cut in Fat: Add the cold butter (or lard) cubes to the flour mixture. Using your fingertips, a pastry blender, or a food processor, cut the fat into the flour until the mixture resembles coarse meal with some pea-sized pieces of butter remaining. This creates pockets of steam for a tender, flaky crust.
Add Liquid: In a separate small bowl, whisk together the beaten egg and cold milk. Gradually add this liquid mixture to the flour mixture, stirring with a fork until the dough just begins to come together. If needed, add ice water one tablespoon at a time until the dough forms a cohesive ball. Be careful not to overmix.
Knead and Rest: Turn the dough out onto a lightly floured surface. Knead briefly, just until it forms a smooth, pliable ball (about 1-2 minutes). The dough should feel soft and not sticky. Flatten the dough into a disc, wrap it tightly in plastic wrap, and refrigerate for at least 30 minutes (or up to 2 days). This resting time allows the gluten to relax, making the dough much easier to roll out and preventing cracking.
Assembling and Baking Your Empanadas Step-by-Step InstructionsPrepare Work Surface & Dough: Lightly flour your work surface. Divide the chilled dough into 2-3 portions. Keep the portions you're not working with covered to prevent them from drying out.
Roll & Cut Discs: Roll one portion of dough out to about ⅛-inch thickness. Using a 4-inch (for party-size) or 5-inch (for meal-size) round cutter or a small bowl, cut out circles. Re-roll scraps gently and cut more discs. Keep the cut discs covered with a damp cloth or plastic wrap to prevent them from drying out.
Fill & Fold: Take one dough disc and place about 1 ½ to 2 tablespoons of the chilled beef filling slightly off-center on one half of the
Prep the Aromatics: Heat olive oil in a large skillet or Dutch oven over medium heat. Add the finely chopped onions and (if using) bell pepper. Sauté gently for 10-15 minutes until they are very soft, translucent, and sweet, but not browned. This slow cooking is key for a juicy filling.
Add Garlic: Stir in the minced garlic and cook for another minute until fragrant, being careful not to burn it.
Brown the Beef: Add the ground beef to the skillet. Break it up with a spoon and cook until it's browned and no longer pink. Drain any excessive fat, leaving just enough for flavor.
Season and Simmer: Stir in the smoked paprika, cumin, oregano, chili powder, nutmeg (if using), salt, and black pepper. Cook for 1-2 minutes, stirring constantly, to toast the spices. Pour in the beef broth or water, bring to a simmer, and cook until most of the liquid has evaporated, leaving the filling moist but not watery.
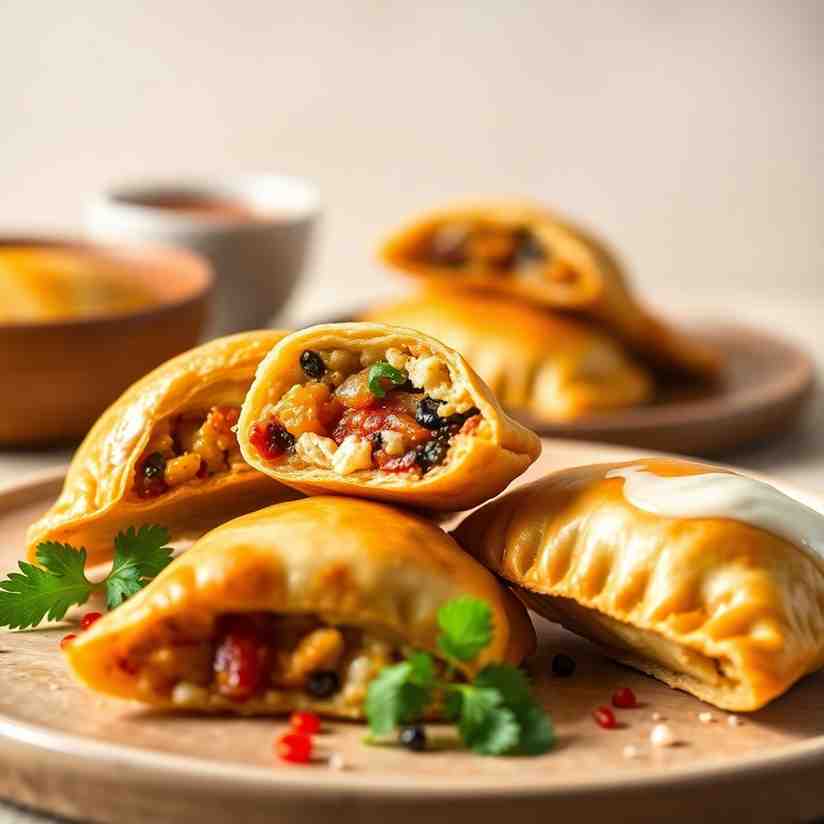
Finish and Cool: Remove the skillet from the heat. Stir in the chopped green olives, chopped hard-boiled eggs, and golden raisins (if using). Mix well to combine. Crucially, transfer the filling to a shallow dish and refrigerate for at least 2-3 hours, or preferably overnight, until completely cold. This step is vital to prevent the filling from melting the dough and causing leaks during assembly.
Homemade Empanada Dough Ingredients
4 cups all-purpose flour, plus more for dusting
1 teaspoon salt
½ cup (1 stick) unsalted butter, very cold and cut into ½-inch cubes (or lard for a more traditional, tender crust)
1 large egg, lightly beaten
½ cup cold milk (or water, if preferred, but milk adds richness)
2-4 tablespoons ice water, as needed
Homemade Empanada Dough Step-by-Step Instructions
Combine Dry Ingredients: In a large mixing bowl, whisk together the flour and salt.
Cut in Fat: Add the cold butter (or lard) cubes to the flour mixture. Using your fingertips, a pastry blender, or a food processor, cut the fat into the flour until the mixture resembles coarse meal with some pea-sized pieces of butter remaining. This creates pockets of steam for a tender, flaky crust.
Add Liquid: In a separate small bowl, whisk together the beaten egg and cold milk. Gradually add this liquid mixture to the flour mixture, stirring with a fork until the dough just begins to come together. If needed, add ice water one tablespoon at a time until the dough forms a cohesive ball. Be careful not to overmix.
Knead and Rest: Turn the dough out onto a lightly floured surface. Knead briefly, just until it forms a smooth, pliable ball (about 1-2 minutes). The dough should feel soft and not sticky. Flatten the dough into a disc, wrap it tightly in plastic wrap, and refrigerate for at least 30 minutes (or up to 2 days). This resting time allows the gluten to relax, making the dough much easier to roll out and preventing cracking.
Assembling and Baking Your Empanadas Step-by-Step Instructions
Prepare Work Surface & Dough: Lightly flour your work surface. Divide the chilled dough into 2-3 portions. Keep the portions you're not working with covered to prevent them from drying out.
Roll & Cut Discs: Roll one portion of dough out to about ⅛-inch thickness. Using a 4-inch (for party-size) or 5-inch (for meal-size) round cutter or a small bowl, cut out circles. Re-roll scraps gently and cut more discs. Keep the cut discs covered with a damp cloth or plastic wrap to prevent them from drying out.
Fill & Fold: Take one dough disc and place about 1 ½ to 2 tablespoons of the chilled beef filling slightly off-center on one half of the disc. Don't overfill! Lightly moisten the edge of the dough with a little water or egg wash. Fold the dough over the filling to create a half-moon shape. Gently press out any air pockets around the filling, then firmly press the edges together to seal.
Seal with Repulgue or Fork: For a simple seal, crimp the edges firmly with a fork. For a traditional repulgue, pinch the sealed edge, fold a small section over, and continue pinching and folding along the entire curve. Ensure the edges are fully sealed to prevent any leaks during baking.
Chill Assembled Empanadas: Place the assembled empanadas on a baking sheet lined with parchment paper. Chill them in the refrigerator for at least 30 minutes. This helps them hold their shape better and further reduces the risk of leakage.
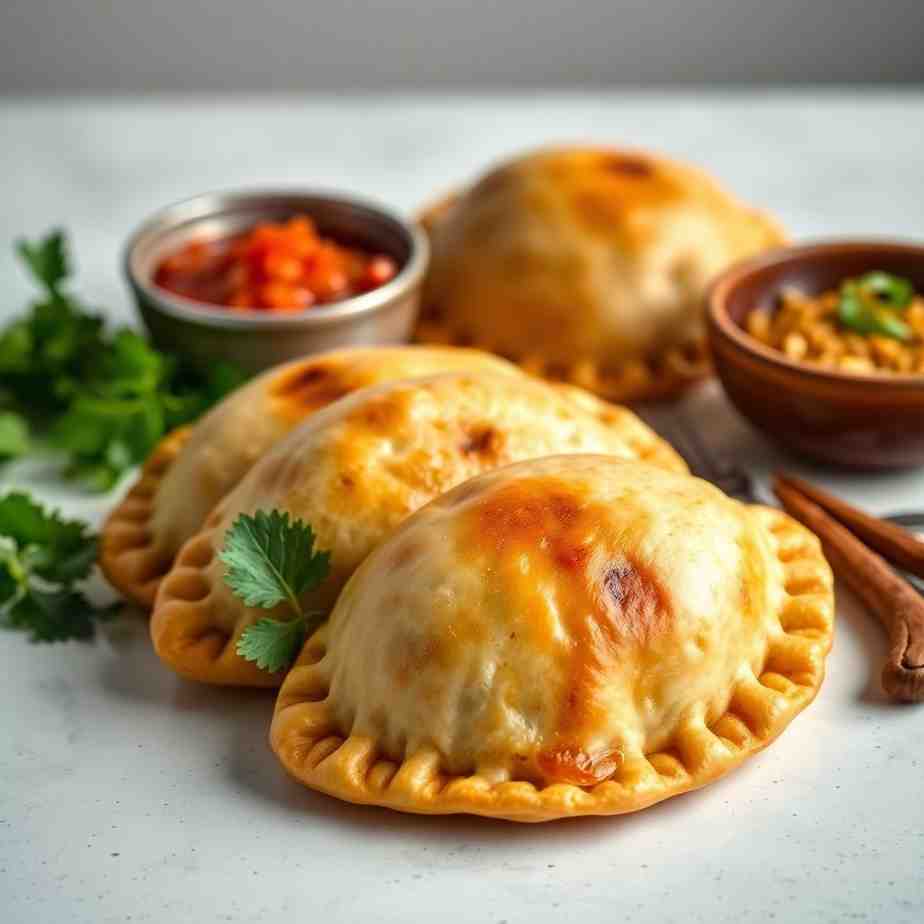
Egg Wash & Bake: Preheat your oven to 400°F (200°C). In a small bowl, whisk one egg with a tablespoon of water for an egg wash. Brush the tops of the chilled empanadas generously with the egg wash; this gives them a beautiful golden sheen.
Bake to Perfection: Bake for 20-25 minutes, or until the empanadas are deeply golden brown and the filling is sizzling at the edges. Let them cool on the baking sheet for a few minutes before serving.
Argentine Empanadas Classic Recipe
Serves: 12 People
Prepare Time: 75 minutes
Cooking Time: 25 minutes
Calories: -
Difficulty:
Medium
Welcome to the ultimate guide for crafting authentic Argentinian beef empanadas! If you've ever dreamt of sinking your teeth into a perfectly golden, savory hand pie bursting with flavor, you've come to the right place. Our recipe for Empanadas Criollas (or Mendocinas, as they're often called) brings the heart of Argentina right into your kitchen. This isn't just any empanada recipe; it's a comprehensive, all-in-one guide that covers everything from making the tender, sturdy `empanada dough` from scratch to perfecting the juicy, savory beef filling.
You'll love how genuinely authentic these empanadas taste, bringing the vibrant flavors of Argentina to your table. We've meticulously tested this recipe for US home kitchens, ensuring you get that traditional taste without a trip to South America. Whether you're planning a party, gearing up for game day, or hosting an asado (Argentinian BBQ), these `baked beef empanadas` are guaranteed to be a hit. Plus, they're incredibly make-ahead and freezer-friendly, making them perfect for busy schedules.
What makes an empanada truly Argentinian? While many Latin American countries boast their own versions of these delightful savory pastries, Argentina's stand out. Our filling is wonderfully beef-forward, packed with lots of sweet onions, aromatic smoked paprika, earthy cumin, and fragrant oregano. The classic additions of briny green olives and creamy hard-boiled eggs are non-negotiable, adding layers of texture and flavor that define this beloved dish. This recipe leans into the criolla or mendocina style, known for its rich beef and specific spice profile. Empanadas are more than just food in Argentina; they're a cultural experience, often enjoyed as a starter with a traditional asado (barbecue) alongside chimichurri sauce, embodying the spirit of communal dining and exploring cultural cuisines. Get ready to master the art of argentine empanadas and impress everyone with your culinary prowess!
Ingredients
Directions
Homemade Empanada Dough Step-by-Step InstructionsCombine Dry Ingredients: In a large mixing bowl, whisk together the flour and salt.
Cut in Fat: Add the cold butter (or lard) cubes to the flour mixture. Using your fingertips, a pastry blender, or a food processor, cut the fat into the flour until the mixture resembles coarse meal with some pea-sized pieces of butter remaining. This creates pockets of steam for a tender, flaky crust.
Add Liquid: In a separate small bowl, whisk together the beaten egg and cold milk. Gradually add this liquid mixture to the flour mixture, stirring with a fork until the dough just begins to come together. If needed, add ice water one tablespoon at a time until the dough forms a cohesive ball. Be careful not to overmix.
Knead and Rest: Turn the dough out onto a lightly floured surface. Knead briefly, just until it forms a smooth, pliable ball (about 1-2 minutes). The dough should feel soft and not sticky. Flatten the dough into a disc, wrap it tightly in plastic wrap, and refrigerate for at least 30 minutes (or up to 2 days). This resting time allows the gluten to relax, making the dough much easier to roll out and preventing cracking.
Assembling and Baking Your Empanadas Step-by-Step InstructionsPrepare Work Surface & Dough: Lightly flour your work surface. Divide the chilled dough into 2-3 portions. Keep the portions you're not working with covered to prevent them from drying out.
Roll & Cut Discs: Roll one portion of dough out to about ⅛-inch thickness. Using a 4-inch (for party-size) or 5-inch (for meal-size) round cutter or a small bowl, cut out circles. Re-roll scraps gently and cut more discs. Keep the cut discs covered with a damp cloth or plastic wrap to prevent them from drying out.
Fill & Fold: Take one dough disc and place about 1 ½ to 2 tablespoons of the chilled beef filling slightly off-center on one half of the
Prep the Aromatics: Heat olive oil in a large skillet or Dutch oven over medium heat. Add the finely chopped onions and (if using) bell pepper. Sauté gently for 10-15 minutes until they are very soft, translucent, and sweet, but not browned. This slow cooking is key for a juicy filling.
Add Garlic: Stir in the minced garlic and cook for another minute until fragrant, being careful not to burn it.
Brown the Beef: Add the ground beef to the skillet. Break it up with a spoon and cook until it's browned and no longer pink. Drain any excessive fat, leaving just enough for flavor.
Season and Simmer: Stir in the smoked paprika, cumin, oregano, chili powder, nutmeg (if using), salt, and black pepper. Cook for 1-2 minutes, stirring constantly, to toast the spices. Pour in the beef broth or water, bring to a simmer, and cook until most of the liquid has evaporated, leaving the filling moist but not watery.
Finish and Cool: Remove the skillet from the heat. Stir in the chopped green olives, chopped hard-boiled eggs, and golden raisins (if using). Mix well to combine. Crucially, transfer the filling to a shallow dish and refrigerate for at least 2-3 hours, or preferably overnight, until completely cold. This step is vital to prevent the filling from melting the dough and causing leaks during assembly.
Homemade Empanada Dough Ingredients
4 cups all-purpose flour, plus more for dusting
1 teaspoon salt
½ cup (1 stick) unsalted butter, very cold and cut into ½-inch cubes (or lard for a more traditional, tender crust)
1 large egg, lightly beaten
½ cup cold milk (or water, if preferred, but milk adds richness)
2-4 tablespoons ice water, as needed
Homemade Empanada Dough Step-by-Step Instructions
Combine Dry Ingredients: In a large mixing bowl, whisk together the flour and salt.
Cut in Fat: Add the cold butter (or lard) cubes to the flour mixture. Using your fingertips, a pastry blender, or a food processor, cut the fat into the flour until the mixture resembles coarse meal with some pea-sized pieces of butter remaining. This creates pockets of steam for a tender, flaky crust.
Add Liquid: In a separate small bowl, whisk together the beaten egg and cold milk. Gradually add this liquid mixture to the flour mixture, stirring with a fork until the dough just begins to come together. If needed, add ice water one tablespoon at a time until the dough forms a cohesive ball. Be careful not to overmix.
Knead and Rest: Turn the dough out onto a lightly floured surface. Knead briefly, just until it forms a smooth, pliable ball (about 1-2 minutes). The dough should feel soft and not sticky. Flatten the dough into a disc, wrap it tightly in plastic wrap, and refrigerate for at least 30 minutes (or up to 2 days). This resting time allows the gluten to relax, making the dough much easier to roll out and preventing cracking.
Assembling and Baking Your Empanadas Step-by-Step Instructions
Prepare Work Surface & Dough: Lightly flour your work surface. Divide the chilled dough into 2-3 portions. Keep the portions you're not working with covered to prevent them from drying out.
Roll & Cut Discs: Roll one portion of dough out to about ⅛-inch thickness. Using a 4-inch (for party-size) or 5-inch (for meal-size) round cutter or a small bowl, cut out circles. Re-roll scraps gently and cut more discs. Keep the cut discs covered with a damp cloth or plastic wrap to prevent them from drying out.
Fill & Fold: Take one dough disc and place about 1 ½ to 2 tablespoons of the chilled beef filling slightly off-center on one half of the disc. Don't overfill! Lightly moisten the edge of the dough with a little water or egg wash. Fold the dough over the filling to create a half-moon shape. Gently press out any air pockets around the filling, then firmly press the edges together to seal.
Seal with Repulgue or Fork: For a simple seal, crimp the edges firmly with a fork. For a traditional repulgue, pinch the sealed edge, fold a small section over, and continue pinching and folding along the entire curve. Ensure the edges are fully sealed to prevent any leaks during baking.
Chill Assembled Empanadas: Place the assembled empanadas on a baking sheet lined with parchment paper. Chill them in the refrigerator for at least 30 minutes. This helps them hold their shape better and further reduces the risk of leakage.
Egg Wash & Bake: Preheat your oven to 400°F (200°C). In a small bowl, whisk one egg with a tablespoon of water for an egg wash. Brush the tops of the chilled empanadas generously with the egg wash; this gives them a beautiful golden sheen.
Bake to Perfection: Bake for 20-25 minutes, or until the empanadas are deeply golden brown and the filling is sizzling at the edges. Let them cool on the baking sheet for a few minutes before serving.
Recipe Nutritional Values
The following nutritional values are per serving (one piece of cake)
Calories
~450-550 kcal
Carbohydrates
~40-50g
Protein
~25-30g
Fat
~25-35g
Additional Information
Serving, 2 Empanadas) Calories: ~450-550 kcal Carbohydrates: ~40-50g Protein: ~25-30g Fat: ~25-35g Additional Information: This estimate can vary based on specific ingredient brands, fat content of beef, and exact portion sizes.
This estimate can vary based on specific ingredient brands, fat content of beef, and exact portion sizes.
Rich in protein from beef and eggs, providing sustained energy.
Contains dietary fiber from onions, bell peppers, and flour.
Recipe Success Tips
Ingredient Substitutions & Variations
Olive Options: While green olives are classic, you can swap them for black olives for a milder, less briny flavor profile. Just be aware the taste will be slightly different but still delicious.
Raisin-Free Version: If you're not a fan of the traditional sweet-savory combination, simply omit the golden raisins from the filling. The empanadas will still be incredibly flavorful.
Spice Level Adjustments: For a milder filling, reduce or omit the chili powder. If you crave more heat, add an extra pinch of chili powder or a dash of hot paprika.
Cheese Twist: While not traditional, a small amount of shredded provolone or mozzarella can be added to the filling just before assembling for a gooey surprise.
Store-Bought Discs: Short on time? You can absolutely use good quality store-bought `empanada wrappers` or `empanada shells` from the freezer aisle. Look for "discos para empanadas" – ideally, those made with lard for a more authentic texture. This will save you the dough-making steps.
Cultural Variations
Raisins - A Matter of Preference: This recipe includes optional raisins for that traditional sweet-savory balance often found in Mendocina-style `authentic empanadas`. Many regions, however, prefer them without, so feel free to adjust based on your taste.
Dough Differences: Our homemade dough offers a tender yet sturdy crust, superior to many store-bought options and different from oil-based vegan doughs that can be flakier. This recipe aims for that perfect balance that holds the juicy filling without being too heavy.
Baked vs. Fried: While some regions fry their empanadas, we've chosen the `oven-baked empanadas` method as our primary focus. It's generally easier, less messy, and still yields `authentic empanadas` with a beautifully crisp, golden crust. Don't worry, even beginners can achieve bakery-style results with this method!
Make-Ahead & Storage Instructions
Make-Ahead (1-2 Days):
Filling: The beef filling can be made up to 2 days in advance and stored in an airtight container in the refrigerator. Ensure it's completely chilled before assembly.
Dough: The empanada dough can be made up to 2 days in advance, wrapped tightly in plastic, and stored in the refrigerator.
Assembled Empanadas: You can assemble the empanadas (without egg wash) up to 24 hours in advance. Place them on a parchment-lined baking sheet, cover loosely with plastic wrap, and refrigerate. Brush with egg wash just before baking.
How to Store Leftover Baked Empanadas:
Store leftover `baked empanadas` in an airtight container in the refrigerator for up to 3-4 days.
For the best crisp crust when reheating, use an oven or air fryer. Reheat in a preheated oven at 350°F (175°C) for 10-15 minutes, or in an air fryer at 325°F (160°C) for 5-8 minutes, until heated through and crisp. Microwaving is not recommended as it makes the crust soggy.
How to Freeze Empanadas:
Freezing Unbaked Empanadas: This is the best method for future enjoyment! Place the assembled, unbaked empanadas (without egg wash) on a parchment-lined baking sheet, ensuring they don't touch. Freeze until solid (about 2-3 hours). Once frozen, transfer them to a freezer-safe bag or container, separating layers with parchment paper. They can be stored for up to 3 months.
Baking from Frozen: When ready to bake, place frozen empanadas on a parchment-lined baking sheet. Brush with egg wash. Bake in a preheated oven at 400°F (200°C) for 30-35 minutes, or until deeply golden and cooked through. No need to thaw!
Freezing Baked Empanadas: You can also freeze `frozen empanadas` that have already been baked. Allow them to cool completely, then freeze on a baking sheet until solid. Transfer to a freezer-safe container. Reheat in the oven as described for leftovers, adding an extra 5-10 minutes to the baking time.
Pro Tips & Troubleshooting
Keep Filling Juicy, Not Soggy: The key to a juicy filling that doesn't make your `empanada crusts` soggy is cooking down the onions until sweet and ensuring any excess liquid from the beef is reduced. Cooling the filling completely is also critical; warm filling will melt the dough.
Dough Cracking? If your dough is cracking excessively when rolling, it might be too cold or hasn't rested enough. Let it sit at room temperature for 5-10 minutes, or if it feels dry, knead in a tiny splash (¼ teaspoon) of ice water.
Preventing Leaks: Overfilling is the number one culprit for leaks. Use the recommended amount of filling. Also, ensure your dough edges are clean and firmly sealed. A good crimp or repulgue is essential.
Bottoms Browning Too Fast or Staying Pale: If the bottoms are browning too quickly, your oven might be hotter at the bottom. Try placing the baking sheet on a higher rack. If they're staying pale, move the tray to a lower rack for the last 5-10 minutes, or consider using a darker baking sheet.
"Learned the Hard Way" Notes: Always chill your filling! Seriously, don't skip this step. I've had many a melted dough disaster from impatience. Also, don't be afraid to reroll dough scraps, but do it gently and only once or twice, as overworking can make the dough tough.
Frequently Asked Questions
Authentic Argentinian empanadas typically feature a savory beef filling (often called pino or recado) made with ground beef, lots of sautéed onions, smoked paprika, cumin, and oregano. Classic additions include green olives and hard-boiled eggs. The dough is usually a tender, pliable pastry, often made with flour, fat (like lard or butter), and liquid.
While specific ingredients vary widely by region, the core components of most empanadas are a dough wrapper and a savory (or sometimes sweet) filling. Our Argentinian empanadas recipe uses a traditional beef filling and a tender, homemade dough.
The "secret" to a truly great empanada lies in three key areas:
A flavorful, juicy (but not wet) filling: Cook your onions until sweet, brown your beef well, and allow the filling to cool completely before assembling. This prevents soggy dough and leaks.
A tender, pliable dough: Our recipe provides an empanada crust that's sturdy enough to hold the filling but still melts in your mouth.
A tight seal: Whether you use a fork crimp or a traditional repulgue, ensuring the edges are fully sealed is crucial to prevent leaks during baking.
While some regional variations are fried, authentic Argentinian empanadas are most commonly oven baked empanadas. Baking them results in a lighter, less greasy pastry with a beautiful golden crust, allowing the rich flavors of the baked beef empanadas filling to shine.
Absolutely! If you're short on time, using store-bought empanada wrappers is a fantastic shortcut. Look for discs specifically labeled "para horno" (for oven) if you plan to bake, as they tend to be less oily and have a texture better suited for baking than frying discs.
While you could in a pinch, pie crust isn't ideal for empanadas. Pie crusts are typically much flakier and more delicate, making them prone to tearing and leaking when filled and handled. Our empanada dough is designed to be tender yet sturdy, perfect for holding that delicious filling.
Yes, you can! To fry, heat about 2-3 inches of vegetable oil in a deep pot or skillet to 350°F (175°C). Fry the empanadas in batches for 3-5 minutes per side, or until deeply golden brown and cooked through. Drain on a wire rack set over paper towels.
Our recipe is designed to be mildly seasoned, focusing on savory depth rather than heat. If you prefer a milder flavor, you can reduce or omit the chili powder. For a spicier kick, add an extra pinch of chili powder, a dash of cayenne pepper, or a pinch of hot smoked paprika to the beef filling.
Yes, these mini beef empanadas are perfect for making ahead! You can prepare the filling and dough up to 2 days in advance, or even assemble the empanadas and chill them on a baking sheet for up to 24 hours before baking. For longer storage, they freeze beautifully (see the Make-Ahead & Storage section above).
Argentinian empanadas are incredibly versatile! They make fantastic appetizers for parties or game days (especially mini beef empanadas), but 2-3 larger empanadas can easily serve as a satisfying main dish when paired with a simple green salad or a side of chimichurri.
Recommended Kitchen Tools
Time-Saving Tools & Ingredients Problem: You're excited to make authentic argentine empanadas, but the thought of rolling out perfect, uniform dough discs feels daunting and time-consuming. Agitate: Inconsistent dough thickness can lead to some empanadas baking perfectly while others are either too thick and doughy or too thin and prone to tearing and leaking that delicious beef filling.
good quality rolling pin with thickness guides
Problem: You're excited to make authentic argentine empanadas, but the thought of rolling out perfect, uniform dough discs feels daunting and time-consuming. Agitate: Inconsistent dough thickness can lead to some empanadas baking perfectly while others are either too thick and doughy or too thin and prone to tearing and leaking that delicious beef filling. Solution: A good quality rolling pin with thickness guides can be a game-changer. These guides ensure your dough is rolled to an even thickness every time, making the process faster, less stressful, and guaranteeing consistently perfect empanada shells.
round pastry cutter set
Problem: Manually cutting dozens of empanada circles can be tedious, leading to uneven sizes and a less polished look for your party-perfect pastries. Agitate: Irregularly sized discs make filling and sealing a challenge, increasing the risk of leaks and making your beautiful baked beef empanadas look homemade in a not-so-charming way. Solution: Invest in a round pastry cutter set or even a simple, sharp-edged drinking glass of the right diameter. This speeds up the cutting process and ensures all your empanada wrappers are uniform, making assembly a breeze.
store-bought empanada discs
Problem: You're craving homemade argentine empanadas but simply don't have the time or energy to make the dough from scratch. Agitate: The dough-making process, while rewarding, adds significant time to the recipe, potentially pushing your empanada dreams to another day. Solution: Don't hesitate to use store-bought empanada discs! Look for brands specifically labeled "para horno" (for oven) if you're baking, or "para freir" (for frying) if you prefer. They come pre-cut and ready to fill, saving you a ton of time without sacrificing flavor, making frozen empanadas a quick reality.
Calories per Ingredient
Click any ingredient for detailed nutritional information:
20-25g
protein
Present
iron
Present
zinc
Present
fat
Nutritional Benefits:
Essential for muscle growth and repair, supports immune function, and aids in oxygen transport throughout the body
40kcal per 100g
calories
Good
vitamin C
Present
b6
Rich
fiber
Nutritional Benefits:
Contains antioxidants (quercetin) that may reduce inflammation, supports gut health, and contributes to immune function
Low
calories
Present
manganese
Present
vitamin B6
Present
vitamin C
Present
selenium
Nutritional Benefits:
Known for its immune-boosting properties, may help reduce blood pressure and cholesterol, and possesses potent antioxidant compounds
High
vitamin C
Present
vitamin A
31kcal per 100g
calories
Nutritional Benefits:
Powerful antioxidant, supports vision health, and contributes to collagen production and immune system strength
Low
calories
Rich
vitamin A
Present
iron
Nutritional Benefits:
Antioxidant properties, may support eye health and contribute to red blood cell formationAdds a depth of flavor without significant caloric impact
Low
calories
Good
iron
Present
manganese
Present
fiber
Nutritional Benefits:
Aids digestion, has antioxidant properties, and may help improve blood sugar control
Present
fat
Present
vitamin E
High
iron
Nutritional Benefits:
Provides antioxidants, supports heart health, and contributes to bone health
6g
protein
Present
vitamin D
Present
b12
Present
selenium
78kcal
choline. per large egg.
Nutritional Benefits:
Supports muscle and tissue repair, crucial for brain development and function, and contributes to bone health
76g per 100g
carbohydrates
10g per 100g
protein
Present
iron
Nutritional Benefits:
Provides energy for daily activitiesEnriched flours contribute essential nutrients like iron and B vitamins
High
fat
Present
vitamins
Present
d
Present
e
102kcal
k2. per tablespoon.
Nutritional Benefits:
Provides fat-soluble vitamins essential for various bodily functions, including vision and bone healthAdds richness and flavor to the dough
Good
calcium
Present
vitamin D
8g per cup
protein
150kcal per cup
fat
Nutritional Benefits:
Essential for strong bones and teeth, supports muscle function, and provides a good source of energy
Hey there! I’m just someone who seriously loves good food and believes that cooking doesn’t have to be complicated to be amazing. Whether it’s a quick weeknight dinner or a cozy weekend meal, I’m all about sharing easy, tasty recipes that actually work.