
Bangladesh Kacchi Chicken Biryani Dish – Make It Today
Bangladesh Kacchi Chicken Biryani Dish – Make It Today


- Serves: 6 People
- Prepare Time: 45 minutes
- Cooking Time: 1 hour 15 m
- Calories: -
- Difficulty: Medium
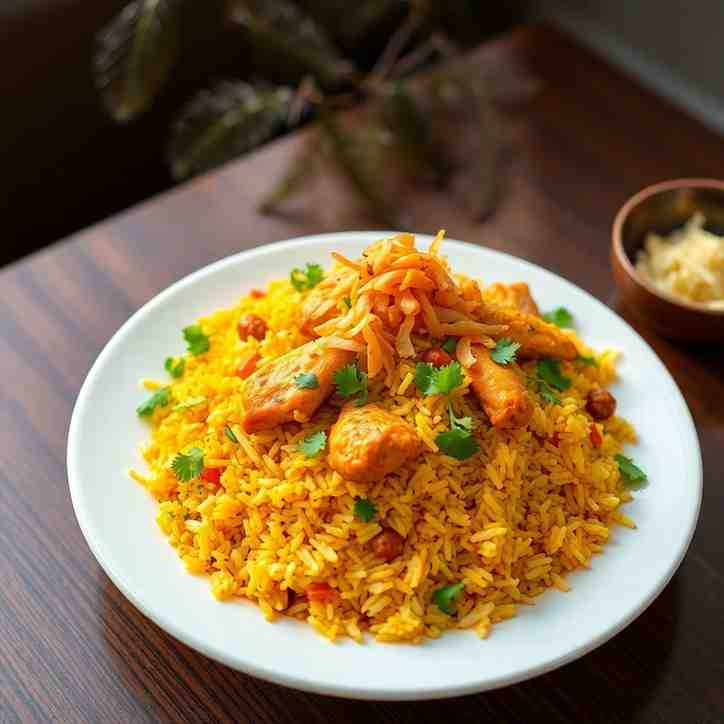
Ever dreamt of creating that legendary, fragrant chicken biryani dish right in your own kitchen? Get ready to dive into the rich culinary heritage of Bangladesh with our definitive guide to an authentic Bangladesh Kacchi Biryani recipe. This isn't just any biryani food recipe; Kacchi Biryani (meaning "raw" biryani) is a masterpiece where raw marinated meat and uncooked basmati rice are layered and slow-cooked together in a sealed pot, allowing the flavors to meld into an incredibly aromatic and tender feast. It's a true celebration of meat and rice recipes, a testament to the art of slow cooking, and a dish that promises a symphony of flavors in every bite.
Many struggle with achieving that perfect balance – fluffy, separate rice grains, tender meat, and a burst of aromatic biryani spices mix. This guide is designed to empower you, whether you're a beginner eager to cook Indian food at home or an experienced cook looking to perfect your technique. We'll demystify the process, from selecting the right recipe using basmati rice to mastering the art of layering and "dum" cooking. Prepare to impress your family and friends with a chicken biryani recipe that tastes like it came straight from a Bangladeshi wedding feast!
Ingredients
Directions
- Prepare the Chicken Marinade (The Foundation of Flavor)
- In a large bowl, combine the chicken pieces with yogurt, ginger garlic paste, red chili garlic paste, red chili powder, turmeric, garam masala, cumin, coriander, black pepper, and salt.
- Add lemon juice, mustard oil, chopped mint, and coriander leaves.
- Mix everything thoroughly, ensuring each piece of chicken is well coated.
- Cover the bowl and refrigerate for a minimum of 2 hours, or ideally 4-6 hours, or even overnight for the best flavor penetration. This long marination is key to the tenderness and taste of your chicken biryani dish.
- Prepare the Rice (The Secret to Fluffy Grains)
- Rinse the basmati rice thoroughly under cold running water until the water runs clear. This removes excess starch and prevents stickiness.
- Soak the rinsed rice in fresh water for at least 30 minutes, but no more than 45 minutes. Soaking helps the grains elongate and cook evenly.
- While the chicken marinates, bring a large pot (your best pot for cooking rice) of 2.5 liters water to a rolling boil. Add 10g salt, white vinegar, bay leaves, green cardamom, cinnamon sticks, and cloves.
- Drain the soaked rice. Once the water is boiling vigorously, add the drained rice. Cook the rice until it is about 60-70% done – the grains should be pliable but still have a slight bite (al dente). This usually takes 5-7 minutes. Overcooking here will lead to mushy biryani.
- Immediately drain the rice through a colander. Gently spread it out on a large tray or plate to stop further cooking and allow excess steam to escape. This is crucial for separate, fluffy grains.
- Fry Onions and Potatoes (Essential Textures and Flavors)
- Heat enough oil in a pan for deep frying. Slice the onion thinly. Fry the onions in batches until they are deeply golden brown and crispy. Remove with a slotted spoon and drain on paper towels. These are your fried onions.
- In the same oil, fry the peeled and quartered potatoes until they are golden brown and par-cooked. Remove and drain.
- Assemble the Biryani (The Art of Layering)
- Choose a heavy-bottomed pot or a large rice cooking pan with a tight-fitting lid (a Dutch oven works perfectly for cooking with meat).
- Spread about 2 tablespoons of melted ghee at the bottom of the pot.
- Carefully arrange the marinated chicken in a single layer at the bottom of the pot. This is the "kacchi" or raw layer.
- Sprinkle about half of the fried onions and half of the fried potatoes over the chicken. Add a few chopped mint and coriander leaves.
- Gently layer the partially cooked basmati rice over the chicken and potato mixture. Don't press it down.
- Drizzle the remaining melted ghee evenly over the rice.
- Pour the saffron milk, rose water cooking essence, and kewra water over the rice.
- Scatter the remaining fried onions and fried potatoes, green chilies (if using), and remaining fresh mint and coriander leaves on top.
- "Dum" Cooking (The Magic Happens Here)
- Seal the pot: Traditionally, a dough made from flour and water is used to seal the lid to the pot, creating an airtight environment. This traps the steam and allows the biryani to cook in its own juices. If you don't want to use dough, ensure your lid is very tight-fitting, perhaps with a heavy weight on top.
- Place the sealed pot on high heat for the first 5-7 minutes. This builds up steam quickly.
- Reduce the heat to the lowest setting. If you have a diffuser or a tawa (griddle), place it under the pot to prevent burning the bottom.
- Cook on low heat for 50-60 minutes. Do NOT open the lid during this time – the "dum" process is crucial.
- After the cooking time, turn off the heat and let the biryani rest, still sealed, for another 15-20 minutes. This allows the flavors to settle and the rice to finish steaming.
- strong>Serve Your Masterpiece!
- Carefully open the lid. The aroma will be incredible!
- Using a large, flat spoon or spatula, gently fluff and mix the biryani from the sides, ensuring you get some chicken from the bottom with the rice. Avoid vigorous stirring, which can break the rice grains.
- Serve hot with raita (yogurt dip), salad, or a simple shami kebab. Enjoy your authentic chicken biryani dish!
Bangladesh Kacchi Chicken Biryani Dish – Make It Today
- Serves: 6 People
- Prepare Time: 45 minutes
- Cooking Time: 1 hour 15 m
- Calories: -
- Difficulty: Medium
Ever dreamt of creating that legendary, fragrant chicken biryani dish right in your own kitchen? Get ready to dive into the rich culinary heritage of Bangladesh with our definitive guide to an authentic Bangladesh Kacchi Biryani recipe. This isn't just any biryani food recipe; Kacchi Biryani (meaning "raw" biryani) is a masterpiece where raw marinated meat and uncooked basmati rice are layered and slow-cooked together in a sealed pot, allowing the flavors to meld into an incredibly aromatic and tender feast. It's a true celebration of meat and rice recipes, a testament to the art of slow cooking, and a dish that promises a symphony of flavors in every bite.
Many struggle with achieving that perfect balance – fluffy, separate rice grains, tender meat, and a burst of aromatic biryani spices mix. This guide is designed to empower you, whether you're a beginner eager to cook Indian food at home or an experienced cook looking to perfect your technique. We'll demystify the process, from selecting the right recipe using basmati rice to mastering the art of layering and "dum" cooking. Prepare to impress your family and friends with a chicken biryani recipe that tastes like it came straight from a Bangladeshi wedding feast!
Ingredients
Directions
- Prepare the Chicken Marinade (The Foundation of Flavor)
- In a large bowl, combine the chicken pieces with yogurt, ginger garlic paste, red chili garlic paste, red chili powder, turmeric, garam masala, cumin, coriander, black pepper, and salt.
- Add lemon juice, mustard oil, chopped mint, and coriander leaves.
- Mix everything thoroughly, ensuring each piece of chicken is well coated.
- Cover the bowl and refrigerate for a minimum of 2 hours, or ideally 4-6 hours, or even overnight for the best flavor penetration. This long marination is key to the tenderness and taste of your chicken biryani dish.
- Prepare the Rice (The Secret to Fluffy Grains)
- Rinse the basmati rice thoroughly under cold running water until the water runs clear. This removes excess starch and prevents stickiness.
- Soak the rinsed rice in fresh water for at least 30 minutes, but no more than 45 minutes. Soaking helps the grains elongate and cook evenly.
- While the chicken marinates, bring a large pot (your best pot for cooking rice) of 2.5 liters water to a rolling boil. Add 10g salt, white vinegar, bay leaves, green cardamom, cinnamon sticks, and cloves.
- Drain the soaked rice. Once the water is boiling vigorously, add the drained rice. Cook the rice until it is about 60-70% done – the grains should be pliable but still have a slight bite (al dente). This usually takes 5-7 minutes. Overcooking here will lead to mushy biryani.
- Immediately drain the rice through a colander. Gently spread it out on a large tray or plate to stop further cooking and allow excess steam to escape. This is crucial for separate, fluffy grains.
- Fry Onions and Potatoes (Essential Textures and Flavors)
- Heat enough oil in a pan for deep frying. Slice the onion thinly. Fry the onions in batches until they are deeply golden brown and crispy. Remove with a slotted spoon and drain on paper towels. These are your fried onions.
- In the same oil, fry the peeled and quartered potatoes until they are golden brown and par-cooked. Remove and drain.
- Assemble the Biryani (The Art of Layering)
- Choose a heavy-bottomed pot or a large rice cooking pan with a tight-fitting lid (a Dutch oven works perfectly for cooking with meat).
- Spread about 2 tablespoons of melted ghee at the bottom of the pot.
- Carefully arrange the marinated chicken in a single layer at the bottom of the pot. This is the "kacchi" or raw layer.
- Sprinkle about half of the fried onions and half of the fried potatoes over the chicken. Add a few chopped mint and coriander leaves.
- Gently layer the partially cooked basmati rice over the chicken and potato mixture. Don't press it down.
- Drizzle the remaining melted ghee evenly over the rice.
- Pour the saffron milk, rose water cooking essence, and kewra water over the rice.
- Scatter the remaining fried onions and fried potatoes, green chilies (if using), and remaining fresh mint and coriander leaves on top.
- "Dum" Cooking (The Magic Happens Here)
- Seal the pot: Traditionally, a dough made from flour and water is used to seal the lid to the pot, creating an airtight environment. This traps the steam and allows the biryani to cook in its own juices. If you don't want to use dough, ensure your lid is very tight-fitting, perhaps with a heavy weight on top.
- Place the sealed pot on high heat for the first 5-7 minutes. This builds up steam quickly.
- Reduce the heat to the lowest setting. If you have a diffuser or a tawa (griddle), place it under the pot to prevent burning the bottom.
- Cook on low heat for 50-60 minutes. Do NOT open the lid during this time – the "dum" process is crucial.
- After the cooking time, turn off the heat and let the biryani rest, still sealed, for another 15-20 minutes. This allows the flavors to settle and the rice to finish steaming.
- strong>Serve Your Masterpiece!
- Carefully open the lid. The aroma will be incredible!
- Using a large, flat spoon or spatula, gently fluff and mix the biryani from the sides, ensuring you get some chicken from the bottom with the rice. Avoid vigorous stirring, which can break the rice grains.
- Serve hot with raita (yogurt dip), salad, or a simple shami kebab. Enjoy your authentic chicken biryani dish!
The following nutritional values are per serving (one piece of cake) Calories ~550-650 kcal Carbohydrates ~60-70g Protein ~35-45g Fat ~20-30g Time-Saving Tools & Ingredients Making Kacchi Biryani from scratch can seem like a big task, but with a few smart tools and ingredient choices, you can cut down on prep time without cutting corners on flavor. Here’s how to make your biryani journey smoother: Problem: Achieving that perfectly cooked, aromatic biryani with distinct layers requires consistent, even heat. Using a thin or flimsy pot can lead to hot spots, burning the bottom layer of rice and meat while leaving the top undercooked. Problem: Preparing the essential ginger-garlic paste and finely slicing mountains of onions for frying can be incredibly time-consuming and tiring for your hands. Problem: While fresh is always king, sometimes you just don't have the time or energy to peel and process ginger and garlic from scratch. Problem: Getting those super thin, consistent onion slices for perfectly crispy fried onions is notoriously difficult and time-consuming with just a knife. Click any ingredient for detailed nutritional information:Recipe Nutritional Values
Additional Information
Recipe Success Tips
Recipe Tips
Frequently Asked Questions
Recommended Kitchen Tools
Heavy-Bottomed Pot or Dutch Oven
Agitate: Imagine all your hard work going up in smoke (literally!) because the bottom of your biryani is scorched, or the rice is unevenly cooked. It's frustrating and can ruin the whole dish.
Solution: A good quality, heavy-bottomed pot or Dutch oven (like a Le Creuset or Lodge) is your best friend. Its superior heat distribution prevents burning and creates the ideal environment for "dum" cooking, ensuring every grain of rice and piece of chicken is perfectly infused with flavor.Food Processor
Agitate: Spending what feels like an eternity chopping and mincing by hand can make a fun cooking project feel like a chore before you even get to the good part. Plus, unevenly chopped ingredients cook inconsistently.
Solution: A food processor is a true kitchen hero here! It can whip up smooth ginger-garlic paste in seconds and quickly slice onions to a uniform thickness, saving you a ton of prep time and ensuring everything cooks evenly.Pre-Made Ginger-Garlic Paste
Agitate: You're craving biryani, but the thought of another prep step, especially when you're short on time, might make you reconsider. Compromising on this key paste can impact the biryani's foundational flavor.
Solution: Don't feel guilty about using a good quality, store-bought ginger-garlic paste! Many brands offer excellent, fresh-tasting options that can significantly cut down on your prep work without sacrificing too much of that authentic Kacchi Biryani flavor.Mandoline Slicer
Agitate: Unevenly sliced onions lead to some burning while others remain soft, missing that crucial texture and flavor that fried onions bring to biryani. It’s a small detail that makes a big difference.
Solution: A mandoline slicer makes quick work of achieving uniformly thin onion slices. This consistency ensures your onions fry up beautifully and evenly, giving you that golden, crispy garnish that elevates your biryani to the next level.Calories per Ingredient
You may also like


Hey there! I’m just someone who seriously loves good food and believes that cooking doesn’t have to be complicated to be amazing. Whether it’s a quick weeknight dinner or a cozy weekend meal, I’m all about sharing easy, tasty recipes that actually work.


