
Easy Beef & Rice Stuffed Bell Peppers Oven-Baked Classic
Easy Beef & Rice Stuffed Bell Peppers Oven-Baked Classic
- Serves: 6 People
- Prepare Time: 25 minutes
- Cooking Time: 55 minutes
- Calories: -
- Difficulty: Easy
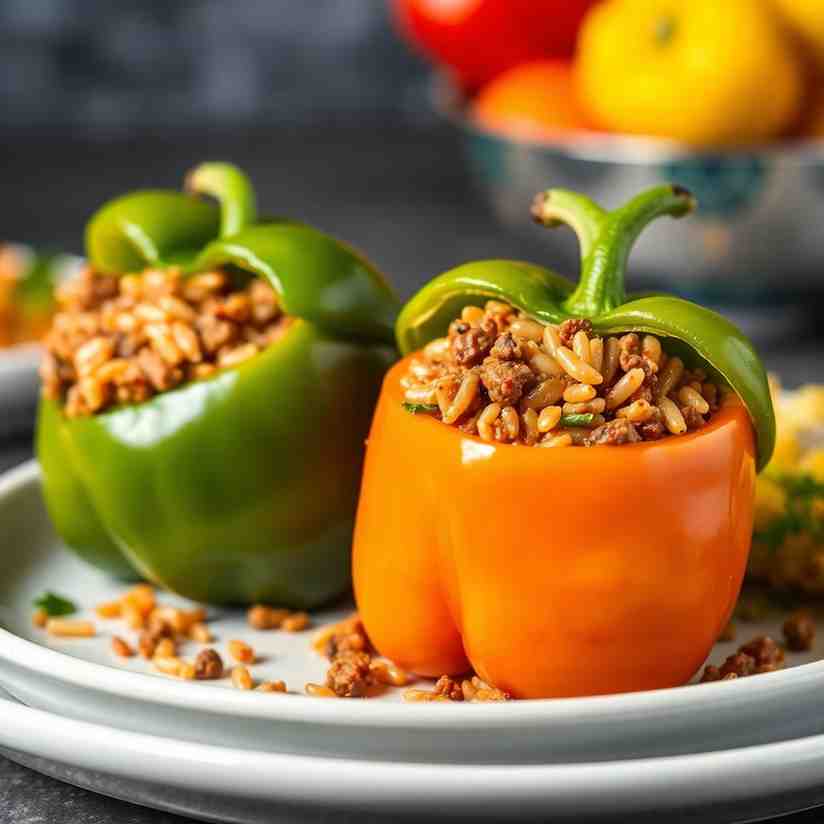
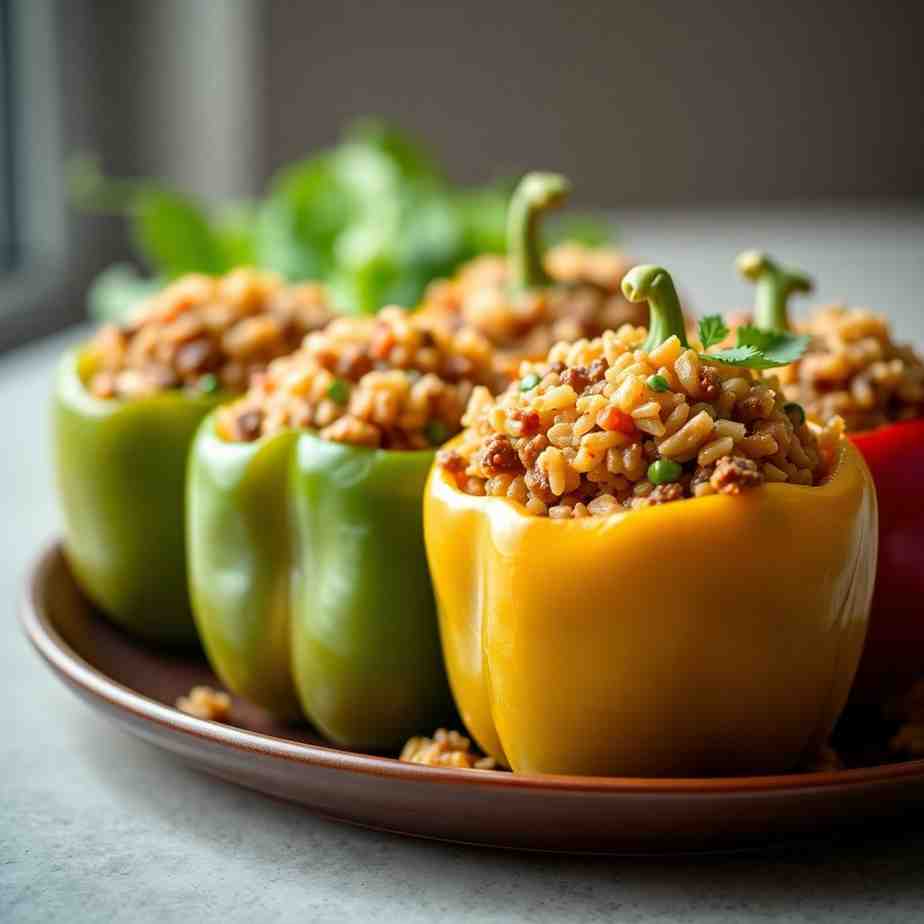
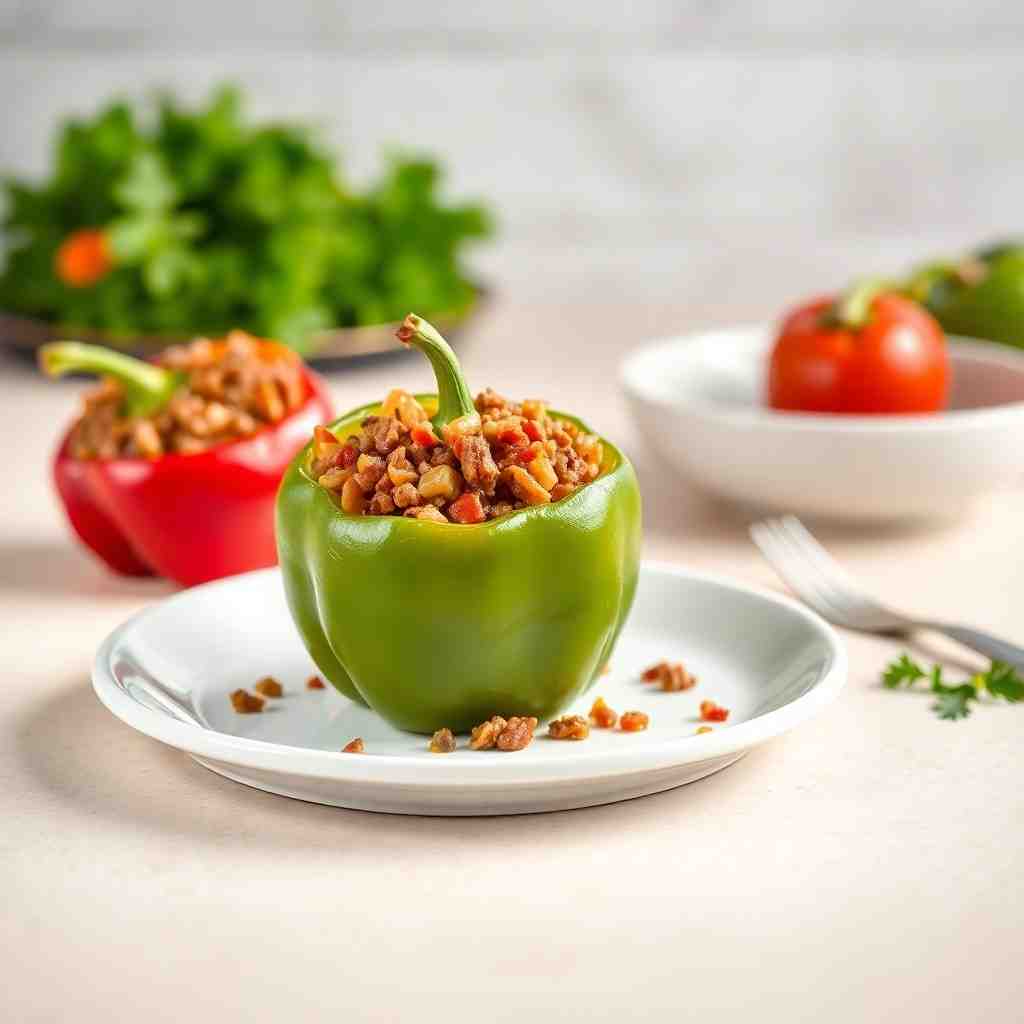
Welcome to the ultimate guide for making delicious stuffed bell peppers! If you're searching for a comforting, family-friendly meal that's both satisfying and surprisingly easy, you've hit the jackpot. Our classic beef and rice stuffed peppers with rice recipe combines seasoned ground beef, fluffy white rice, and a savory tomato sauce, all baked inside tender bell peppers until bubbling and topped with melty cheese. This isn't just another recipe; it's your new go-to for perfect baked bell peppers stuffed every time.
What makes this version stand out? We're diving deep into the "why" behind each step, offering clear, concise instructions that cut through common cooking frustrations. You'll get smart safety cues, clever troubleshooting tips, and a comprehensive guide that ensures your stuffed red bell peppers (or green, or yellow!) are always a triumph. Whether you're a beginner or an experienced home cook looking for a reliable classic, these stuffed bell peppers are designed to be foolproof. They're easy to make, reheat beautifully, and even freeze like a dream, making them perfect for meal prep. Ready to create a dish that'll have everyone asking for seconds? Let's get cooking!
Ingredients
Directions
- Prep the Peppers
- Wash and thoroughly dry your bell peppers.
- Carefully cut off the tops of each pepper, then use a spoon or your hands to remove the seeds and white ribs from the inside.
- Trim a tiny slice off the bottom of each pepper, if needed, so they stand upright firmly in your baking dish. This prevents them from toppling over and spilling their delicious filling!
- Lightly brush the inside and outside of the prepped peppers with olive oil, then sprinkle with salt and pepper.
- Arrange the peppers cut-side up in a 9x13-inch baking dish. Pour about ½ inch of water into the bottom of the dish.
- Pre-bake the peppers in an oven preheated to 375°F (190°C) for 15-20 minutes. This softens them slightly, ensuring they're tender when the filling is cooked and preventing a crunchy pepper casing.
- Cook the Rice (or Use Leftovers)
If using leftover rice: Briefly reheat it in the microwave or on the stovetop with a splash of water, breaking up any clumps so it mixes evenly into the filling.
If cooking fresh rice: Prepare 1 cup of white rice according to package directions (typically 1 cup rice to 2 cups water). Once cooked, fluff with a fork.
For brown rice: If you prefer brown rice, prepare it as usual (it will require longer cooking and a touch more liquid than white rice). Just ensure it's fully cooked before adding to the filling. - Make the Beef & Rice Filling
- In a large skillet, brown the ground beef over medium-high heat, breaking it up with a spoon as it cooks. Season lightly with a pinch of salt and pepper.
- Once the beef is fully browned, drain off any excess fat.
- Add the diced onion and minced garlic to the skillet with the beef. Cook for 5-7 minutes, or until the onion is soft and translucent.
- Stir in the diced tomatoes (with their liquid), tomato paste, Italian seasoning, and Worcestershire sauce (if using). Bring the mixture to a gentle simmer
- Reduce the heat to low and let it simmer for 5-7 minutes, allowing some of the liquid to reduce and the flavors to meld. The filling should be thick and scoopable, not soupy – if it looks watery, simmer a few extra minutes.
- Remove the skillet from the heat. Stir in the cooked rice and half of the shredded Monterey Jack cheese until well combined.
- Taste the filling and adjust salt and pepper as needed.
- Stuff the Peppers
- Remove the par-baked peppers from the oven (carefully drain any water if it accumulated inside the peppers).
- Arrange the peppers snugly in your 9x13-inch baking dish.
- Spoon the beef and rice filling firmly into each pepper, mounding it slightly at the top but not so high that it spills over.
- Add a splash of broth or water (about ½ cup total) to the bottom of the baking pan. This creates a steamy environment, keeping the pepper bottoms from drying out and helping them cook evenly.
- Bake, Melt & Brown
- Cover the baking dish tightly with aluminum foil.
- Bake in the preheated 375°F (190°C) oven for 30 minutes.
- Remove the foil. Sprinkle the remaining shredded Monterey Jack cheese generously over the top of each stuffed bell pepper.
- Return the dish to the oven, uncovered, and bake for another 15-20 minutes, or until the peppers are fork-tender and the cheese is melted and lightly golden brown.
- For an extra-browned, bubbly cheese topping, you can briefly broil the peppers for 1-2 minutes at the end, watching carefully to prevent burning.
- Rest, Garnish & Serve
- Once baked, remove the stuffed peppers from the oven and let them rest for 5-10 minutes. This allows the filling to settle, makes them easier to handle, and prevents accidental burns from super-hot filling.
- Garnish with fresh chopped parsley just before serving.
- Suggest serving portions of 1-2 halves per adult, depending on appetite and what sides you're offering.
Easy Beef & Rice Stuffed Bell Peppers Oven-Baked Classic
- Serves: 6 People
- Prepare Time: 25 minutes
- Cooking Time: 55 minutes
- Calories: -
- Difficulty: Easy
Welcome to the ultimate guide for making delicious stuffed bell peppers! If you're searching for a comforting, family-friendly meal that's both satisfying and surprisingly easy, you've hit the jackpot. Our classic beef and rice stuffed peppers with rice recipe combines seasoned ground beef, fluffy white rice, and a savory tomato sauce, all baked inside tender bell peppers until bubbling and topped with melty cheese. This isn't just another recipe; it's your new go-to for perfect baked bell peppers stuffed every time.
What makes this version stand out? We're diving deep into the "why" behind each step, offering clear, concise instructions that cut through common cooking frustrations. You'll get smart safety cues, clever troubleshooting tips, and a comprehensive guide that ensures your stuffed red bell peppers (or green, or yellow!) are always a triumph. Whether you're a beginner or an experienced home cook looking for a reliable classic, these stuffed bell peppers are designed to be foolproof. They're easy to make, reheat beautifully, and even freeze like a dream, making them perfect for meal prep. Ready to create a dish that'll have everyone asking for seconds? Let's get cooking!
Ingredients
Directions
- Prep the Peppers
- Wash and thoroughly dry your bell peppers.
- Carefully cut off the tops of each pepper, then use a spoon or your hands to remove the seeds and white ribs from the inside.
- Trim a tiny slice off the bottom of each pepper, if needed, so they stand upright firmly in your baking dish. This prevents them from toppling over and spilling their delicious filling!
- Lightly brush the inside and outside of the prepped peppers with olive oil, then sprinkle with salt and pepper.
- Arrange the peppers cut-side up in a 9x13-inch baking dish. Pour about ½ inch of water into the bottom of the dish.
- Pre-bake the peppers in an oven preheated to 375°F (190°C) for 15-20 minutes. This softens them slightly, ensuring they're tender when the filling is cooked and preventing a crunchy pepper casing.
- Cook the Rice (or Use Leftovers)
If using leftover rice: Briefly reheat it in the microwave or on the stovetop with a splash of water, breaking up any clumps so it mixes evenly into the filling.
If cooking fresh rice: Prepare 1 cup of white rice according to package directions (typically 1 cup rice to 2 cups water). Once cooked, fluff with a fork.
For brown rice: If you prefer brown rice, prepare it as usual (it will require longer cooking and a touch more liquid than white rice). Just ensure it's fully cooked before adding to the filling. - Make the Beef & Rice Filling
- In a large skillet, brown the ground beef over medium-high heat, breaking it up with a spoon as it cooks. Season lightly with a pinch of salt and pepper.
- Once the beef is fully browned, drain off any excess fat.
- Add the diced onion and minced garlic to the skillet with the beef. Cook for 5-7 minutes, or until the onion is soft and translucent.
- Stir in the diced tomatoes (with their liquid), tomato paste, Italian seasoning, and Worcestershire sauce (if using). Bring the mixture to a gentle simmer
- Reduce the heat to low and let it simmer for 5-7 minutes, allowing some of the liquid to reduce and the flavors to meld. The filling should be thick and scoopable, not soupy – if it looks watery, simmer a few extra minutes.
- Remove the skillet from the heat. Stir in the cooked rice and half of the shredded Monterey Jack cheese until well combined.
- Taste the filling and adjust salt and pepper as needed.
- Stuff the Peppers
- Remove the par-baked peppers from the oven (carefully drain any water if it accumulated inside the peppers).
- Arrange the peppers snugly in your 9x13-inch baking dish.
- Spoon the beef and rice filling firmly into each pepper, mounding it slightly at the top but not so high that it spills over.
- Add a splash of broth or water (about ½ cup total) to the bottom of the baking pan. This creates a steamy environment, keeping the pepper bottoms from drying out and helping them cook evenly.
- Bake, Melt & Brown
- Cover the baking dish tightly with aluminum foil.
- Bake in the preheated 375°F (190°C) oven for 30 minutes.
- Remove the foil. Sprinkle the remaining shredded Monterey Jack cheese generously over the top of each stuffed bell pepper.
- Return the dish to the oven, uncovered, and bake for another 15-20 minutes, or until the peppers are fork-tender and the cheese is melted and lightly golden brown.
- For an extra-browned, bubbly cheese topping, you can briefly broil the peppers for 1-2 minutes at the end, watching carefully to prevent burning.
- Rest, Garnish & Serve
- Once baked, remove the stuffed peppers from the oven and let them rest for 5-10 minutes. This allows the filling to settle, makes them easier to handle, and prevents accidental burns from super-hot filling.
- Garnish with fresh chopped parsley just before serving.
- Suggest serving portions of 1-2 halves per adult, depending on appetite and what sides you're offering.
The following nutritional values are per serving (one piece of cake) Estimated Calories per serving (1 stuffed pepper half) 350-450 Estimated Carbohydrates per serving 30-40g Estimated Protein per serving 20-25g Estimated Fat per serving 15-20g Making delicious stuffed bell peppers doesn't have to be a huge time commitment! Here are a few tools and ingredient choices that can shave precious minutes off your prep and cook time, letting you get dinner on the table faster. Problem: Ever worry if your ground beef filling is fully cooked, or if the peppers are done but not mushy? Guessing internal temperatures can lead to undercooked meat (a food safety no-no!) or overcooked, dry results. Problem: Cooking rice from scratch adds an extra 20-30 minutes to your meal prep, plus another pot to wash. When you're busy, that can feel like a whole extra step you just don't have time for. Problem: Juggling multiple pans – one for browning beef, another for sautéing veggies, maybe a third for simmering sauce – can make your kitchen feel like a chaotic mess, and cleanup becomes a chore. Click any ingredient for detailed nutritional information:Recipe Nutritional Values
Additional Information
Recipe Success Tips
Ingredient Substitutions & Variations
Cultural Variations
Make-Ahead & Storage Instructions
Frequently Asked Questions
Recommended Kitchen Tools
Instant-Read Thermometer
Agitate: Without a thermometer, you're left crossing your fingers, potentially serving unsafe food or sacrificing the perfect texture you worked so hard for. This adds stress and uncertainty to your cooking.
Solution: An instant-read thermometer takes all the guesswork out. A quick poke into the center of your filling will confirm it's reached 165°F, ensuring your meal is perfectly cooked and safe every single time, giving you peace of mind and delicious results.Pre-Cooked or Leftover Rice
Agitate: This often means you either rush the rice, ending up with crunchy bits, or you push dinner back, leading to hungry family members asking "Is it ready yet?!"
Solution: If you've got leftover white rice from another meal, you're golden! Just a quick reheat or breaking up clumps, and it's ready to mix into your beef filling. This completely eliminates a cooking step, making your stuffed peppers come together super fast.Large Skillet with a Lid
Agitate: More pans mean more scrubbing, and the need to constantly monitor different components on the stove. This adds stress and takes away from the joy of cooking.
Solution: A single, large skillet (especially one with a lid) is your best friend here. You can brown your beef, sauté your aromatics, and simmer your tomato sauce all in one vessel. The lid helps the sauce reduce and flavors meld without splattering, streamlining your entire filling process and cutting down on dishes.Calories per Ingredient
You may also like


Hey there! I’m just someone who seriously loves good food and believes that cooking doesn’t have to be complicated to be amazing. Whether it’s a quick weeknight dinner or a cozy weekend meal, I’m all about sharing easy, tasty recipes that actually work.


