
Braised Beef Short Ribs Fall-Off-The-Bone Recipe
Braised Beef Short Ribs Fall-Off-The-Bone Recipe
- Serves: 6 People
- Prepare Time: 25 minutes
- Cooking Time: 3 hours 30
- Calories: -
- Difficulty: Medium
Welcome to the ultimate guide for making truly spectacular braised beef short ribs right in your own kitchen! Forget the fancy restaurant prices; we're talking about incredibly tender, fall-off-the-bone beef ribs smothered in a rich, savory red wine sauce that you can easily achieve in a simple Dutch oven. This isn't just another recipe; it's your ticket to a deeply flavorful, comforting meal that feels special without being overly complicated.
What makes this recipe stand out? It's a tried-and-true method that combines the magic of a good sear with a slow, gentle oven braise, finishing with a perfectly reduced sauce. We've designed this recipe for one primary method – the oven – because it consistently delivers the best flavor and texture, though we'll touch on other methods later for those who love their slow cooker or Instant Pot. Whether you're a busy home cook looking to impress or simply craving a truly satisfying dinner, this guide has you covered. You'll find a clear ingredients list, easy-to-follow cooking instructions, a peek at how different cooking methods compare, and even quick fixes if you hit a snag. Get ready to transform humble beef short ribs into a culinary masterpiece!
Ingredients
Directions
- Prep Your Ribs & Oven: Pat the beef short ribs thoroughly dry with paper towels; this is crucial for a good sear. Season them generously all over with salt and freshly ground black pepper. Lightly dredge the seasoned ribs in flour, shaking off any excess. This helps create a beautiful brown crust and slightly thickens the sauce later. Preheat your oven to 325°F (160°C).
- Sear the Ribs: Heat 1-2 tablespoons of olive oil in a large (5-7 quart) Dutch oven or heavy oven-safe pot over medium-high heat until shimmering. Working in batches to avoid crowding the pot, sear the short ribs on all sides until deeply browned, about 3-5 minutes per side. You're aiming for a rich, dark crust – don't rush this step, as it builds immense flavor. Remove the seared ribs to a plate and set aside.
- Build the Aromatics: Reduce the heat to medium. If using, add 2-3 slices of chopped pancetta or bacon to the pot and cook until crispy, then remove (leaving the fat). Add the chopped onion, carrots, and celery to the pot. Sauté, scraping up any browned bits from the bottom, until softened and lightly golden, about 8-10 minutes. Stir in the minced garlic and tomato paste, cooking for another 1-2 minutes until fragrant and the tomato paste has darkened slightly.
- Deglaze & Build Braising Liquid: Pour in the entire bottle of red wine, scraping the bottom of the pot vigorously with a wooden spoon to release all those flavorful browned bits (this is called deglazing!). Bring the wine to a simmer and let it reduce slightly, by about one-third, for 5-7 minutes. Add the beef broth, fresh thyme, rosemary, bay leaf (if using), and any optional Worcestershire or soy sauce. Taste the liquid and lightly season with a pinch of salt and pepper, keeping in mind it will reduce and concentrate later.
- Braise in the Oven: Carefully return the seared beef short ribs to the Dutch oven, nestling them into the liquid. They should be mostly submerged. Bring the liquid back to a gentle simmer on the stovetop. Cover the pot tightly with its lid and transfer it to your preheated oven. Braise for 3 to 3.5 hours, or until the beef short ribs are incredibly tender and practically falling off the bone. You can check them halfway through, but resist the urge to peek too often. The liquid should maintain a gentle, consistent simmer.
- Rest, Skim & Reduce Sauce: Once done, carefully remove the tender beef short ribs from the pot and place them on a clean plate or shallow dish. Cover loosely with foil to keep them warm. Skim any excess fat from the surface of the braising liquid using a spoon or ladle. For an even easier fat removal, you can quickly chill the pot in the fridge for 20-30 minutes; the fat will solidify on top, making it simple to lift off. Return the pot with the braising liquid to the stovetop over medium-high heat. Bring to a vigorous simmer and cook, uncovered, stirring occasionally, until the sauce has thickened, become glossy, and can coat the back of a spoon – this typically takes 10-20 minutes.
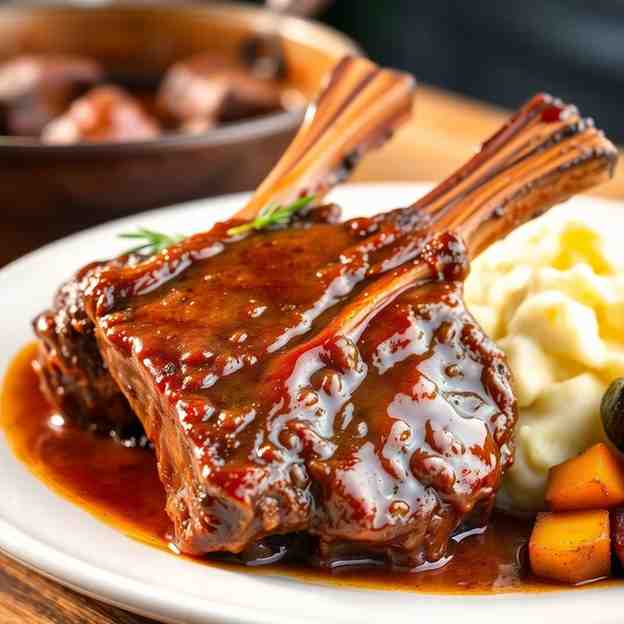
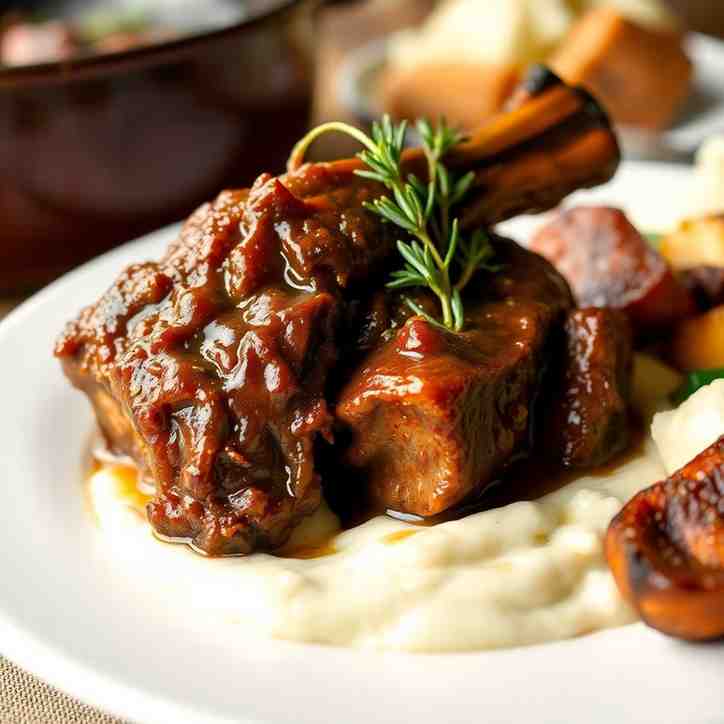
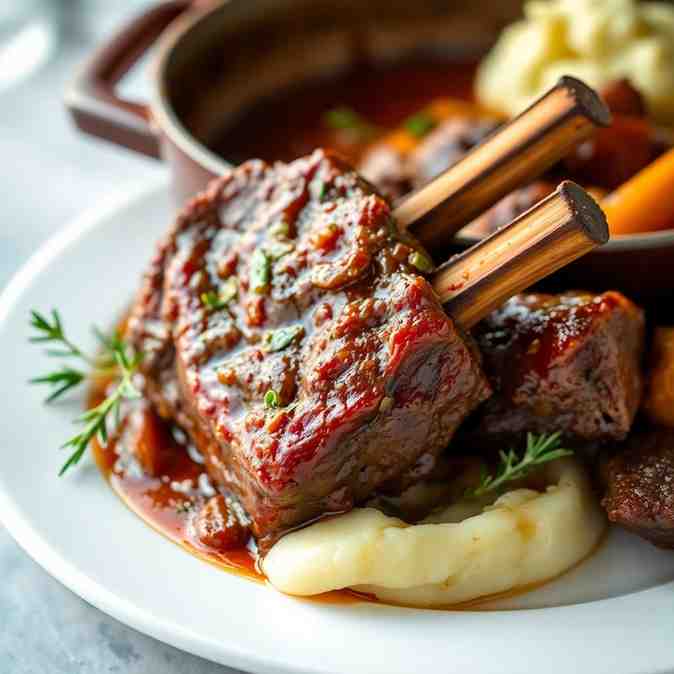
- Serve: Taste the reduced sauce and adjust seasoning as needed with salt and pepper. If it needs a touch more richness, swirl in the optional knob of butter. If it tastes a bit flat, a splash of red wine vinegar or lemon juice can brighten it up. Ladle the luscious sauce generously over the beef short ribs. Serve immediately over your favorite sides, perhaps with a sprinkle of fresh herbs or flaky sea salt for garnish. Enjoy your restaurant-quality meal!
Braised Beef Short Ribs Fall-Off-The-Bone Recipe
- Serves: 6 People
- Prepare Time: 25 minutes
- Cooking Time: 3 hours 30
- Calories: -
- Difficulty: Medium
Welcome to the ultimate guide for making truly spectacular braised beef short ribs right in your own kitchen! Forget the fancy restaurant prices; we're talking about incredibly tender, fall-off-the-bone beef ribs smothered in a rich, savory red wine sauce that you can easily achieve in a simple Dutch oven. This isn't just another recipe; it's your ticket to a deeply flavorful, comforting meal that feels special without being overly complicated.
What makes this recipe stand out? It's a tried-and-true method that combines the magic of a good sear with a slow, gentle oven braise, finishing with a perfectly reduced sauce. We've designed this recipe for one primary method – the oven – because it consistently delivers the best flavor and texture, though we'll touch on other methods later for those who love their slow cooker or Instant Pot. Whether you're a busy home cook looking to impress or simply craving a truly satisfying dinner, this guide has you covered. You'll find a clear ingredients list, easy-to-follow cooking instructions, a peek at how different cooking methods compare, and even quick fixes if you hit a snag. Get ready to transform humble beef short ribs into a culinary masterpiece!
Ingredients
Directions
- Prep Your Ribs & Oven: Pat the beef short ribs thoroughly dry with paper towels; this is crucial for a good sear. Season them generously all over with salt and freshly ground black pepper. Lightly dredge the seasoned ribs in flour, shaking off any excess. This helps create a beautiful brown crust and slightly thickens the sauce later. Preheat your oven to 325°F (160°C).
- Sear the Ribs: Heat 1-2 tablespoons of olive oil in a large (5-7 quart) Dutch oven or heavy oven-safe pot over medium-high heat until shimmering. Working in batches to avoid crowding the pot, sear the short ribs on all sides until deeply browned, about 3-5 minutes per side. You're aiming for a rich, dark crust – don't rush this step, as it builds immense flavor. Remove the seared ribs to a plate and set aside.
- Build the Aromatics: Reduce the heat to medium. If using, add 2-3 slices of chopped pancetta or bacon to the pot and cook until crispy, then remove (leaving the fat). Add the chopped onion, carrots, and celery to the pot. Sauté, scraping up any browned bits from the bottom, until softened and lightly golden, about 8-10 minutes. Stir in the minced garlic and tomato paste, cooking for another 1-2 minutes until fragrant and the tomato paste has darkened slightly.
- Deglaze & Build Braising Liquid: Pour in the entire bottle of red wine, scraping the bottom of the pot vigorously with a wooden spoon to release all those flavorful browned bits (this is called deglazing!). Bring the wine to a simmer and let it reduce slightly, by about one-third, for 5-7 minutes. Add the beef broth, fresh thyme, rosemary, bay leaf (if using), and any optional Worcestershire or soy sauce. Taste the liquid and lightly season with a pinch of salt and pepper, keeping in mind it will reduce and concentrate later.
- Braise in the Oven: Carefully return the seared beef short ribs to the Dutch oven, nestling them into the liquid. They should be mostly submerged. Bring the liquid back to a gentle simmer on the stovetop. Cover the pot tightly with its lid and transfer it to your preheated oven. Braise for 3 to 3.5 hours, or until the beef short ribs are incredibly tender and practically falling off the bone. You can check them halfway through, but resist the urge to peek too often. The liquid should maintain a gentle, consistent simmer.
- Rest, Skim & Reduce Sauce: Once done, carefully remove the tender beef short ribs from the pot and place them on a clean plate or shallow dish. Cover loosely with foil to keep them warm. Skim any excess fat from the surface of the braising liquid using a spoon or ladle. For an even easier fat removal, you can quickly chill the pot in the fridge for 20-30 minutes; the fat will solidify on top, making it simple to lift off. Return the pot with the braising liquid to the stovetop over medium-high heat. Bring to a vigorous simmer and cook, uncovered, stirring occasionally, until the sauce has thickened, become glossy, and can coat the back of a spoon – this typically takes 10-20 minutes.
- Serve: Taste the reduced sauce and adjust seasoning as needed with salt and pepper. If it needs a touch more richness, swirl in the optional knob of butter. If it tastes a bit flat, a splash of red wine vinegar or lemon juice can brighten it up. Ladle the luscious sauce generously over the beef short ribs. Serve immediately over your favorite sides, perhaps with a sprinkle of fresh herbs or flaky sea salt for garnish. Enjoy your restaurant-quality meal!
The following nutritional values are per serving (one piece of cake) Calories ~550-650 kcal Protein ~45-55g Fat ~35-45g Carbohydrates ~10-15g Ever wish you could whip up a gourmet meal without spending all day in the kitchen? While our braised beef short ribs recipe is designed to be manageable, a few smart tools and ingredient choices can shave off precious minutes and make the process even smoother. Here are some of our favorites: Problem: Searing beef short ribs perfectly requires a pan that holds heat like a champ and can go straight into the oven. Problem: After hours of slow braising, your sauce is rich and delicious, but often has a layer of rendered fat on top that you want to remove. Problem: Chopping all those aromatics (onions, carrots, celery, garlic) can feel like a chore, especially after a long day. Problem: Making beef broth from scratch is a labor of love, but you might not always have the time or ingredients. Click any ingredient for detailed nutritional information:Recipe Nutritional Values
Additional Information
Recipe Success Tips
Doneness & Troubleshooting Your Braised Beef Short Ribs
Method Comparison: Oven vs. Slow Cooker vs. Instant Pot
Ingredient Substitutions & Variations
Braised beef short ribs are one of those magical dishes that often taste even better the next day!
Frequently Asked Questions
Recommended Kitchen Tools
Time-Saving Tools & Ingredients
Agitate: Using a flimsy pan means uneven browning, less flavor development, and an extra dish to wash if you have to transfer everything. Nobody wants that!
Solution: A Dutch oven is your best friend here! Its heavy-duty construction ensures even heat distribution for that deep, flavorful sear, and it transitions seamlessly from stovetop to oven. It’s a true one-pot wonder for this kind of cooking.Time-Saving Tools & Ingredients
Agitate: Skimming fat with a spoon can be tedious, messy, and you often end up taking too much of the precious sauce with it.
Solution: A fat-separating jug makes quick work of this! Simply pour your braising liquid in, and the fat rises to the top, allowing you to pour off the pure, flavorful sauce from the bottom. Easy peasy!Time-Saving Tools & Ingredients
Agitate: Those precious minutes spent prepping vegetables add up, delaying the start of your delicious meal.
Solution: Many grocery stores offer pre-chopped mirepoix (that's the fancy name for onion, carrot, and celery combo!) and even pre-minced garlic. It's a fantastic shortcut that lets you jump straight into the cooking process.Time-Saving Tools & Ingredients
Agitate: Using a low-quality broth can make your sauce taste flat and less robust, undermining all your hard work.
Solution: Invest in a high-quality, low-sodium beef broth. It provides a deep, savory base for your braising liquid without adding excessive salt, and it saves you hours of simmering bones.Calories per Ingredient
You may also like


Hey there! I’m just someone who seriously loves good food and believes that cooking doesn’t have to be complicated to be amazing. Whether it’s a quick weeknight dinner or a cozy weekend meal, I’m all about sharing easy, tasty recipes that actually work.


