
Classic Cheese Ball Recipe
Classic Cheese Ball Recipe
- Serves: 20 People
- Prepare Time: 20 minutes
- Cooking Time: 0 minutes
- Calories: -
- Difficulty: Easy
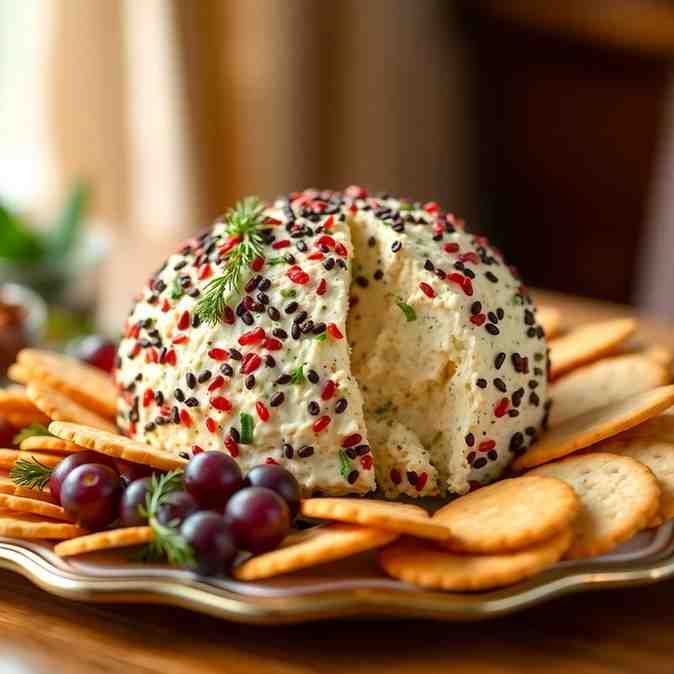
Looking for that perfect, no-fail party appetizer that always disappears first? You’ve found it! Our classic cheese ball recipe is a retro delight that still reigns supreme at any gathering, from casual get-togethers to festive holiday feasts. Forget complicated dishes; this easy cheese ball recipe is your secret weapon for crowd-pleasing flavor, offering a creamy inside, a satisfyingly crunchy coating, and a whole lot of savory goodness. It's a make-ahead marvel that saves you stress, leaving you more time to enjoy your guests. If you’ve never rolled a cheese ball before, don’t worry — I’ll show you exactly what it should look and feel like at every step, ensuring your homemade cheese ball is a guaranteed success!
Ingredients
Directions
- Soften the Cream Cheese Properly: Take your cream cheese blocks out of the fridge at least 1-2 hours before you start, allowing them to soften completely at room temperature. It should be soft to the touch, without any hard core in the middle. If you're short on time, you can microwave it in 10-15 second bursts, but be careful not to melt it! It needs to be soft enough to beat smooth.
- Mix Everything Until Smooth & Spreadable: In a medium mixing bowl, use a sturdy spoon or a hand mixer to beat the softened cream cheese until it's completely smooth and creamy. Next, add the freshly grated sharp cheddar, chopped green onions, Worcestershire sauce, optional hot sauce, dried parsley, garlic powder, and black pepper. Stir or beat until all ingredients are evenly combined. The mixture should be thick but easily spreadable, with no pockets of plain cream cheese.
- Shape It Into a Ball (Without Making a Huge Mess): Scrape the entire cheese mixture into the center of a large sheet of plastic wrap. Gather the edges of the plastic wrap around the mixture and twist them tightly at the top to form a compact, round ball. For extra help with shaping, you can place the wrapped ball into a small bowl and press it gently to achieve a perfect sphere.
- Chill Until Firm: Place the tightly wrapped cheese ball in the refrigerator to chill for at least 2-3 hours, or ideally, overnight. This chilling time is crucial for the cheese ball to firm up properly, making it easy to unwrap and ensuring it holds its shape beautifully when served. It should feel firm, not squishy, when gently pressed.
- Roll in the Coating & Serve: When you're ready to serve, spread your chosen coating (finely chopped nuts or the nut-free alternative) in a shallow dish or on a plate. Unwrap the chilled cheese ball and gently roll it in the coating, pressing the nuts or crumbs firmly into the surface until it's completely covered on all sides. Transfer the coated cheese ball to your serving platter or a small board. Arrange your favorite dippers around it, and don't forget a small cheese knife or spreader for easy serving!
Classic Cheese Ball Recipe

- Serves: 20 People
- Prepare Time: 20 minutes
- Cooking Time: 0 minutes
- Calories: -
- Difficulty: Easy
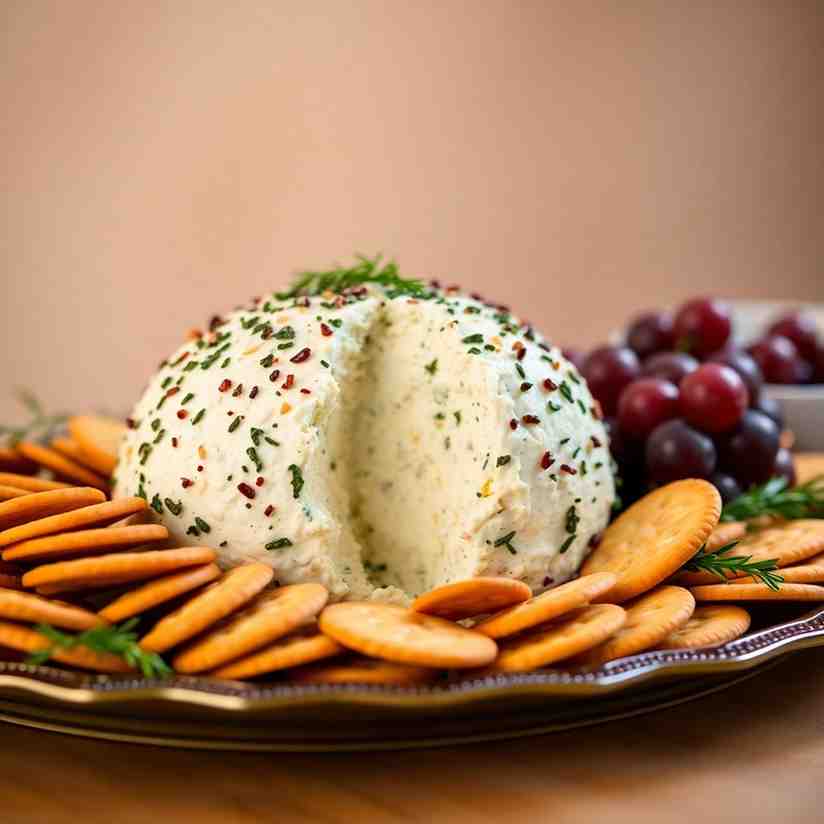
Looking for that perfect, no-fail party appetizer that always disappears first? You’ve found it! Our classic cheese ball recipe is a retro delight that still reigns supreme at any gathering, from casual get-togethers to festive holiday feasts. Forget complicated dishes; this easy cheese ball recipe is your secret weapon for crowd-pleasing flavor, offering a creamy inside, a satisfyingly crunchy coating, and a whole lot of savory goodness. It's a make-ahead marvel that saves you stress, leaving you more time to enjoy your guests. If you’ve never rolled a cheese ball before, don’t worry — I’ll show you exactly what it should look and feel like at every step, ensuring your homemade cheese ball is a guaranteed success!
Ingredients
Directions
- Soften the Cream Cheese Properly: Take your cream cheese blocks out of the fridge at least 1-2 hours before you start, allowing them to soften completely at room temperature. It should be soft to the touch, without any hard core in the middle. If you're short on time, you can microwave it in 10-15 second bursts, but be careful not to melt it! It needs to be soft enough to beat smooth.
- Mix Everything Until Smooth & Spreadable: In a medium mixing bowl, use a sturdy spoon or a hand mixer to beat the softened cream cheese until it's completely smooth and creamy. Next, add the freshly grated sharp cheddar, chopped green onions, Worcestershire sauce, optional hot sauce, dried parsley, garlic powder, and black pepper. Stir or beat until all ingredients are evenly combined. The mixture should be thick but easily spreadable, with no pockets of plain cream cheese.
- Shape It Into a Ball (Without Making a Huge Mess): Scrape the entire cheese mixture into the center of a large sheet of plastic wrap. Gather the edges of the plastic wrap around the mixture and twist them tightly at the top to form a compact, round ball. For extra help with shaping, you can place the wrapped ball into a small bowl and press it gently to achieve a perfect sphere.
- Chill Until Firm: Place the tightly wrapped cheese ball in the refrigerator to chill for at least 2-3 hours, or ideally, overnight. This chilling time is crucial for the cheese ball to firm up properly, making it easy to unwrap and ensuring it holds its shape beautifully when served. It should feel firm, not squishy, when gently pressed.
- Roll in the Coating & Serve: When you're ready to serve, spread your chosen coating (finely chopped nuts or the nut-free alternative) in a shallow dish or on a plate. Unwrap the chilled cheese ball and gently roll it in the coating, pressing the nuts or crumbs firmly into the surface until it's completely covered on all sides. Transfer the coated cheese ball to your serving platter or a small board. Arrange your favorite dippers around it, and don't forget a small cheese knife or spreader for easy serving!
The following nutritional values are per serving (one piece of cake) Calories ~180-200 kcal Carbohydrates ~3-5g Protein ~7-9g Fat ~16-18g Time-Saving Tools & Ingredients Sometimes, a little help in the kitchen goes a long way. Here are a couple of things that can make your cheese ball journey even smoother: Problem: Mixing cream cheese and other ingredients by hand can be a real arm workout, especially if your cream cheese isn't perfectly softened. This can lead to lumpy mixtures and uneven distribution of flavor. Problem: While fresh chopping nuts provides the best flavor and texture, it can be a tedious and messy task, especially when you need them finely chopped for coating. Click any ingredient for detailed nutritional information:Recipe Nutritional Values
Additional Information
Recipe Success Tips
Ingredient Substitutions & Variations
Make-Ahead, Storage & Food Safety
Troubleshooting Common Cheese Ball Issues
Frequently Asked Questions
Recommended Kitchen Tools
Hand Mixer
Agitate: No one wants a cheese ball with chunks of plain cream cheese or an arm so tired you can't enjoy the party! Uneven mixing compromises the creamy texture and consistent taste you're aiming for.
Solution: A simple hand mixer makes quick work of beating the cream cheese until smooth and then effortlessly combines all your ingredients into a uniform, spreadable mixture. It saves you time and ensures a perfectly blended, creamy cheese ball every time.Pre-Chopped Nuts
Agitate: Who has time for extra chopping when you're prepping for a party? Dealing with flying nut pieces and a sticky cutting board adds unnecessary stress to your cooking process.
Solution: Opt for quality pre-chopped pecans or mixed nuts from the grocery store. Just give them a quick pulse in a food processor if you need them even finer for optimal coating adherence. This simple shortcut gets you to the fun part of rolling and serving much faster!Calories per Ingredient
You may also like


Hey there! I’m just someone who seriously loves good food and believes that cooking doesn’t have to be complicated to be amazing. Whether it’s a quick weeknight dinner or a cozy weekend meal, I’m all about sharing easy, tasty recipes that actually work.


