
Best Strawberry & Whipped Cream Dessert - Easy No-Bake Recipe
Best Strawberry & Whipped Cream Dessert - Easy No-Bake Recipe
- Serves: 4 People
- Prepare Time: 15 minutes
- Cooking Time: 0 minutes
- Calories: -
- Difficulty: Easy
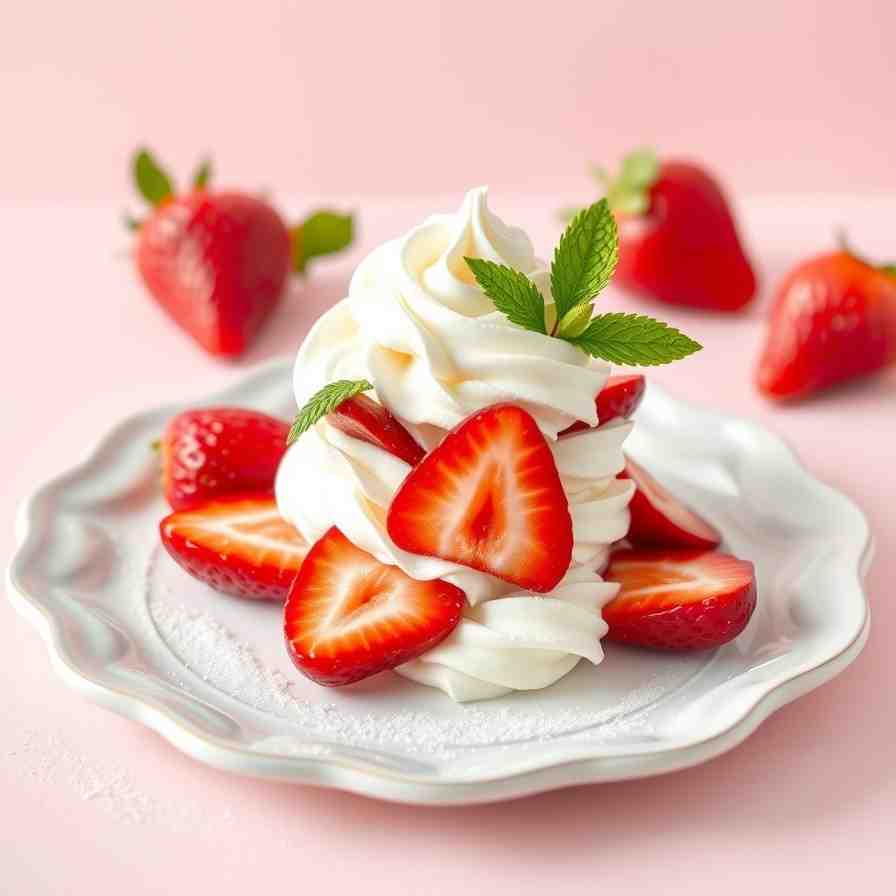
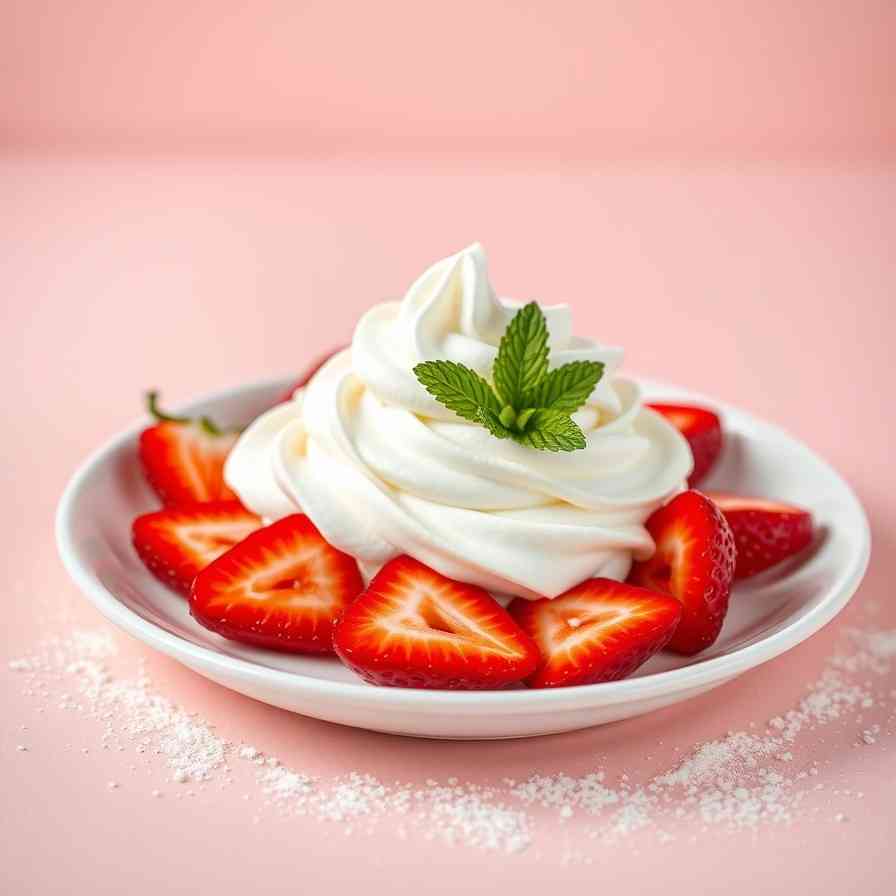
Get ready for the easiest, most delicious strawberry and whipped cream dessert you’ll ever make! This isn't just any dessert; it's a luscious, no-bake masterpiece that comes together in about 15 minutes, making it perfect for those spontaneous summer gatherings, a romantic Valentine's treat, or when last-minute guests arrive. We’re talking about layers of sweet, juicy fresh strawberries and billowy, homemade vanilla heavy whipped cream for cake (or, in this case, glasses!) – a combination that truly works every single time.
Why this dessert will become your new go-to:
Ready in a Flash: Seriously, about 15 minutes from start to finish.
Simple Ingredients: Just a handful of pantry staples like fresh heavy cream and ripe berries.
Scales Beautifully: Whether it’s a cozy dessert for two or a showstopper for a crowd, it’s super easy to adjust.
I’ve tested this dessert countless times for family dinners and friend get-togethers, and it always gets rave reviews. The secret? Perfectly prepped strawberries creating their own natural strawberries in syrup and rich, homemade whipped cream with granulated sugar that’s miles better than anything from a can. Trust me, once you try this, you'll be hooked!
Ingredients
Directions
- strong>Prepare Your Strawberries (Macerate for Flavor)
- Choose & Wash: Pick bright red, fragrant berries with few bruises. Rinse them gently under cool water just before use; avoid soaking them, which can make them watery.
- Dry Thoroughly: Pat the strawberries completely dry with a paper towel. This is crucial so no excess water dilutes their natural syrup or your beautiful cream.
- Hull & Slice: Use a small knife or a straw to hull the berries (remove the green leafy tops). Slice or quarter them, depending on the size of your serving glasses and your preferred texture.
- Macerate: In a medium bowl, combine the sliced strawberries with 2-3 tablespoons of granulated sugar. Gently stir to coat. Let them stand for 10-15 minutes at room temperature. During this time, the sugar will draw out the berries' natural juices, creating a lovely, light syrup. Stir once or twice. The syrup should look slightly thickened and glossy. Taste and adjust sweetness if your berries are particularly tart.
- Make Your Homemade Whipped Cream (No Cool Whip Here!)
- Chill Your Equipment (Optional but Recommended): For the best results, chill your mixing bowl (preferably metal or glass) and whisk attachment in the freezer for 10-15 minutes before you start. Cold equipment helps the cream whip faster and hold its shape better.
- Start Whipping: Pour the 1 ½ cups of very cold heavy whipping cream into your chilled bowl. Using an electric hand mixer or a stand mixer with a whisk attachment (or even a hand whisk for an arm workout!), start on low speed to prevent splattering, then gradually increase to medium-high.
- Sweeten & Flavor: Once the cream starts to thicken slightly and small bubbles form (usually after 1-2 minutes), add the 2-3 tablespoons of powdered sugar and 1 teaspoon of vanilla extract. Continue whipping.
- Achieve Medium-Stiff Peaks: Keep whipping until the cream forms "medium-stiff peaks." This means when you lift the whisk, the cream will hold its shape beautifully, forming little "mountains" that stand up but still have a soft, creamy appearance, not dry or crumbly. Be careful not to over-whip, or it can turn grainy!Assemble Your DessertSet Up Glasses: Choose clear serving glasses, jars, or parfait cups to show off those beautiful layers. This recipe is perfect for 4-6 individual servings.
- Layer Time!
- Spoon a small amount of the strawberry syrup from the macerated berries into the bottom of each glass.
- Add a generous layer of the macerated strawberries (use a slotted spoon if you want to control the amount of syrup).
- Top with a dollop or piped swirl of your homemade whipped cream.
- Repeat the layers once or twice, finishing with a final gorgeous layer of whipped cream and a few pretty strawberry slices on top.
Best Strawberry & Whipped Cream Dessert - Easy No-Bake Recipe

- Serves: 4 People
- Prepare Time: 15 minutes
- Cooking Time: 0 minutes
- Calories: -
- Difficulty: Easy
Get ready for the easiest, most delicious strawberry and whipped cream dessert you’ll ever make! This isn't just any dessert; it's a luscious, no-bake masterpiece that comes together in about 15 minutes, making it perfect for those spontaneous summer gatherings, a romantic Valentine's treat, or when last-minute guests arrive. We’re talking about layers of sweet, juicy fresh strawberries and billowy, homemade vanilla heavy whipped cream for cake (or, in this case, glasses!) – a combination that truly works every single time.
Why this dessert will become your new go-to:
Ready in a Flash: Seriously, about 15 minutes from start to finish.
Simple Ingredients: Just a handful of pantry staples like fresh heavy cream and ripe berries.
Scales Beautifully: Whether it’s a cozy dessert for two or a showstopper for a crowd, it’s super easy to adjust.
I’ve tested this dessert countless times for family dinners and friend get-togethers, and it always gets rave reviews. The secret? Perfectly prepped strawberries creating their own natural strawberries in syrup and rich, homemade whipped cream with granulated sugar that’s miles better than anything from a can. Trust me, once you try this, you'll be hooked!
Ingredients
Directions
- strong>Prepare Your Strawberries (Macerate for Flavor)
- Choose & Wash: Pick bright red, fragrant berries with few bruises. Rinse them gently under cool water just before use; avoid soaking them, which can make them watery.
- Dry Thoroughly: Pat the strawberries completely dry with a paper towel. This is crucial so no excess water dilutes their natural syrup or your beautiful cream.
- Hull & Slice: Use a small knife or a straw to hull the berries (remove the green leafy tops). Slice or quarter them, depending on the size of your serving glasses and your preferred texture.
- Macerate: In a medium bowl, combine the sliced strawberries with 2-3 tablespoons of granulated sugar. Gently stir to coat. Let them stand for 10-15 minutes at room temperature. During this time, the sugar will draw out the berries' natural juices, creating a lovely, light syrup. Stir once or twice. The syrup should look slightly thickened and glossy. Taste and adjust sweetness if your berries are particularly tart.
- Make Your Homemade Whipped Cream (No Cool Whip Here!)
- Chill Your Equipment (Optional but Recommended): For the best results, chill your mixing bowl (preferably metal or glass) and whisk attachment in the freezer for 10-15 minutes before you start. Cold equipment helps the cream whip faster and hold its shape better.
- Start Whipping: Pour the 1 ½ cups of very cold heavy whipping cream into your chilled bowl. Using an electric hand mixer or a stand mixer with a whisk attachment (or even a hand whisk for an arm workout!), start on low speed to prevent splattering, then gradually increase to medium-high.
- Sweeten & Flavor: Once the cream starts to thicken slightly and small bubbles form (usually after 1-2 minutes), add the 2-3 tablespoons of powdered sugar and 1 teaspoon of vanilla extract. Continue whipping.
- Achieve Medium-Stiff Peaks: Keep whipping until the cream forms "medium-stiff peaks." This means when you lift the whisk, the cream will hold its shape beautifully, forming little "mountains" that stand up but still have a soft, creamy appearance, not dry or crumbly. Be careful not to over-whip, or it can turn grainy!Assemble Your DessertSet Up Glasses: Choose clear serving glasses, jars, or parfait cups to show off those beautiful layers. This recipe is perfect for 4-6 individual servings.
- Layer Time!
- Spoon a small amount of the strawberry syrup from the macerated berries into the bottom of each glass.
- Add a generous layer of the macerated strawberries (use a slotted spoon if you want to control the amount of syrup).
- Top with a dollop or piped swirl of your homemade whipped cream.
- Repeat the layers once or twice, finishing with a final gorgeous layer of whipped cream and a few pretty strawberry slices on top.
The following nutritional values are per serving (one piece of cake) Calories Approximately 280-350 kcal Carbohydrates Approximately 25-35g Protein Approximately 2-4g Fat Approximately 20-28g Time-Saving Tools & Ingredients Sometimes, a little help in the kitchen can make all the difference, especially when you want to whip up something delicious in a flash! Here are a few tools and ingredient tips that can streamline your dessert-making process: Problem: Whipping cream by hand can be a real workout and take a while to get just right. Problem: Removing strawberry stems with a knife can sometimes be a bit messy and might accidentally take away too much of that delicious red fruit. Problem: Serving a beautifully layered dessert in opaque dishes hides all the effort you put into making it look gorgeous. Click any ingredient for detailed nutritional information:Recipe Nutritional Values
Additional Information
Recipe Success Tips
Variations & Substitutions
Make-Ahead, Storage & Food Safety
Pro Tips & Troubleshooting
Frequently Asked Questions
Recommended Kitchen Tools
Electric Hand Mixer or Stand Mixer
Agitate: You want perfectly fluffy, medium-stiff cream that holds its shape beautifully without breaking a sweat, especially when you're making a batch for a crowd.
Solution: An electric hand mixer or a stand mixer with a whisk attachment makes quick work of whipping cream, ensuring consistent, airy results in just a few minutes, leaving your arm muscles happy.Strawberry Huller
Agitate: You want to prep your beautiful berries cleanly and efficiently, preserving as much juicy fruit as possible for your dessert.
Solution: A simple strawberry huller quickly removes the core and stem with minimal fuss, making berry prep a breeze and ensuring you get the most out of every strawberry.Clear Serving Glasses or Jars
Agitate: You’ve carefully created those vibrant layers of red strawberries and white, creamy whipped cream, and you absolutely want to show them off!
Solution: Using clear parfait glasses, elegant champagne flutes, or rustic mason jars instantly elevates the presentation, making your dessert as appealing to the eyes as it is to the taste buds.Calories per Ingredient
You may also like


Hey there! I’m just someone who seriously loves good food and believes that cooking doesn’t have to be complicated to be amazing. Whether it’s a quick weeknight dinner or a cozy weekend meal, I’m all about sharing easy, tasty recipes that actually work.


