
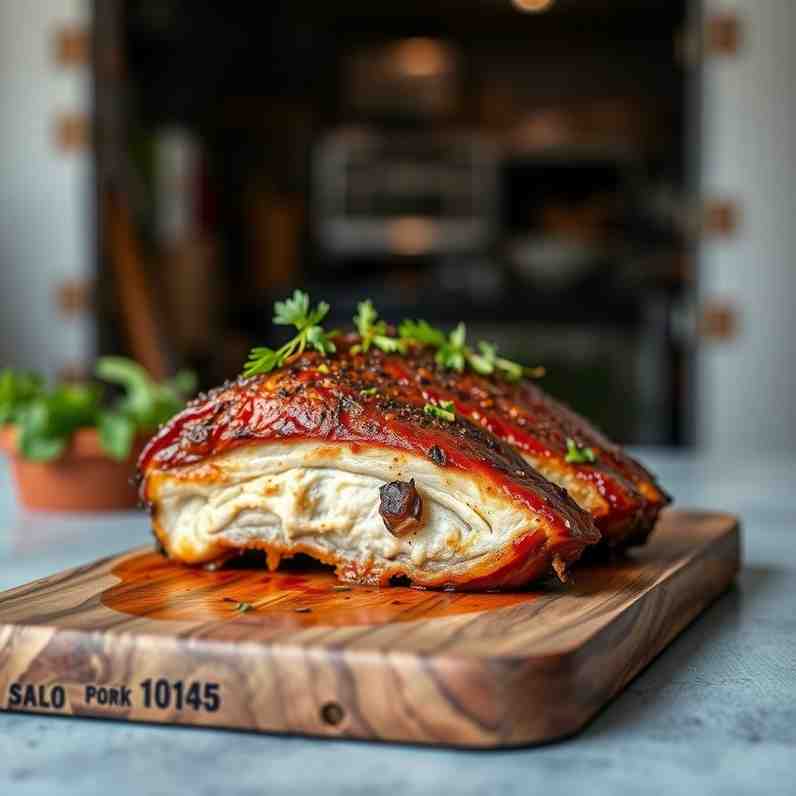
Roast Goose - Crispy Skin, Juicy Meat
Roast Goose - Crispy Skin, Juicy Meat

- Serves: 6 People
- Prepare Time: 45 minutes
- Cooking Time: 2 hours 30
- Calories: -
- Difficulty: Easy
Planning a holiday feast can feel like a high-stakes game, and a roasted goose often seems like the ultimate challenge. It's a showstopper, a classic centerpiece, but many of us are intimidated by the thought of cooking something so rich and unfamiliar. Maybe you've heard horror stories of smoky kitchens or dry, tough meat. But what if we told you that achieving a perfect roast goose with crispy skin and incredibly juicy meat is not only possible but totally doable?
This guide is your secret weapon, designed to walk you through every single step, from picking the right bird to carving it like a pro. Forget the stress and embrace the deliciousness! By the end of this, you'll have a roasted goose that boasts golden, crackling skin, tender, flavorful meat, and a rich pan gravy that will make your holiday meal unforgettable. Plus, we'll show you how to time everything perfectly for a relaxed holiday. Get ready to create some serious Christmas dinner magic!
Exactly how to roast a goose with crisp skin and juicy meat (without smoking out the kitchen).
How to pick and buy the right goose in US stores.
The key roasted goose cooking tips that actually matter.
How rich it really is nutritionally (and simple ways to lighten your plate).
Where you can order roast goose in restaurants if you’d rather let someone else cook.
Ingredients
Directions
- 1. Day Before (Optional but Recommended)
- Unwrap & Dry: Unwrap the goose, remove any giblets or neck from the cavity (save them for stock if you like!), and pat the entire goose bone-dry with paper towels, inside and out. Trim any obvious excess fat from the cavity opening or tail.Dry-Brine: Rub 2-3 tablespoons of kosher salt evenly all over the goose, including inside the cavity. If desired, you can also mix in some finely chopped fresh herbs or citrus zest with the salt.
- Chill: Place the goose on a rack set inside a roasting pan. Leave it uncovered in the fridge overnight. This dry-brining process helps draw moisture from the skin, leading to incredible crispness.
- 2. Prep the Goose (Day Of)
- Bring to Room Temp: About 45-60 minutes before you plan to roast, take the goose out of the fridge to let it come closer to room temperature.
- Trim & Render: Remove any remaining neck or giblets. Trim any large pockets of internal fat, especially around the cavity opening and tail. You can chop this fat and render it down in a small saucepan over very low heat while you prep the goose; this liquid gold is great for cooking!
- Prick the Skin: Use a needle, skewer, or the tip of a sharp knife to prick the skin all over, especially on the breast and thighs. Be careful to only pierce the skin and fat layer, not the meat itself. This allows the fat to escape during roasting, ensuring a crispy skin.
- Stuff Cavity: Stuff the goose cavity with the halved lemon or orange, quartered onion, smashed garlic cloves, and fresh herb sprigs. These aromatics will infuse the meat with flavor.
- Truss (Optional): Loosely truss the legs together with kitchen twine and tuck the wing tips underneath the body. This helps the goose cook more evenly.
- 3. Set Up the Roasting Pan
- Position Goose: Place the goose, breast-side up, on a sturdy roasting rack inside a deep roasting pan.
- Add Vegetables (Optional): If using, scatter the chunked root vegetables (carrots, parsnips, potatoes) in the bottom of the pan, underneath the rack. Toss them with a spoonful of rendered goose fat or oil, salt, and pepper.
- Add Liquid: Pour a small splash (about ½ cup) of water or stock into the bottom of the pan. This helps reduce early smoking and keeps the pan drippings from burning.
- 4. High-Heat Start
- Preheat Oven: Preheat your oven to a high temperature, around 425°F (220°C).
- Initial Roast: Roast the goose at this high temperature for 20-30 minutes. This initial blast of heat helps to tighten and jump-start the crisping of the skin.
- Drain Fat: Keep an eye on the pan. If it starts to fill rapidly with rendered fat, carefully remove the pan from the oven and drain some of the hot fat into a heatproof jar or bowl. You'll want to save this amazing goose fat for later!
- Optional Glaze: In the last few minutes of this high-heat phase, you can optionally brush the goose with a light honey + herb mixture for extra flavor and color.
- 5. Lower-Heat Roast Until Done
- Reduce Heat: Reduce the oven temperature to a lower setting, around 325°F (160°C).
- Continue Roasting: Continue roasting the goose, basting occasionally with the pan fat (if desired) and draining off excess fat as needed. For a 10-12 pound goose, this can take another 1.5 to 2.5 hours.
- Flip (Optional): About halfway through this lower-heat roast, you can carefully flip the goose breast-side down for about 30-45 minutes. This helps the breast meat stay juicy and allows for more even rendering of fat from the back. Then, flip it back breast-side up for the remainder of the cooking time to ensure the breast skin crisps beautifully.
- Check Temperature: The most accurate way to tell when your goose is done is with an instant-read thermometer. Insert it into the thickest part of the breast (avoiding bone) and the thickest part of the thigh. Aim for about 160-165°F (71-74°C) in the breast and 170°F (77°C) or higher in the thigh. The temperature will rise a few degrees as it rests.
- 6. Rest the Goose
- Transfer & Tent: Once cooked, carefully transfer the
- roasted goose to a large carving board or platter. Tent it loosely with foil.
- Rest Time: Let the goose rest for 20-30 minutes. This crucial step allows the juices to redistribute throughout the meat, resulting in a much juicier bird.
- 7. Simple Pan Gravy (Same Recipe, Not a New Dish)
- Skim Fat: While the goose rests, carefully pour off most of the rendered fat from the roasting pan, leaving behind a few tablespoons of fat and all the flavorful browned bits (fond) in the bottom. Save the excess goose fat for future cooking!
- Sauté Aromatics: Place the roasting pan on the stovetop over medium heat (you might need to use two burners). Add a handful of finely chopped onion and garlic to the pan and cook until softened, scraping up the browned bits from the bottom.
- Make Roux: Sprinkle 2 tablespoons of all-purpose flour into the pan and cook, stirring constantly, for 1-2 minutes until it forms a nutty-smelling paste (a roux).
- Whisk in Stock: Gradually whisk in 2 cups of chicken or vegetable stock, scraping any remaining fond from the bottom of the pan.
- Simmer & Season: Bring the gravy to a simmer, whisking occasionally, until it thickens to your desired consistency. Season with salt and pepper to taste. Strain the gravy through a fine-mesh sieve for an extra smooth finish, if desired.
- 8. Carve & Serve
- Carving Order:
- First, remove the legs and wings by cutting through the joint. You can separate the drumsticks and thighs if you like.
- Next, slice the breast meat across the grain, starting from the top of the breastbone.
- Serve: Arrange the carved goose slices on a platter with the roasted vegetables (if used) and serve the warm gravy alongside. Remember, pour the gravy next to the goose, not over the crispy skin, to keep that beautiful crunch!
Roast Goose - Crispy Skin, Juicy Meat
- Serves: 6 People
- Prepare Time: 45 minutes
- Cooking Time: 2 hours 30
- Calories: -
- Difficulty: Easy
Planning a holiday feast can feel like a high-stakes game, and a roasted goose often seems like the ultimate challenge. It's a showstopper, a classic centerpiece, but many of us are intimidated by the thought of cooking something so rich and unfamiliar. Maybe you've heard horror stories of smoky kitchens or dry, tough meat. But what if we told you that achieving a perfect roast goose with crispy skin and incredibly juicy meat is not only possible but totally doable?
This guide is your secret weapon, designed to walk you through every single step, from picking the right bird to carving it like a pro. Forget the stress and embrace the deliciousness! By the end of this, you'll have a roasted goose that boasts golden, crackling skin, tender, flavorful meat, and a rich pan gravy that will make your holiday meal unforgettable. Plus, we'll show you how to time everything perfectly for a relaxed holiday. Get ready to create some serious Christmas dinner magic!
Exactly how to roast a goose with crisp skin and juicy meat (without smoking out the kitchen).
How to pick and buy the right goose in US stores.
The key roasted goose cooking tips that actually matter.
How rich it really is nutritionally (and simple ways to lighten your plate).
Where you can order roast goose in restaurants if you’d rather let someone else cook.
Ingredients
Directions
- 1. Day Before (Optional but Recommended)
- Unwrap & Dry: Unwrap the goose, remove any giblets or neck from the cavity (save them for stock if you like!), and pat the entire goose bone-dry with paper towels, inside and out. Trim any obvious excess fat from the cavity opening or tail.Dry-Brine: Rub 2-3 tablespoons of kosher salt evenly all over the goose, including inside the cavity. If desired, you can also mix in some finely chopped fresh herbs or citrus zest with the salt.
- Chill: Place the goose on a rack set inside a roasting pan. Leave it uncovered in the fridge overnight. This dry-brining process helps draw moisture from the skin, leading to incredible crispness.
- 2. Prep the Goose (Day Of)
- Bring to Room Temp: About 45-60 minutes before you plan to roast, take the goose out of the fridge to let it come closer to room temperature.
- Trim & Render: Remove any remaining neck or giblets. Trim any large pockets of internal fat, especially around the cavity opening and tail. You can chop this fat and render it down in a small saucepan over very low heat while you prep the goose; this liquid gold is great for cooking!
- Prick the Skin: Use a needle, skewer, or the tip of a sharp knife to prick the skin all over, especially on the breast and thighs. Be careful to only pierce the skin and fat layer, not the meat itself. This allows the fat to escape during roasting, ensuring a crispy skin.
- Stuff Cavity: Stuff the goose cavity with the halved lemon or orange, quartered onion, smashed garlic cloves, and fresh herb sprigs. These aromatics will infuse the meat with flavor.
- Truss (Optional): Loosely truss the legs together with kitchen twine and tuck the wing tips underneath the body. This helps the goose cook more evenly.
- 3. Set Up the Roasting Pan
- Position Goose: Place the goose, breast-side up, on a sturdy roasting rack inside a deep roasting pan.
- Add Vegetables (Optional): If using, scatter the chunked root vegetables (carrots, parsnips, potatoes) in the bottom of the pan, underneath the rack. Toss them with a spoonful of rendered goose fat or oil, salt, and pepper.
- Add Liquid: Pour a small splash (about ½ cup) of water or stock into the bottom of the pan. This helps reduce early smoking and keeps the pan drippings from burning.
- 4. High-Heat Start
- Preheat Oven: Preheat your oven to a high temperature, around 425°F (220°C).
- Initial Roast: Roast the goose at this high temperature for 20-30 minutes. This initial blast of heat helps to tighten and jump-start the crisping of the skin.
- Drain Fat: Keep an eye on the pan. If it starts to fill rapidly with rendered fat, carefully remove the pan from the oven and drain some of the hot fat into a heatproof jar or bowl. You'll want to save this amazing goose fat for later!
- Optional Glaze: In the last few minutes of this high-heat phase, you can optionally brush the goose with a light honey + herb mixture for extra flavor and color.
- 5. Lower-Heat Roast Until Done
- Reduce Heat: Reduce the oven temperature to a lower setting, around 325°F (160°C).
- Continue Roasting: Continue roasting the goose, basting occasionally with the pan fat (if desired) and draining off excess fat as needed. For a 10-12 pound goose, this can take another 1.5 to 2.5 hours.
- Flip (Optional): About halfway through this lower-heat roast, you can carefully flip the goose breast-side down for about 30-45 minutes. This helps the breast meat stay juicy and allows for more even rendering of fat from the back. Then, flip it back breast-side up for the remainder of the cooking time to ensure the breast skin crisps beautifully.
- Check Temperature: The most accurate way to tell when your goose is done is with an instant-read thermometer. Insert it into the thickest part of the breast (avoiding bone) and the thickest part of the thigh. Aim for about 160-165°F (71-74°C) in the breast and 170°F (77°C) or higher in the thigh. The temperature will rise a few degrees as it rests.
- 6. Rest the Goose
- Transfer & Tent: Once cooked, carefully transfer the
- roasted goose to a large carving board or platter. Tent it loosely with foil.
- Rest Time: Let the goose rest for 20-30 minutes. This crucial step allows the juices to redistribute throughout the meat, resulting in a much juicier bird.
- 7. Simple Pan Gravy (Same Recipe, Not a New Dish)
- Skim Fat: While the goose rests, carefully pour off most of the rendered fat from the roasting pan, leaving behind a few tablespoons of fat and all the flavorful browned bits (fond) in the bottom. Save the excess goose fat for future cooking!
- Sauté Aromatics: Place the roasting pan on the stovetop over medium heat (you might need to use two burners). Add a handful of finely chopped onion and garlic to the pan and cook until softened, scraping up the browned bits from the bottom.
- Make Roux: Sprinkle 2 tablespoons of all-purpose flour into the pan and cook, stirring constantly, for 1-2 minutes until it forms a nutty-smelling paste (a roux).
- Whisk in Stock: Gradually whisk in 2 cups of chicken or vegetable stock, scraping any remaining fond from the bottom of the pan.
- Simmer & Season: Bring the gravy to a simmer, whisking occasionally, until it thickens to your desired consistency. Season with salt and pepper to taste. Strain the gravy through a fine-mesh sieve for an extra smooth finish, if desired.
- 8. Carve & Serve
- Carving Order:
- First, remove the legs and wings by cutting through the joint. You can separate the drumsticks and thighs if you like.
- Next, slice the breast meat across the grain, starting from the top of the breastbone.
- Serve: Arrange the carved goose slices on a platter with the roasted vegetables (if used) and serve the warm gravy alongside. Remember, pour the gravy next to the goose, not over the crispy skin, to keep that beautiful crunch!
You may also like

Hey there! I’m just someone who seriously loves good food and believes that cooking doesn’t have to be complicated to be amazing. Whether it’s a quick weeknight dinner or a cozy weekend meal, I’m all about sharing easy, tasty recipes that actually work.


